Modular Shower Shelf


Print Profile(4)


Description
 Update: I added a practical and sturdy Shower Head Holder to this shelving system. You can find it here. |
This is my entry for Makerworlds “Bathroom Accessories Design Contest”:
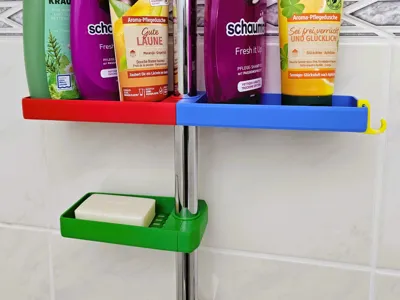
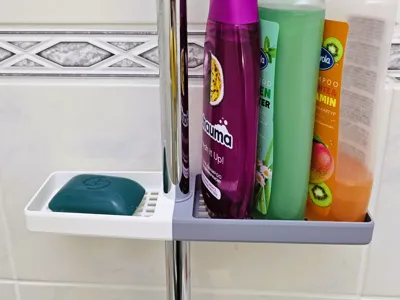
An elegant modular shelving system for your shower rail.
Features:
- two dish sizes, one for soap bars and a longer one for shampoo bottles,
- one-sided or two-sided installation,
- can be combined in any way,
- optional hooks,
- fits almost all shower rails up to 28 mm in diameter,
- easy installation without additional components.
Select the components you want
You can combine any dish with an end piece to create a single soap dish. Or you can put two dishes together to create a shelf on both sides. If you need hooks for washcloths or other things, simply clip one or more of them to a dish.
Adjustment to your shower rail
The advantage of this design is an elegant and space-saving mounting system. This comes with tight tolerances, so some adjustment work may be required:
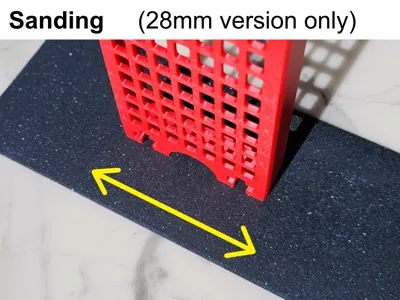
- Shower Rails with a diameter of 28 mm:
If the clamp attachment is not sufficiently tight, you will have to remove some material from the contact surfaces of the dishes or the end piece with sandpaper (around 0.1 mm), see picture “Sanding” above.
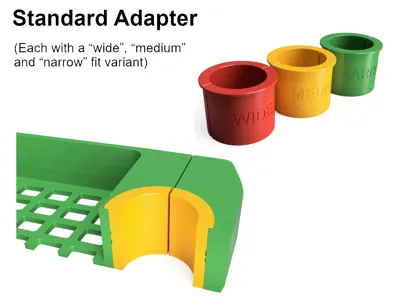
- Shower rails with a diameter of 18, 19, 20, 21, 22, 23, 24 or 25 mm:
No sanding required! Adapters are available for shower rails with this discrete diameters, each in a “narrow”, “medium” and “wide” variant (see picture “Standard Adapter” above). Choose the variant that gives a tight fit without a large gap visible between the parts.
- Shower rails with any other diameter:
No sanding required! Please load the print profile "Adapter template". This profile contains a universal solid adapter with a "negative part" in the middle which cuts out the space for the shower rail. Measure the diameter of your shower rail with a caliper and scale this “negative part” in the x and y directions to this value. The z direction must not be scaled, so deactivate the "uniform scale" option (see picture “Adapter Template” above). Then print out this part. If this adapter does not fit 100%, you can change the x-y scaling accordingly in increments of about 0.1 mm.
How to print
Please use my print profiles. Do not change the layer height of 0.2 mm, as the wedges are held in place by the interlocking of the individual layers. A smaller layer height would weaken this connection. PLA filament is ok, but I recommend PETG because of its better heat resistance.
I uploaded 2 print profiles for the components, one with brim and one without brim. If you occasionally have problems with the print bed adhesion with larger models, I recommend the version with brim. The brim must be carefully removed after printing.
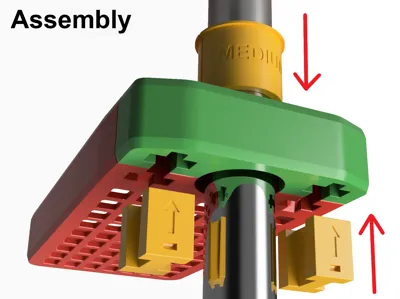
Assembly
Hold the chosen components (2 dishes or 1 dish and 1 end piece) against each other around the shower rail and push the two wedges in firmly from below in the direction of the arrow until the unit is firmly seated (see picture “Assembly” above). When using an adapter, it is easiest to insert one of the wedges first and then push the adapter halves in from above before inserting the second wedge.
Disassembly
The wedges have slots at the bottom. Please insert the tip of a flat screwdriver into these slot and use it to lever out the wedge (see picture “Disassembly” above).
License
You shall not share, sub-license, sell, rent, host, transfer, or distribute in any way the digital or 3D printed versions of this object, nor any other derivative work of this object in its digital or physical format (including - but not limited to - remixes of this object, and hosting on other digital platforms). The objects may not be used without permission in any way whatsoever in which you charge money, or collect fees.
Comment & Rating (477)