
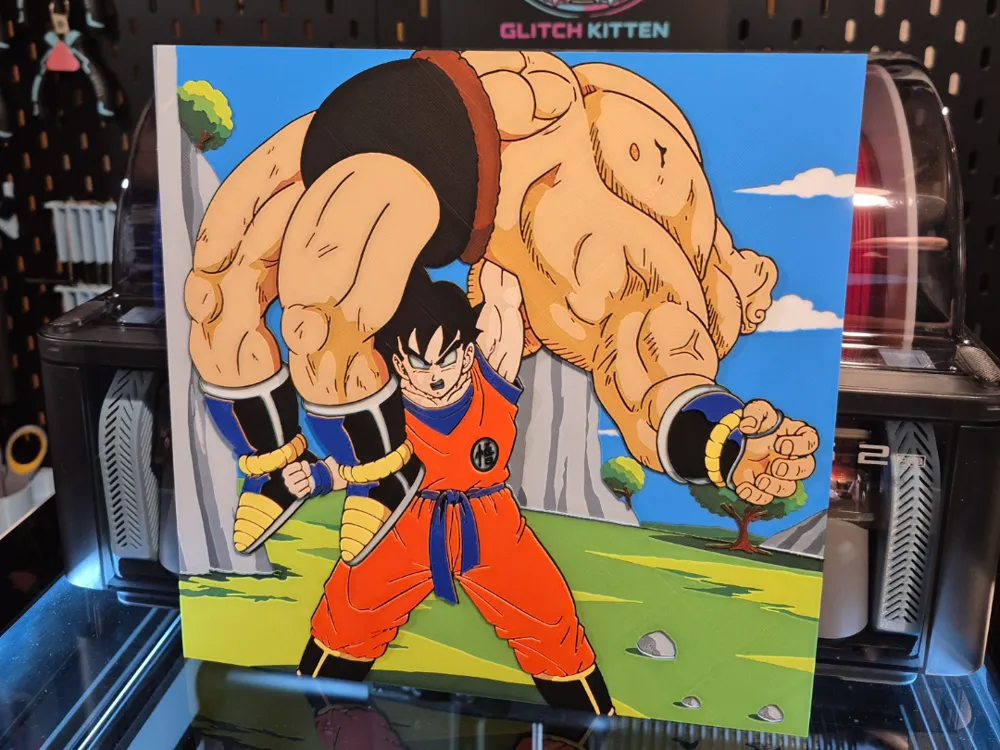
Goku Wins - DBZ Hueforge
Print Profile(2)
Description
"Goku Wins…"
I was just a little kid when I saw this scene for the first time, and to me it was absolutely the a** kicking of the century! 🤣
I remember being totally blown away that I was seeing a cartoon character LITERALLY get his face smashed in so his head looked like a freaking potato! God they made Nappa so easy to hate, and when Goku finally showed up an wiped the floor with him…. SO satisfying!
I love doing fanfare on these but this one is actually a bit more complicated than my usual prints, so today I will take up this space with my notes on the print instead. Please do read my notes here because I want you to get the best results possible 😽.
First Note. Okay, so I know that the most popular hueforge format right now is 200x200mm. I know, and I have been trying to fit more of them in for y'all where I can. Most of my 1:1 hueforges can be scaled with pretty good results. This is where I need to stop you a second though. I know some of you will try to scale this down to 200x200, and before you do, I just want to say that I don't recommend it with this one.. so scale it down at your own risk. Some of these details are small even for 235mm, and I just feel certain that things will disappear or potentially get messy if we try to shrink them down from here. This is why I will not be including an A1 Mini Version (so sorry friends!😪). The second note coming is relevant to this as well.
Second Note. I am sure many of you have heard other designers stress the importance of a well calibrated machine to ensure successful print quality on their forges. I have never put this in my descriptions once yet, until now.. Seriously, this is not my usual surefire project. If you are having extrusion or adhesion issues, you WANT to FIX those as best you can before this one. There are some large spaces being colored by sharp single layer color transitions, these can be finicky if everything isn't going smoothly! Most especially on Goku's suit, Nappa's skin, and the darkest foliage shading. These are the crucial spots that need your printer to be on its game. If there was ever a print to run a “just in case” calibration before, this is that print. Do what you need to because it's heartbreaking when you get a patch of yellow showing through the orange. This is not a fault in the design, these specific hues achieved this way are just very dependant on precision. 😬 This is another reason I fear downscaling this piece, the more complex (miniscule) the fill areas get, the higher the odds of having surface gaps or bleeding where there shouldn't be.
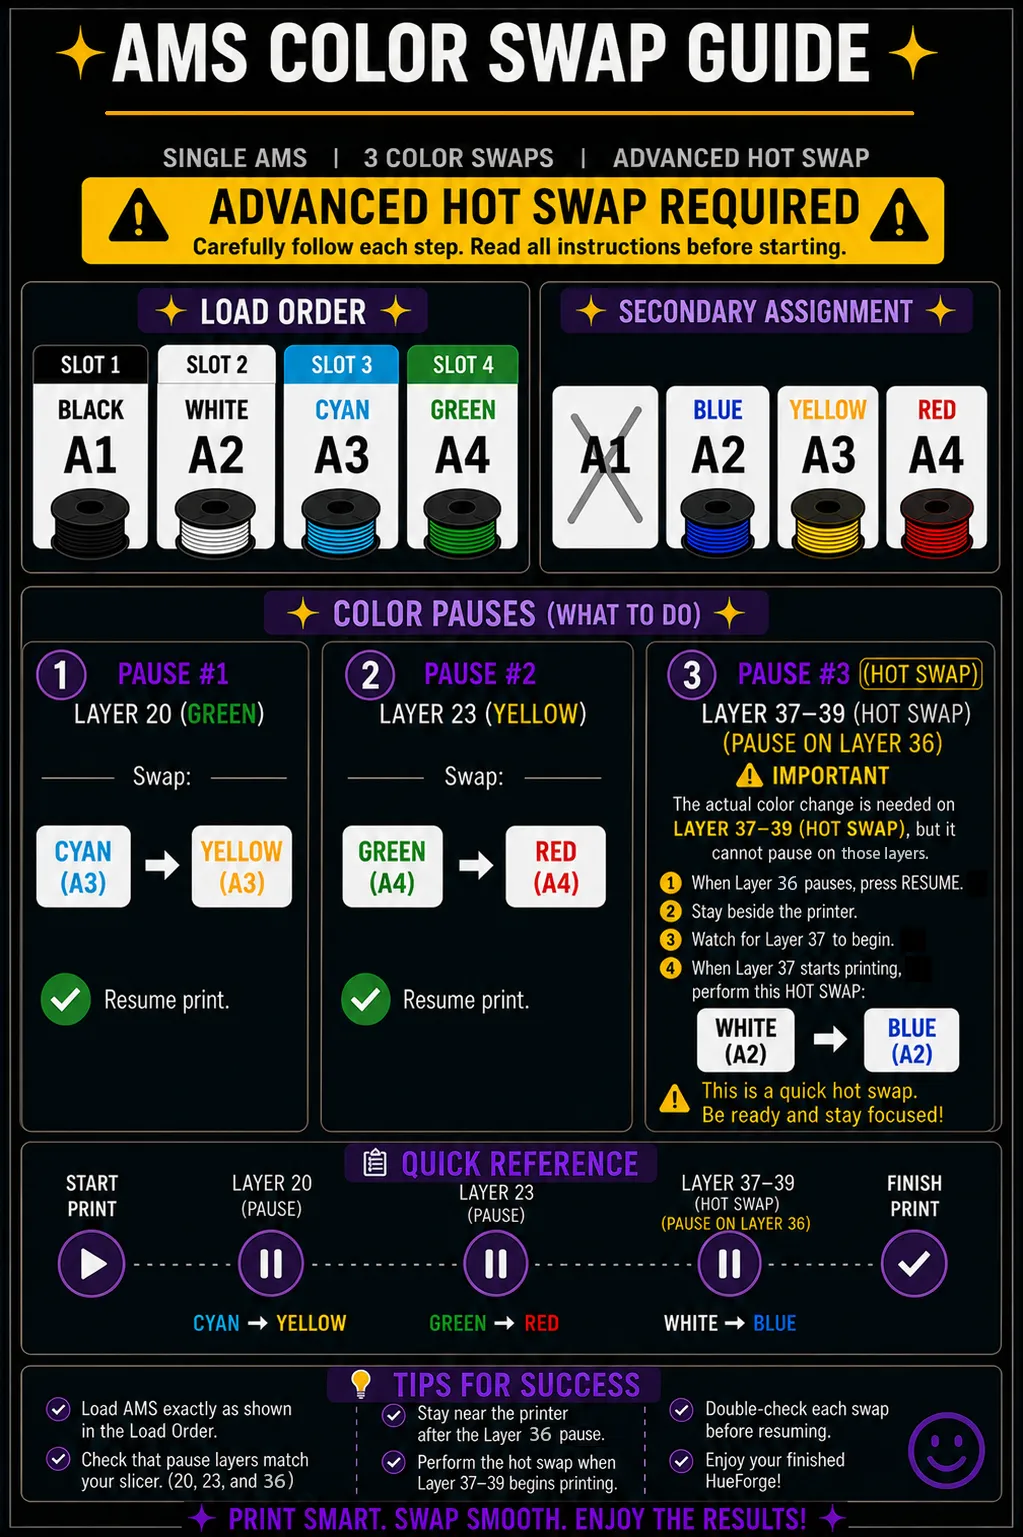
Third Note. We have one hotswap (a swap performed while the printer is in operation without the benefit of a precise pause) for our Single AMS Users, and I know y'all hate these so I'll try to make it as simple as I can. It's VERY doable don't get me wrong, just takes a few extra steps that's all. I am certain that even though it's a little more advanced than my usual stuff, that all experience levels should be able to pull it off with one AMS without issue. Just make sure to read my instructions carefully, and refer to my Single AMS Guide down in the print details.
- Fourth and Final Note. Prime towers… I use them. I know many designers and users have mixed feelings, perhaps some of you already prefer to disable them on my prints. Well I turned it off on this one, BUT here is why. It's a larger hueforge, and I sliced it for the P1S to ensure as much compatibility across the board as possible. But it leaves no room for a tower so I turned it off. However the one you see in my pic was printed WITH a prime tower. I honestly see the difference in print consistency when I use them with my hueforges because of the pressure advancement between swaps and pauses. So if you have make room for one on your plate, I would recommend enabling it.
Okay so let's get into the print, and again.. please read carefully from here to ensure you catch the details of the Hotswap and AMS Assignments.
Print at 100% infill with a layer height of 0.08mm with a base layer of 0.16mm
The Model is 235x235mm in size
You may print at higher layer heights below the Base Thickness of 0.48mm
The Max allowed Thickness is 3.6mm and the Actual Thickness is 3.6mm
PLA BambuLab Basic Black Transmission Distance: 0.6
PLA BambuLab Basic Jade White Transmission Distance: 5
PLA BambuLab Basic Cyan Transmission Distance: 3.5
PLA BambuLab Basic BambuLab Green Transmission Distance: 2
PLA BambuLab Basic Yellow Transmission Distance: 6
PLA BambuLab Basic Red Transmission Distance: 4
PLA BambuLab Basic Blue Transmission Distance: 4
This print uses 7 unique filaments. (Please note Transmission Distance when making Brand substitutions, especially with WHITE and YELLOW. My hueforges are all about blending, and if you use white that doesn't transmit enough light, then you will not have skin color.)
Please take note of the Load Order and Secondary Assignments in my Single AMS Guide below.
Before you send your print, you will be assigning some filaments to the same AMS slots. 🙏
There is still a pause before the Hotswap, to allow you to walk away from your print confidently, knowing you will be able to comfortably return before the swap window, on your own time. You will not miss your window on my print. 😽
Simply return to your printer when you can (when layer 36 is paused), hit resume and wait for the short white layer that follows to print, then when layer 36 is finished, just swap the white out with the blue, quick and easy. That's all there is to it.
Swap Instructions:
Start with Black
At layer #5 (0.48mm) swap to Jade White
At layer #13 (1.12mm) swap to Cyan
At layer #18 (1.52mm) swap to Black
At layer #19 (1.6mm) swap to BambuLab Green
At layer #22 (1.84mm) swap to Yellow
At layer #25 (2.08mm) swap to Black
At layer #27 (2.24mm) swap to Red
At layer #32 (2.64mm) swap to Yellow
At layer #34 (2.8mm) swap to Jade White
At layer #37 (3.04mm) swap to Yellow
At layer #38 (3.12mm) swap to Red
At layer #39 (3.2mm) swap to Black
At layer #40 (3.28mm) swap to Blue for the rest.
Boost Me (for free)
Thanks for bearing with me rockstars. 🙏
I hope this was worth your effort 😁! I really enjoyed flexing 7 colors for you! I can't wait to see your results!!!! See you on the next one! 💕
License

You shall not share, sub-license, sell, rent, host, transfer, or distribute in any way the digital or 3D printed versions of this object, nor any other derivative work of this object in its digital or physical format (including - but not limited to - remixes of this object, and hosting on other digital platforms). The objects may not be used without permission in any way whatsoever in which you charge money, or collect fees.


Comment & Rating (6)