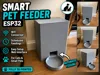
smart pet feeder


Print Profile(1)
Bill of Materials

- USB-C Power Supply x 1:
- Push Button x 1:
- Arduino Nano ESP32 x 1:
- Continuous Rotation Servo (360 x 1:
- RGB LED (Common Anode) x 1:
- 220Ω Resistors x 3:
Description
Boost Me (for free)
Like this model? Give it a Boost! It helps me continue designing free, functional 3D-printable outdoor gear for the community. Thank you! 👍🏕️
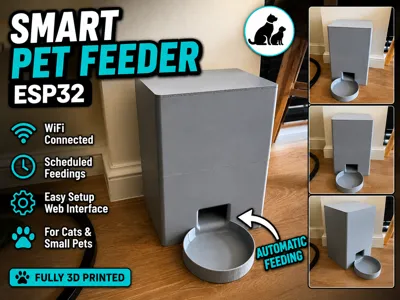
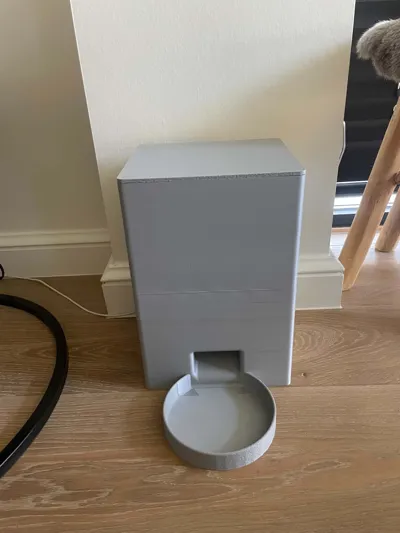
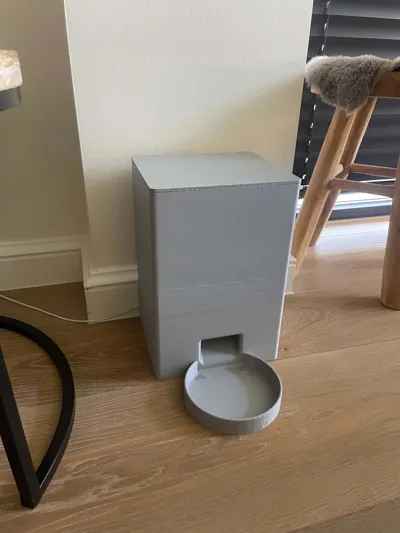
Smart Pet Feeder ESP32
Designed, tested and used daily for over 2 months before release.
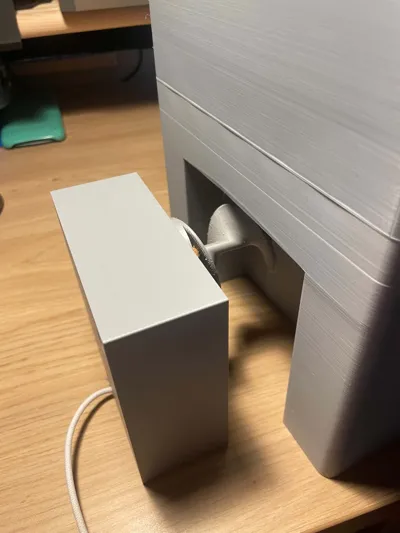
A fully 3D printed smart pet feeder powered by an ESP32. Easily configure feeding schedules through a built-in WiFi web interface without the need for a dedicated app.
The feeder uses a servo-driven dispensing mechanism and automatically stores all settings, even after power loss. Perfect for cats and small pets.
Real-World Tested 🐾
This feeder is not just a prototype.
The design and software have been tested in daily use for more than 2 months before release. During this period, the feeder reliably dispensed food according to schedule and allowed continuous improvements to both the hardware and software.
Features
✅ Fully 3D printed design
✅ WiFi setup with captive portal
✅ Mobile-friendly web interface
✅ Multiple feeding schedules
✅ Adjustable feeding duration
✅ Adjustable motor speed
✅ Manual feeding button
✅ RGB status LED
✅ Automatic daylight saving time support
✅ Settings saved in memory
✅ USB powered
✅ Factory reset function
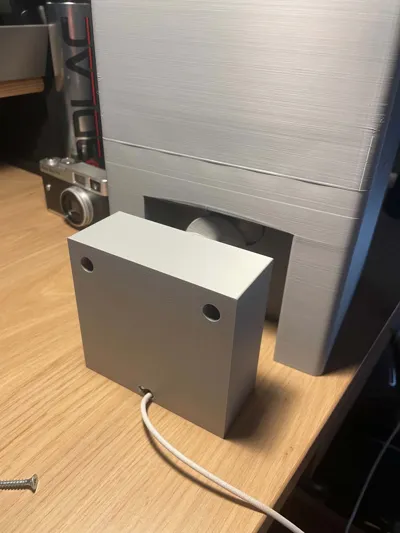
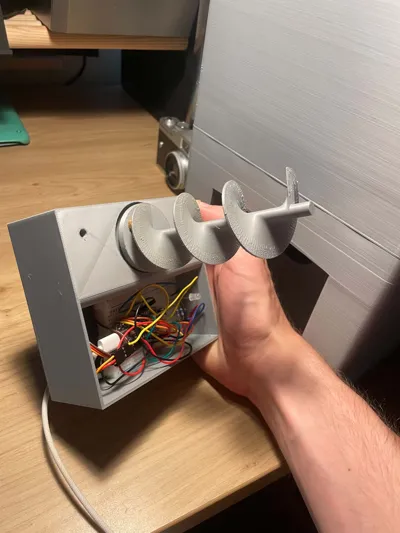
Hardware
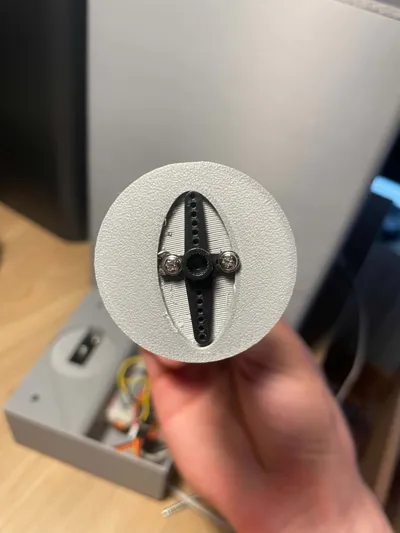
- Arduino Nano ESP32
- Continuous Rotation Servo
- RGB LED
- Push Button
- USB-C Power Supply
Software
- Arduino IDE
- WiFiManager
- ESP32Servo
- ESP32 WebServer
How It Works
After powering on, the feeder creates a WiFi setup portal if no network is configured.
Once connected to your WiFi network, you can access the built-in web interface from any phone, tablet, or computer on the same network.
Feeding schedules, motor speed and feeding duration can all be configured directly from the web page.
All settings are automatically saved and restored after power loss.
First Setup
- Power on the feeder.
- Connect to the WiFi setup network:
CatFeeder
- The WiFi setup page will automatically open on most devices.
- If it does not open automatically, browse to:
192.168.4.1
- Enter your WiFi credentials.
- The feeder will restart and connect to your WiFi network.
- Find the assigned IP address in your router.
- Open that IP address in your browser to access the web interface.
Accessing the Web Interface
After connecting the feeder to your WiFi network, open the IP address assigned by your router in a web browser.
Example:
http://192.168.1.150
The IP address can usually be found in your router's connected devices list under:
CatFeeder
Once connected, you can access the web interface from any phone, tablet, or computer connected to the same WiFi network.
Web Interface Guide
The Smart Pet Feeder ESP32 includes a built-in web interface that can be accessed from any phone, tablet, or computer connected to the same WiFi network.
Note: The screenshots shown on this page may be slightly different from the current version. The final version included with the project uses English labels and buttons.

Current Time
At the top of the page, the current time is displayed.
The ESP32 automatically synchronizes the clock using an internet time server and automatically adjusts for daylight saving time.
Speed
The Speed slider controls the rotation speed of the servo motor.
- Lower value = slower feeding
- Higher value = faster feeding
The current percentage is displayed above the slider.
Duration
The Duration slider controls how long the feeder dispenses food.
- Displayed in seconds
- Higher value = larger food portion
Feeding Times
Under Feeding Times, you can configure up to five automatic feeding schedules.
For each feeding time:
- Left field = Hour (0–23)
- Right field = Minute (0–59)
Add Feeding Time
Press the + button to add a new feeding schedule.
Maximum: 5 feeding times
Remove Feeding Time
Press the X button next to a feeding time to remove it.
Feed Now
Press FEED NOW to immediately dispense food.
This does not affect the programmed feeding schedule.
Automatic Saving
All settings are saved automatically.
No save button is required.
Settings remain stored after restart or power loss.
Status LED
The RGB LED indicates the current system status.
| Color | Status |
|---|---|
| Green | Connected and ready |
| Orange | Feeding in progress |
| Red | Reset mode |
Wiring / Connections
ESP32 Connections
| ESP32 Pin | Function |
|---|---|
| GPIO18 | Servo Signal |
| GPIO5 | Reset Button |
| GPIO10 | RGB LED Red |
| GPIO11 | RGB LED Blue |
| GPIO12 | RGB LED Green |
| VIN / 5V | USB-C Power Input |
| GND | Common Ground |
Servo
| Servo Wire | Connection |
|---|---|
| Red | 5V |
| Brown | GND |
| Orange | GPIO18 |
RGB LED
| RGB LED Pin | Connection |
|---|---|
| Common Anode | 5V |
| Red | 220Ω → GPIO10 |
| Green | 220Ω → GPIO12 |
| Blue | 220Ω → GPIO11 |
Reset Button
| Button Pin | Connection |
|---|---|
| Pin 1 | GPIO5 |
| Pin 2 | GND |
Hold the reset button for 3 seconds to perform a factory reset.

Factory Reset
To completely reset the feeder:
- Press and hold the reset button for 3 seconds.
- The RGB LED will indicate that the reset process has started.
- The ESP32 will erase:
- Saved WiFi credentials
- Feeding schedules
- Speed setting
- Feeding duration
- The device will restart automatically.
After the restart, the feeder will behave like a brand-new device and will start the WiFi setup process again.
Default Settings After Reset
| Setting | Value |
|---|---|
| Speed | 30% |
| Duration | 2 seconds |
| Feeding Time 1 | 08:00 |
| Feeding Time 2 | 08:00 |
| WiFi | Not configured |
Power Supply
USB Version
- USB-C 5V / 2A Power Supply
- ESP32 powered through VIN
- Servo powered directly from 5V
- Common ground shared between all components
Recommended
Add a 1000µF capacitor between 5V and GND near the servo connector to prevent voltage drops and unexpected ESP32 resets.
Required Components
| Component | Quantity |
|---|---|
| Arduino Nano ESP32 | 1 |
| Continuous Rotation Servo | 1 |
| RGB LED (Common Anode) | 1 |
| 220Ω Resistor | 3 |
| Push Button | 1 |
| 1000µF Capacitor | 1 |
| USB-C Power Supply | 1 |
Printing
Recommended Settings
| Setting | Value |
|---|---|
| Layer Height | 0.20 mm |
| Infill | 15–20% |
| Supports | Yes |
| Material | PLA or PETG |
Source Code
The complete Arduino source code is included with this project.
Required libraries:
- WiFiManager
- ESP32Servo
- Preferences
- ESPmDNS
Board:
- Arduino Nano ESP32
License
This project is intended for personal use and maker projects.
Feel free to modify, improve and share your own versions.
My name is Andres, and I just started uploading and designing for others. If you'd like to help me, you can always donate a boost.
My name is Andres, and I just started uploading and designing for others. If you'd like to help me, you can always donate a boost.
Boost Me (for free)
thanks for boosting me
Documentation (1)
License
You shall not share, sub-license, sell, rent, host, transfer, or distribute in any way the digital or 3D printed versions of this object, nor any other derivative work of this object in its digital or physical format (including - but not limited to - remixes of this object, and hosting on other digital platforms). The objects may not be used without permission in any way whatsoever in which you charge money, or collect fees.
Comment & Rating (2)