Lower Spool Mount for Track Switch & TPU Feed


Print Profile(1)
Description
Project Overview: Bypassing the Track Switch Limitation
The Technical Challenge with the X2D & TPU
If you want to print multi-material projects on the Bambu Lab X2D that combine the AMS (for rigid parts or support interfaces) and TPU (for flexible components), you immediately run into two hard design limitations:
- The AMS Limitation: You cannot run flexible filaments like TPU through the AMS. The elasticity causes it to wrap around the internal rollers, jam the gears, and fail to feed. TPU must be fed from an external spool via a dedicated feeder like the TPU Feed Assist.
- The Track Switch Bottleneck: The official Bambu Lab Filament Track Switch does not accommodate or allow an external spool line on its track by design. It forces an "either/or" choice between the AMS and a standard single line, effectively blocking a true multi-material AMS + TPU workflow.
The Solution: The Dual 4-in-1 Bypass Matrix
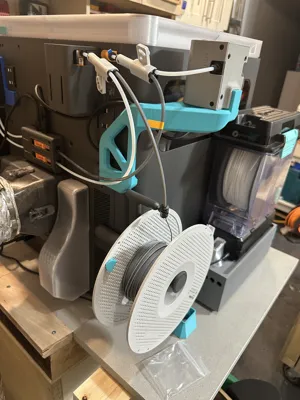
This Lower Left Spool Holder Bracket is the mechanical anchor that makes a complete bypass system possible. By placing the external spool low on the left side, it perfectly aligns the filament path to split the lines after the switch, cheating the system's limitations.
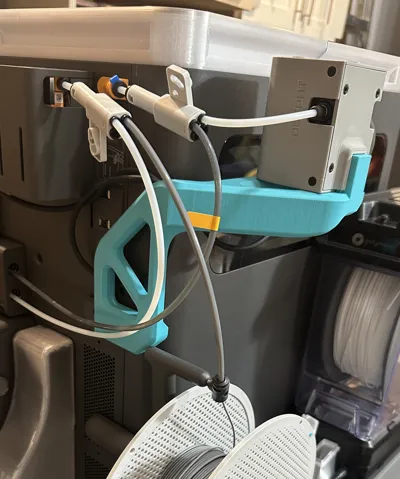
How the routing matrix solves it: Instead of letting the Track Switch block your external line, you route each of the two PTFE tubes coming out of the Filament Track Switch into its own 4-in-1 PTFE adapter.
- The Primary Adapter: Integrates your main extruder line and the TPU Feed Assist.
- The Auxiliary Adapter: Connects directly to this new lower-mounted external spool holder.
The Ultimate Multi-Material Workflow
By splitting the paths downstream of the Track Switch using this bracket and the dual 4-in-1 adapters, you completely bypass the factory restrictions. The AMS and your external TPU spool are now permanently plumbed into the machine simultaneously.
When you need to transition between standard AMS printing and an advanced AMS + TPU multi-material project, you never have to unplug a single PTFE tube. The absolute only manual task remaining is to quickly unplug/toggle the Filament Track Switch to change over the internal track state. Your tubes stay put, your pneumatic fittings never wear out, and your X2D is unlocked for true flexible multi-material printing!
Advanced Routing & Workflow Explained
This lower spool holder is the missing puzzle piece for a fully automated, wear-free multi-material layout. By positioning the external spool low on the left side, it perfectly aligns with a dual 4-in-1 adapter routing matrix.
The Setup Geometry:
- From the Filament Track Switch: Each of the two PTFE lines exiting the Filament Track Switch routes directly into its own 4-in-1 PTFE adapter.
- Path 1 (Main Extruder / TPU Feeder): One adapter line manages the primary printing path, seamlessly integrating the TPU Feed Assist.
- Path 2 (Auxiliary Extruder / External Spool): The second adapter line connects to this newly mounted lower external spool, dedicated to your auxiliary setup.
The Only Manual Task Remaining: Because all paths are permanently plumbed, you never have to change your physical tube routing. When you want to switch between your AMS setup and your external TPU/multi-material configuration, the only manual task left to do is unplug/toggle the Filament Track Switch itself. It keeps your workspace organized, protects your hardware from wear and tear, and lets you transition from rigid AMS filaments to flexible external spools in seconds.
Why Choose a Lower Mount?
- Perfect Ergonomics: Keeps the external spool accessible and stable, lowering the center of gravity compared to top or rear-heavy mounts.
- Seamless Integration: Specifically spaced to clear existing rear exhaust chutes and side accessories while perfectly aligning the filament path with the auxiliary extruder
- Sturdy & Secure: Reuses the existing chassis screw holes on the rear/side panel for a rock-solid, vibration-free installation.
Hardware & Installation Instructions
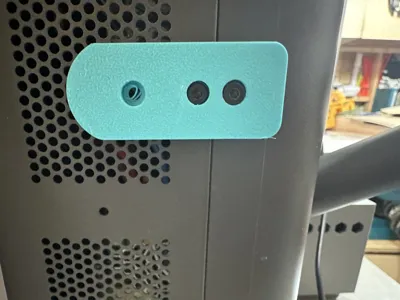
- Remove Chassis Screws: Back out the existing screws on the rear frame panel (as shown in the close-up photo).
- Mount the Bracket: Align the countersunk holes of the 3D-printed bracket with the frame holes and secure it using slightly longer screws
- Attach the Spool Rod: Insert your standard spool holder arm/rod into the main receiving hole of the bracket.
- Route the Filament: Mount your auxiliary material spool.
If you like this design, please leave a ⭐⭐⭐⭐⭐ review and a boost ! Your feedback are welcome!
Comment & Rating (0)