Search models, users, collections, and posts
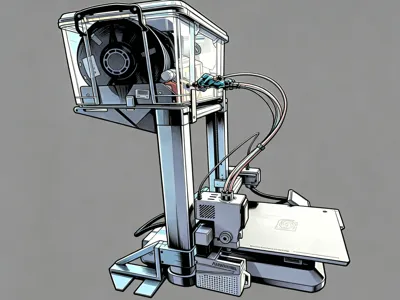
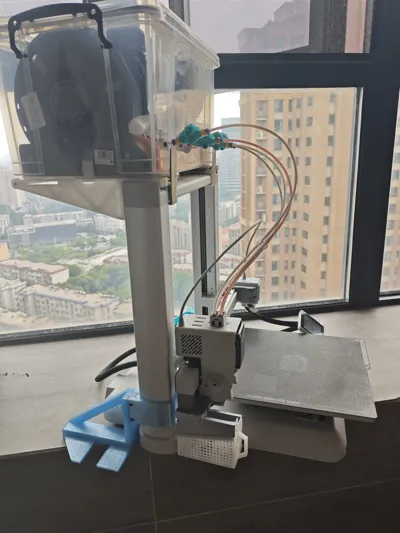
Anycubic KOBRA X Universal Top Dry Box Holder | Completely solves filament moisture issues and multi-color printing tangled filament problems
IP Report


Print Profile(1)
0.2mm layer, 3 walls, 15% infill
Designer
15.6 h
10 plates
Open in Bambu Studio
Boost
4
5
2
0
8
0
Released
Description
Content has been automatically translated.
🔥 Why Do You Need This Holder?
If you're using an Anycubic KOBRA X multi-color 3D printer, you've likely encountered these two critical issues:
- Filament Moisture Issue: The original top filament spool holder is completely exposed to the air. In southern rainy seasons or humid regions, filaments like PLA/TPU/PETG absorb moisture within half a day, leading to stringing, bubbles, layer separation during printing, and even nozzle clogs or damage
- Multi-color Printing Tangled Filament Disaster: The original holder has no rewind function. During frequent filament changes in multi-color printing, loose filament can unwind and tangle from the spool, resulting in print failures, broken filament, or even damage to the feeder
This holder was created to perfectly solve these two problems — it allows you to directly install a standard sealed dry box on top of your KOBRA X, along with a rewinding spool holder and desiccant, completely eliminating filament moisture and tangled filament issues from the source.
✨ Core Design Highlights
- Full-size Universal Adaptability + Customizable Extension
- Standard version supports: bottom width 260mm-330mm, bottom depth 190mm-260mm
- Most household sealed boxes on the market can be used directly, no customization needed
- Wider Bayonet Version: If you need support for a wider dry box, please private message me for the corresponding STL file
- Depth Customization Notes: The standard depth is limited by the KOBRA X's own print space. If you have a larger 3D printer or special depth requirements, you can also private message me for customization
- Zero-Interference Safe Design
- Precisely calculated tool head movement limits, completely avoiding interference with X/Y axis motion
- Center of gravity strictly controlled within the printer body, preventing tipping during normal use
- Does not obstruct the control panel or heat vents, ensuring no impact on the machine's original functions
- Extreme Lightweight + Easy Installation
- Only 8 M3 screws of different specifications + 2 segments of filament are needed for the complete installation
- All holder components can be self-printed by your KOBRA X
- Extensive topological optimization was performed on the model to reduce weight, minimizing the impact on machine printing accuracy while ensuring strength
- Forward-Looking Expandable Design
- Reserved TPU Spool Holder Mounting Position: Standard mounting holes are reserved in the middle of the holder, and a dedicated TPU soft filament spool holder will be released later
- Supports non-destructive upgrades: No need to disassemble the existing dry box holder; simply install the new spool holder component directly
- Install once, enjoy long-term feature updates
- Low-Cost DIY Solution
- No need to purchase expensive dedicated dry boxes
- Compatible with all publicly available rewinding spool holders and manual feeders on the MakerWorld platform
- Total cost is only a few tens of RMB (sealed box + desiccant + PTFE tube)
Boost Me (for free)
📦 Required Materials
- Printing Material: Highly Recommended PETG (high strength, not easily deformed, moisture resistant). PLA can also be used but is not recommended for long-term load bearing
- Hardware Accessories: 6 M312mm screws + 2 M318mm screws (nuts are optional, screwing directly into the printed part is also secure enough)
- Additional Accessories: Two segments of filament approximately 5cm long (used as rotating shafts for depth and width limits)
- Dry Box Kit: Transparent sealed box + desiccant + rewinding spool holder + manual feeder + PTFE tube
🖨️ Recommended Print Settings
| Parameter | Recommended Value |
|---|---|
| Layer height | 0.2mm |
| Infill | 20% |
| Walls | 3 |
| Top / Bottom layers | 4 |
| Support | None |
| Print speed | 60-80mm/s |
🛠️ Compatible Component Notes
- Recommended Sealed Box: I personally tested a right-angle sealed box with bottom dimensions of 330250mm (outer dimensions 3928*22cm), offering ample space for 4 spools simultaneously
- Rewinding Spool Holder / Manual Feeder: Simply search MakerWorld for the corresponding keywords to find many excellent public models
- PTFE Tube: It is recommended to use a PTFE tube with an inner diameter of 2mm and outer diameter of 4mm; cut the length according to the dry box's position
⚠️ Important Reminders
- Regarding the risk of tipping: Normally placing the dry box with 4 full spools is perfectly fine. If you are particularly concerned, you can search MakerWorld for "KOBRA X Z-axis Stabilizer" to install
- This holder only provides dry box mounting functionality and does not include the dry box itself, internal spool holders, feeders, or other components
- Please refer to the accompanying instruction diagrams for all screw positions, locating pins, and alignment marks to avoid installation errors
- Size Customization Notes: The standard version covers over 90% of household sealed box sizes. If you require a custom version with greater width or depth, please private message me to specify your needs
- TPU Spool Holder Preview: A dedicated soft filament spool holder is currently under development. It will be updated as soon as it's finished, and existing users can install it directly without damage
- Engineering Files Not Currently Provided: I am relatively new to 3D design, and there are many areas for optimization in the model, so I won't show it prematurely. However, all STL files have been verified through actual printing and long-term use, and their functionality is completely normal
🤝 Detailed Installation Steps
- Download all STL files and accompanying instruction diagrams, and print all components according to the recommended settings
- Step 1: Install the Crossbeam Component: First, use filament as an axle and place it on both ends of the crossbeam. Refer to the position of the original holder, ensuring the groove (see attached diagram) faces the uprights. Do not rush to screw in the M3*12 (14/16)mm holes
- Step 2: Install the Depth Bracket: Insert the depth bracket into the main bracket's slot. The M3*12 (14/16)mm screws will secure both the bracket and the crossbeam component together
- Step 3: Install the Limit Components: The width snaps directly into place, direction doesn't matter. For depth, first screw the M3*18 screw into the round nut component, then insert it into the depth limit crossbeam and use the nut to control the specific position
- Re-check the installation positions and alignment of all components against the instruction diagrams, ensuring all screws are tightened
- Simply place the dry box directly on the holder; no extra fixation is needed
- Install the rewinding spool holder and manual feeder inside the dry box, and connect the PTFE tube to the printer's feeder port
- Place the desiccant inside, close the sealed box, and start enjoying worry-free printing
🤝 Attached Diagrams


Boost Me (for free)
License
This user content is licensed under a
Creative Commons Attribution-Noncommercial
Comment & Rating (2)