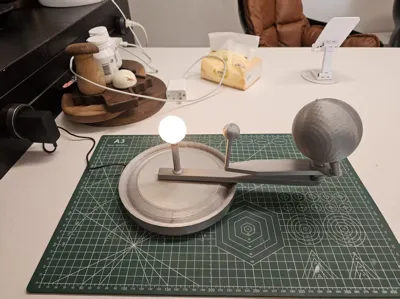
A four-axis tellurion for children to learn astronomy from a God's-eye view


Print Profile(1)

Description
Precautions:
1. Feel free to use any daylight light source, choose according to the materials available to each person (pay attention to heat dissipation; high-power light sources should avoid touching the inner wall of the sun model, and drill holes for heat dissipation; the light source opening is 1cm)
2. The sun bracket holds down the Earth's orbit and is nested on the sun stand. If it is too tight, you can scale it up slightly when printing. To prevent a poor fit, I used a drill bit to enlarge the hole and fixed it with glue.
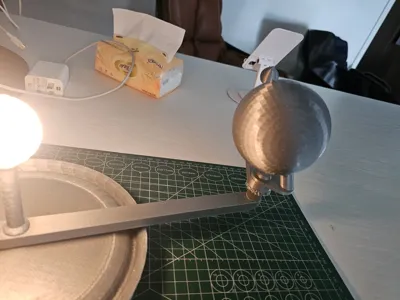
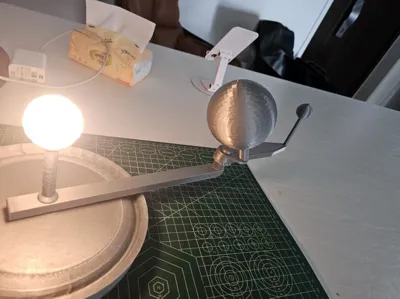
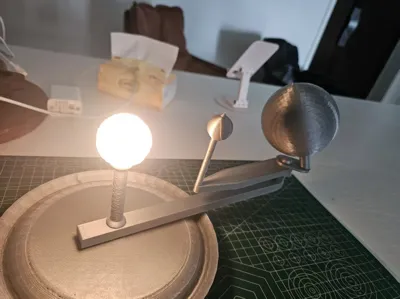
3. To better replicate the demonstration effect, you can choose a globe (with a world map) and a more vivid moon model, scaled proportionally, to replace them, or print with matte and highly reflective materials, which can perfectly simulate the waxing and waning of moon phases.
4. The content involved may contain errors, and we welcome everyone to point them out.
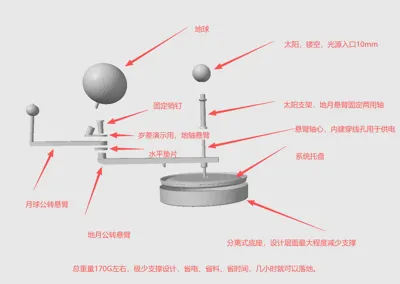
Four-Axis Interconnected Earth-Moon-Sun Astronomical Demonstration Triple-Sphere System (Tellurion) User Manual
Product Name: Four-Axis Interconnected Earth-Moon-Sun Astronomical Demonstration Triple-Sphere System
Core Structure: Four independent drive axes (Earth's rotation axis, Earth's axial precession axis, Earth's revolution axis, Moon's revolution axis)
Applicable Scenarios: Professional astronomical teaching, junior and senior high school geography classroom demonstrations, astronomical science popularization and study tours, practical learning of celestial motion principles
Core Features Description:
- This device is a purely manual mechanical model with no motors or automatic control; all movements require manual operation.
- There is no independent Moon rotation axis, following the principle of tidal locking—the Moon completes one revolution while having no relative rotation to itself, always facing Earth with the same side.
- It features an Earth's axial precession axis (second axis), used for initial calibration or demonstrating long-term axial precession (precession). During demonstrations of regular seasons, polar day/night, day/night length, etc., the Earth's axis orientation should remain fixed, with all phenomena naturally presented solely through Earth's revolution.
- It accurately reproduces the obliquity of the ecliptic (23.5°) and the inclination of the Moon's orbit (5°09′), capable of demonstrating professional astronomical phenomena such as the terminator, changes in day and night length, movement of the sun's direct point, seasonal changes, polar day/night, moon phases, solar and lunar eclipses.
Table of Contents
- Product Core Structure and Four-Axis Principle Explanation
- Professional Orbits, Celestial Inclinations, and Model Physical Parameters (Including Scaling Explanation)
- Detailed Description of Complete Machine Components
- First-Time Operation and Manual Astronomical Baseline Reset
- Basic Celestial Motion Demonstration (Terminator, Day/Night Length, Direct Point Movement)
- Advanced Professional Astronomical Phenomena Demonstration (Polar Day/Night)
- Complete Moon Phase, Solar Eclipse, Lunar Eclipse Demonstration (Combined with Inclination of Moon's Orbit)
- Standard Operation Precautions
- Common Problems and Principle Q&A
1. Product Core Structure and Four-Axis Principle Explanation
1.1 Functions of the Four Core Axes
| Axis Order | Name | Function Description |
|---|---|---|
| First Axis | Earth's Rotation Axis | Controls the Earth's rotation from west to east around its tilted axis (23.5°), simulating day and night alternation and terminator movement, with manually adjustable speed. |
| Second Axis | Earth's Axial Precession Axis | Used to adjust the spatial orientation of the Earth's axis during initial calibration, or to demonstrate long-term axial precession (precession, with a cycle of approximately 26,000 years). This axis must be locked during regular season, polar day/night, and other demonstrations, keeping the Earth's axis orientation fixed. |
| Third Axis | Earth's Revolution Axis | Controls the Earth's overall revolution around the Sun along the ecliptic plane, simulating annual orbital motion, and, with a fixed Earth's axis orientation, presents seasonal changes and direct point movement. |
| Fourth Axis | Moon's Revolution Axis | Controls the Moon's revolution around the Earth along the Moon's orbital plane, with no independent rotation. During revolution, the fixed side points towards the Earth's center, replicating tidal locking. |
1.2 Principle of Lunar Tidal Locking (Design Basis)
The real Moon's rotation period is perfectly synchronized with its revolution period around Earth (27.3 days), thus it always faces Earth with the same side. This device does not have an independent Moon rotation axis; during revolution, the Moon's surface is fixed to point towards the Earth's center, accurately replicating the real celestial body's state.
2. Professional Orbits, Celestial Inclinations, and Model Physical Parameters
2.1 Core Angle Parameters
- Obliquity of the Ecliptic (Earth's Axial Tilt): 23.5°, fixed. It is the fundamental cause of seasons, polar day/night, and changes in day/night length.
- Inclination of the Moon's Orbit: The angle between the ecliptic plane (Earth's orbital plane) and the Moon's orbital plane is 5°09′. This device mechanically achieves this angle through the tilted Moon's revolution sub-arm (or orbital support structure), regardless of whether the Moon has its own rotation axis.
- The Moon's axial tilt (approx. 1.5°) is not involved in demonstrations as the device lacks Moon's rotation.
2.2 Two Major Orbital Planes
- Ecliptic Plane: Earth's orbital plane.
- Moon's Orbital Plane: The Moon's orbital plane, inclined at 5°09′ to the ecliptic plane.
2.3 Model Physical Dimensions and Distances (Desktop Adaptive Differentiated Scaling)
| Component | Diameter / Distance |
|---|---|
| Sun Model | 36 mm |
| Earth Model | 80 mm |
| Moon Model | 21 mm |
| Earth-Sun Center Distance | 200 mm |
| Earth-Moon Center Distance | 120 mm |
Scaling Explanation:
The true Sun-Earth diameter ratio is approximately 109:1, and the distance ratio is approximately 11700:1. If both diameter and distance ratios were accurately maintained in a desktop model, the model would be too large for teaching purposes. Therefore, this device uses scientific differentiated scaling:
- The Sun model has a smaller diameter (36mm) to avoid obstructing the light source and ensure uniform illumination;
- The Earth model is appropriately enlarged (80mm) to clearly display surface markings (equator, tropics, polar circles, etc.);
- The Earth's axial tilt, inclination of the Moon's orbit, illumination geometry, and the relative motion relationship between revolution and rotation are all strictly maintained, so the demonstration principles of all astronomical phenomena (seasons, polar day/night, moon phases, solar and lunar eclipses) are completely unaffected.
✅ This scaling method is a standard design for professional astronomical teaching models and is not a scientific error.
3. Detailed Description of Complete Machine Components
| Component Name | Function Description |
|---|---|
| Sun Light Source Model | Simulates parallel sunlight, emitting constant light. Light source specifications and power supply methods can be adapted as needed. |
| Earth Model (with Fixed Earth's Axis) | Built-in Earth's axis with a fixed tilt of 23.5°, with the equator, tropics, and polar circles marked on its surface. Supports rotation and revolution. |
| Moon Model (Tidally Locked) | No rotation; during revolution, the fixed side points towards the Earth's center, moving along the Moon's orbital plane around Earth. |
| Earth's Axial Precession Adjustment Knob | Used for initial calibration of the Earth's axis orientation or demonstrating precession. It should remain locked during regular demonstrations and must not be used to simulate seasonal changes. |
| Earth's Main Revolution Arm | Drives the Earth's revolution around the Sun along the ecliptic plane, displaying solar term positions in conjunction with the calibrated base. |
| Moon's Revolution Sub-Arm | Drives the Moon's revolution around the Earth along the Moon's orbital plane, with a built-in 5°09′ inclination of the Moon's orbit structure. |
| Calibrated Base | Marks the ecliptic orbit, equinoxes and solstices, and seasonal positions, assisting with positioning. |
| Power Switch | Controls the on/off of the Sun light source, adaptable as needed. |
4. First-Time Operation and Manual Astronomical Baseline Reset
This device is a purely manual model with no automatic operation function. All position adjustments require manual operation.
Purpose of Baseline Reset: To set a unified initial state and ensure subsequent demonstrations conform to astronomical principles.
Manual Reset Steps (Purely Manual Alignment):
- Rotate the Earth's main revolution arm to the vernal equinox mark position on the base.
- Adjust the Earth's axial precession axis so that the Earth's axis orientation aligns with the "North Pole Direction Mark" on the base (if no mark is present, set the Earth's axial tilt direction perpendicular to the Sun-Earth connection line, with the North Pole pointing away from the Sun—this is the standard vernal equinox orientation).
- Lock the Earth's axial precession axis, and do not rotate it in subsequent demonstrations.
- Rotate the Moon's revolution arm to the New Moon point (between Sun and Earth) baseline position.
- Visually check that the ecliptic plane and Moon's orbital plane inclinations have no offset, then complete the reset.
Core Principle: Except for precession demonstrations or initial calibration, once the Earth's axis orientation is set, it must remain fixed throughout the entire revolution demonstration. Phenomena such as seasons, polar day/night, etc., are generated automatically by Earth's revolution, without the need to manually change the Earth's axis direction.
5. Basic Celestial Motion Demonstration Operations
5.1 Day and Night Alternation and the Terminator
Turn on the light source and rotate the Earth's rotation axis (from west to east) at a constant speed.
- The side facing the light source is the day hemisphere, the side facing away is the night hemisphere, and the dividing line between light and dark is the terminator circle.
- Following the direction of rotation, the line from night to day is the dawn line, and the line from day to night is the dusk line.
- Observations: The terminator is always perpendicular to the sun's rays, and the equator has equal day and night lengths throughout the year. Fixing the Earth's rotation angle can display the global day and night distribution at a given moment.
5.2 Annual Movement of the Sun's Direct Point
Keep the Earth's axis orientation fixed (the precession axis is locked) and slowly rotate the Earth's main revolution arm.
- During revolution, due to the fixed tilt of the Earth's axis, the sun's direct point moves between the Tropics of Cancer and Capricorn:
- Summer Solstice (when revolving to the Summer Solstice mark) directly shines on the Tropic of Cancer
- Winter Solstice directly shines on the Tropic of Capricorn
- Vernal/Autumnal Equinox directly shines on the equator
5.3 Seasonal Change Demonstration (Correct Method)
Prerequisite: The Earth's axis orientation is locked and no longer adjusted.
Revolve sequentially to the four solar term marks and observe the illumination conditions:
| Solar Term | Revolution Position | Sun's Direct Point | Northern Hemisphere Season | Southern Hemisphere Season |
|---|---|---|---|---|
| Vernal Equinox | Vernal Equinox Point | Equator | Spring | Autumn |
| Summer Solstice | Summer Solstice Point | Tropic of Cancer | Summer | Winter |
| Autumnal Equinox | Autumnal Equinox Point | Equator | Autumn | Spring |
| Winter Solstice | Winter Solstice Point | Tropic of Capricorn | Winter | Summer |
Note: Do not rotate the Earth's axial precession knob during the demonstration, otherwise it will incorrectly suggest that seasons require manual adjustment of the Earth's axis orientation.
5.4 Global Differences in Day and Night Length
At different revolution positions, observe the day and night lengths at different latitudes:
- Summer Solstice: Northern Hemisphere has long days and short nights, with polar day in the Arctic Circle; the Southern Hemisphere is opposite.
- Winter Solstice: Northern Hemisphere has short days and long nights, with polar night in the Arctic Circle; the Southern Hemisphere is opposite.
- Vernal/Autumnal Equinox: Global day and night are equal.
5.5 Division of Earth's Five Zones
Demonstrate the division of tropical zones (between the Tropics of Cancer and Capricorn), temperate zones (between the tropics and polar circles), and frigid zones (within the polar circles) through the illuminated range and the movement of the direct point.
6. Advanced Professional Astronomical Phenomena Demonstration (Polar Day/Night)
Prerequisite for Correct Demonstration: The Earth's axis orientation is fixed (precession axis locked), and only Earth's revolution changes its position in orbit.
6.1 Polar Day in the Arctic, Polar Night in the Antarctic on Summer Solstice
- Turn on the light source, and rotate the main revolution arm to the Summer Solstice mark.
- Keep the Earth's axis orientation unchanged (the orientation set during the vernal equinox); at this point, the Earth's North Pole naturally tilts towards the sun.
- Observe the terminator tangent to the Arctic Circle, with the entire Arctic Circle experiencing daylight (polar day), and the Antarctic Circle experiencing darkness (polar night).
- Rotate the Earth's rotation axis; the polar day/night regions will not change.
6.2 Polar Day in the Antarctic, Polar Night in the Arctic on Winter Solstice
- Rotate the main revolution arm to the Winter Solstice mark.
- The Earth's axis orientation remains at the initial setting; at this point, the Earth's South Pole tilts towards the sun.
- The terminator is tangent to the Antarctic Circle, with the Antarctic Circle experiencing polar day, and the Arctic Circle experiencing polar night.
6.3 No Polar Day or Night on Vernal and Autumnal Equinoxes
When revolving to the vernal or autumnal equinox mark, the sun directly shines on the equator, the terminator passes through both poles, global day and night are equal, and there is no polar day or night.
6.4 Gradual Change in Polar Day/Night Range Demonstration
Slowly and continuously rotate the main revolution arm to observe the dynamic process of the polar day/night range gradually expanding from the poles to the polar circles and then gradually shrinking, fully replicating the year-round changes.
7. Complete Moon Phase, Solar Eclipse, Lunar Eclipse Demonstration (Combined with Inclination of Moon's Orbit)
7.1 Moon Phase Cycle Demonstration
Turn on the light source and manually rotate the Moon's revolution axis; the Moon revolves along its orbital plane. Observe the shape changes of the illuminated portion of the Moon:
New Moon (Conjunction) → Waxing Crescent → First Quarter → Waxing Gibbous → Full Moon (Opposition) → Waning Gibbous → Last Quarter → Waning Crescent → New Moon.
(Due to tidal locking, the same side of the Moon always faces Earth, but the illuminated area changes with its orbital position.)
7.2 Solar Eclipse Demonstration (New Moon Restricted)
Rotate the Moon to the point between the Sun and Earth (New Moon), and finely adjust the Moon's revolution angle to compensate for the inclination of the Moon's orbit, so that the Sun, Moon, and Earth are approximately collinear. At this time, the Moon's shadow falls on the Earth, allowing for the demonstration of total/partial solar eclipse effects.
Explanation: Due to the inclination of the Moon's orbit, most New Moons are not collinear, which is why solar eclipses are rare.
7.3 Lunar Eclipse Demonstration (Full Moon Restricted)
Rotate the Moon to the Sun-Earth extension line (Full Moon), finely adjust the angle to make the Sun, Earth, and Moon collinear, and the Earth's shadow covers the Moon, demonstrating a lunar eclipse. Similarly, it does not occur on every Full Moon.
8. Standard Operation Precautions
- The four-axis structure is precise; rotations must be gentle and at a constant speed. Violent operation is prohibited.
- The Earth's axial precession axis should remain locked during regular demonstrations and only adjusted when demonstrating precession or during initial calibration.
- When demonstrating the terminator, polar day/night, and solar/lunar eclipses, it is recommended to do so in a dimly lit environment.
- Light source brightness and power supply methods can be adapted independently as needed.
- The device is a precision model; dropping, impacting, or submerging it is prohibited. Children operating it must be accompanied by an adult.
- Unauthorized disassembly of the axes is prohibited to prevent loss of precision in the four-axis interconnected movement.
9. Common Problems and Principle Q&A
Q1: Why does the Moon not rotate on its axis? Is this a defect?
A: No, it is not a defect. The real Moon is tidally locked, with its rotation and revolution periods being the same, always facing Earth with the same side. This device scientifically reproduces this characteristic.
Q2: Why is it unnecessary to rotate the Earth's axial precession knob when demonstrating seasons?
A: During Earth's actual revolution, the orientation of its axis in space remains constant (pointing towards the vicinity of Polaris). Seasonal changes are entirely caused by the revolution position altering the sun's direct point. If the Earth's axis is manually rotated during revolution, it will result in an incorrect principle. The Earth's axial precession axis on this device is only used for initial calibration or demonstrating precession.
Q3: Why is the Sun model smaller than the Earth model?
A: This is an engineering scale adjustment for the feasibility of desktop teaching. True proportions cannot be achieved in a desktop model. This device sacrifices size proportion but retains all angles, illumination geometry, and relative motion relationships, without affecting the teaching of any astronomical phenomena.
Q4: How is the 5°09′ inclination of the Moon's orbit achieved? Does the absence of a Moon rotation axis affect it?
A: The inclination of the Moon's orbit is the angle between the Moon's orbital plane and the Earth's orbital plane (ecliptic plane), mechanically achieved through the tilted Moon's revolution sub-arm, and is unrelated to whether the Moon rotates on its axis. This device correctly preserves this angle for demonstrating the conditions for solar and lunar eclipses.
Q5: Why can't solar and lunar eclipses be demonstrated on every New Moon and Full Moon?
A: The device accurately reproduces the 5°09′ inclination of the Moon's orbit; on most New Moons and Full Moons, the three bodies are not collinear, which is consistent with reality and not a malfunction.
Q6: What if the polar day/night and terminator demonstration effects are not obvious?
A: Check if the revolution position accurately corresponds to the solar term marks, and confirm that the Earth's axis orientation is locked and the tilt angle is correct (the precession knob has not been accidentally touched). Simply reset according to Chapter 4.
Q7: Why doesn't the terminator completely coincide with the meridians?
A: Only on the two days of the vernal and autumnal equinoxes does the sun directly shine on the equator, causing the terminator to coincide with the meridians; at other times, due to the Earth's axial tilt, there is an angle between the terminator and the meridians, and this device can fully present this variation.
Comment & Rating (0)