V4 Fully 3D printable wind turbine | windmill
V4 Fully 3D printable wind turbine | windmill


Print Profile(3)

Description
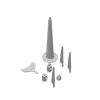
Assembly tips:
- DO NOT use a hammer or excessive force. This will cause the parts to shatter.
- Instead, apply an even pressure using a vice or a clamp.
- If the parts still do not wish to budge, then please the male connector in the freezer, and the female connector in some warm water.
- Print in petg, abs or asa, not pla. Pla is too brittle and will snap.
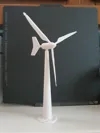
The latest version of my wind turbine. After taking feedback from some others who made the V3 I have improved this design in a few major ways.
I have fixed the blades. The pictures are not fully updated yet however they are now the correct way round.
The first improvement I made was to clean up the tolerances on the ‘bearings’ so that there was slightly less wobble.
The second was to actually balance the turbine since I completely forgot about that in the first version…
And last but not least I have changed the design of the blades to be more realistic and also slightly more efficient, in terms of getting it to spin faster. I also made it able to print them separately to print them vertically for a better surface finish.
There have also been a few minor changes to clean up the whole look.


