


Print Profile(5)

Description

Boost Me (for free)
If you enjoy this model, please consider giving it a boost to help others discover it too! I put a lot of care into designing it for quality, ease of printing, and functionality. Your support means a lot to me and feedback is always welcome, feel free to leave a comment or remix it. Thanks for checking it out, and happy printing! 🚀🖨️
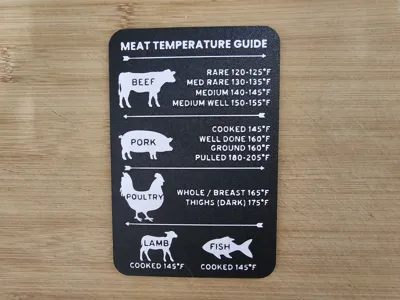
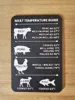
Ultimate Meat Temperature Guide (Kitchen/BBQ Magnet)°F
Stop guessing and start grilling with precision! This Meat Temperature Guide is a sleek, durable, and easy-to-read reference for your kitchen or outdoor grill area. It covers everything from a perfect medium-rare steak to fall-apart pulled pork.
Looking for a Celsius version? Check this out: Meat Temperature Guide (Kitchen/BBQ Magnet) °C - Free 3D Print Model - MakerWorld
Features
- Comprehensive Guide: Includes Beef, Pork, Poultry, Lamb, and Fish.
- Dual Units: Designed with clear Fahrenheit readings.
- High Contrast: Optimized for 2-color printing to make the text pop.
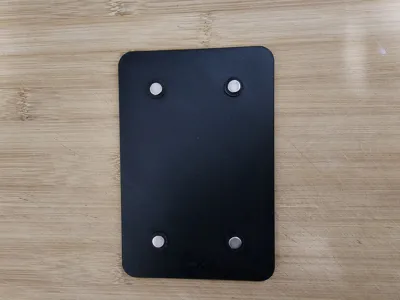
- Compact & Functional: Perfect for mounting on the fridge or the side of your smoker with a small magnet.
- Magnet Hole: Includes 4 magnet hoes to fit 8x3mm magnets. I'll upload 6x3 and 10x3mm to separate print profiles.
Printing Instructions
This model is designed for a AMS/MMU setup.
- Layer Height: 0.20mm (Standard)
- Filament: PLA, PETG (recommended if using outdoors)
- Infill: 15% (Gyroid).
- Support: None required!
Assembly
- Download and Print: Ensure model is facing down on the build plate.
- Locate your Magnets: The model images use 4 x 8x3mm magnets.
- Glue: Place a small amount of superglue in the magnet holes.
- Magnets: Slot the magnets into the holes and leave for 30 minutes.
🎨 How to Change Print Colours
Follow these steps to customize the base and detail colours of your model:
- Orient the Model: Select the Lay on Face tool and click the back of the model to ensure the text and designs are facing upwards.
- Set the Base Colour: * Switch to the Object tab.
- Click the Filament Colour box next to your model and select your preferred base colour.
- Open Paint Tools: Select the Colour Painting icon (the paint bucket) from the top toolbar.
- Configure Height Range:
- Choose your desired detail colour from the palette.
- Change the painting tool type to Height Range.
- Apply Colour:
- Hover your cursor over an animal or text element.
- Adjust the selection until the bottom layer is listed as 3.03.
- Click to apply; all animals and text at that height will automatically change colour.
- Orient the Model: Select the Lay on Face tool and click the back of the model to ensure the text and designs are facing towards the build plate again.

I love seeing how these prints turn out! 🖨️ If you download this, please **post an image of your print** or **leave a review**. ✅ If you have any issues or suggestions, drop a comment, I’m always looking to refine and improve my designs based on your feedback! 🔧📐
Check out some of my other designs:


License
You shall not share, sub-license, sell, rent, host, transfer, or distribute in any way the digital or 3D printed versions of this object, nor any other derivative work of this object in its digital or physical format (including - but not limited to - remixes of this object, and hosting on other digital platforms). The objects may not be used without permission in any way whatsoever in which you charge money, or collect fees.
Comment & Rating (27)