Sunlu S8 Pro Mod - Standalone - All in One
Sunlu S8 Pro Mod - Standalone - All in One


Print Profile(0)
Description
Summary
Attention -- There are no openings for the Z-motor cables in the cover plates yet!
Edit: Coverplate w opening added!
The maximum print height must be reduced, otherwise the X chain will be jammed. (For me at 397mm)
Likewise, the maximum X travel must be reduced somewhat, but this does not affect the print width. I have mounted the CR-Touch on the right, so this is not a problem.
Now I'm just about to finish it...
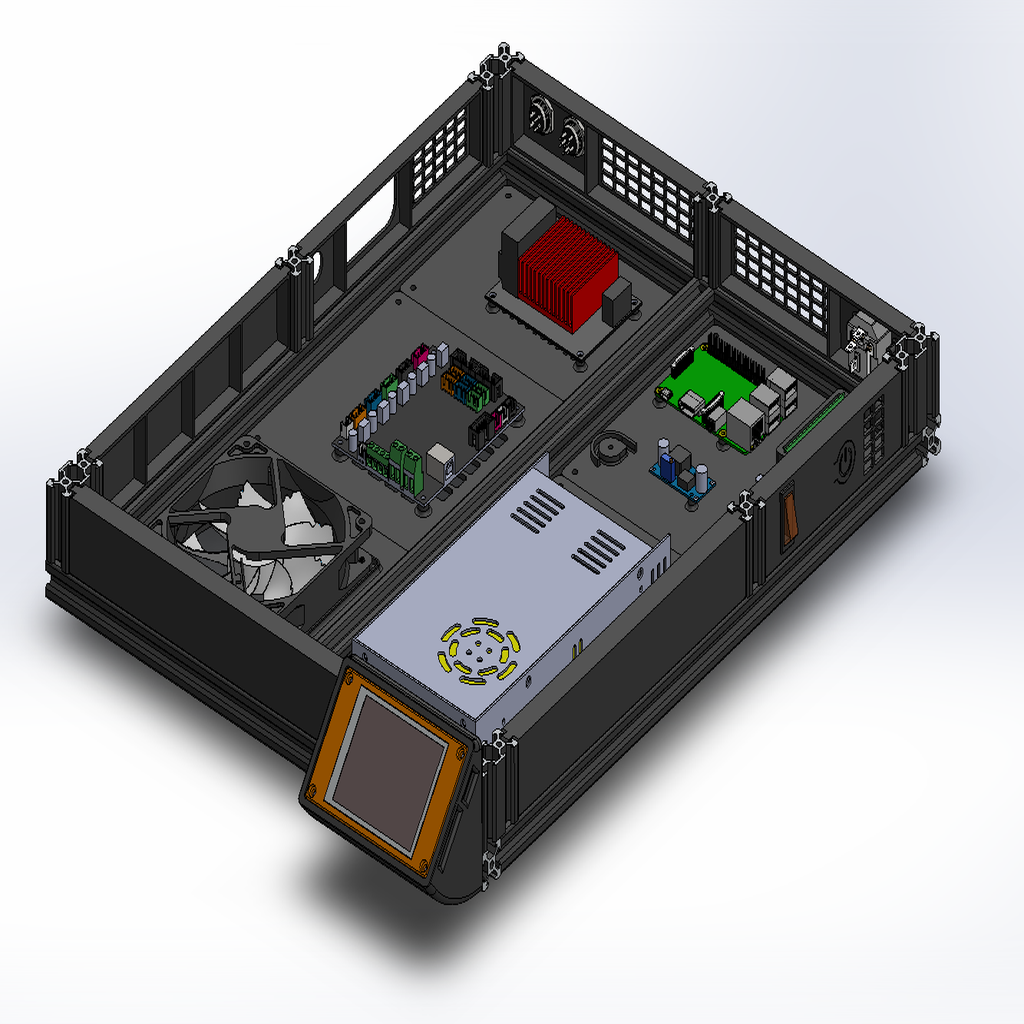
What bothered me most on this printer were the long cables at the side and the electronics box at the front. The cable from the print bed was always hitting the wall and at the front the electronics box was sticking out over the desk.
I had to remake many parts and adapt existing ones to the dimensions of the S8 Pro, as the main project was for the CR10. Huge thanks for the great idea of the CR-10 Mod - Standalone - All in One by Cornely_Cool.
Some parts I adapted with Tinkercad, for others it was "easier" to build them myself with FreeCad. I am really new to FreeCad, please check the drawing before printing.
The extrusion dimensions are:
4x V-Slot rail 2040 40mm
4x V-Slot rail 2020 40mm
3x V-Slot rail 2020 450mm
2x V-Slot rail 2020 404 (!) mm
The first time I chose a supplier in the neighbouring country of Germany, unfortunately the V-Slot there was 7.20mm wide. Also, I couldn't get any cuttings of only 40mm, the minimum was 80mm. I used Blender to adjust the base_panel-locking_clamps, but it was really tiring. I also had to print the extrusions in 40mm myself, but that wasn't particularly stable. I bit the bullet and ordered a second time, this time on Ooznest. Now everything was right, cut and dimensions.
To sit tight, i had to play with horizontal expansion for the base_panel_locking_clamp.
Since I find cable chains somehow tidier I also wanted to use some. But the ones I printed myself are all sagging. The Voron Switchwire project appealed to me because of its chain guide. But I also wanted to leave as much as possible original, so only the chain holders were adapted. The chains are the 10x11mm R18 with 3 hole end connector.
I made a bracket for the Y-slide, this is simply put on the spacers of the rollers. The cable from the heatbed has to be re-soldered! Be sure to preheat the heatbed to at least 80°C, then it will also work with a smaller soldering iron.
I had to raise my hotend holder for the Sherpa Mini a bit to make space for the chain. The holder for the chain is simply clipped onto the spacers of the rollers.
The X and Y chains are attached to a holder on the extruder motor plate. This was completely reassembled with Tinkercad, but in terms of design I used the Slim X Axis Cable Chain with Extruder and Hotend Mount for Ender 3 Pro by norp April 27, 2020.
The two frame holders for the Y and Z chain were taken from the Switchwire project and slightly adapted.
Use threaded inserts in the chainmounts.
For the hinges you need 2x MR95 miniature ball bearing each side.
Now I'm trying to decide whether to do the front with text or just plain or with a pattern.
It's all still a work in progress!
My Tinkercad-works:
Coverplates + Hinges + Z&Y-FrameChainmount + Connectos-Hub + cutout-stamp
Hotend Mount + Y-Axis Chain Mount
Sherpa Mini mount (w cutout for Minimus cooler system)
S8 Pro Extruder 10x11 Chain Mount
From Printables:
Sunlu S8 Legs