Poseable Astro Bot


Print Profile(2)
Description
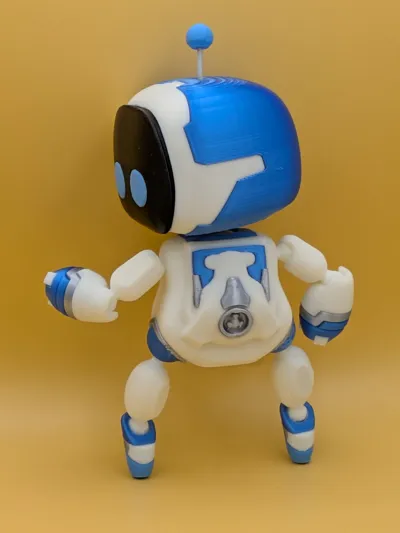
Astro Bot
An articulated and fully poseable Astro Bot action figure, from the award-winning Playstation 5 game of the same name.
Update 2-22-2026:
- Added recommendation to use glue on print bed and/or brims for adhesion
- Added note about multi-color prints in general using a lot of extra filament
- Highlighted certain pieces of text for emphasis
- Add info to STEP files that they are intended for remixes rather than printing directly
Details 🔍
- Fully poseable
- 12 points of articulation
- No glue or external fasteners needed
- Minimal supports
- Around 5.25 inches (13.25 cm) tall from the bottom of the feet to top of the head - a little taller with the antenna
- Multi-color supported (AMS required)
You can also download the STEP file if you want to remix the model. The STEP file is NOT arranged in a print-friendly layout, so I recommend printing from the 3mf file instead!
Printing notes and recommendations 🖨️
- This model can be printed with PLA, but the joints will likely become loose over time, so PETG, ABS, or ASA are recommended.
- Depending on the filament used, some joints or connection points may be very tight or very loose during assembly.
- The upper leg piece is relatively narrow where the white and blue parts meet, but that part is crucial for moving the leg joint, so it is recommended to print with 4 walls. The rest of the model works well with 3 walls.
- Some parts require supports - for example the neck, upper arm, upper leg, and face plate - so make sure they are enabled.
- I would recommend using a glue stick on the print bed to ensure good adhesion.
- In my prints, the feet/lower leg part required a brim for sufficient bed adhesion. You may also want to add brims to other parts if you have trouble with adhesion.
- I used 15% gyroid infill and had good results.
I tend not to spend a lot of time tweaking or optimizing settings unless needed, so feel free to play with the setup and I'm sure you can probably get a cleaner look or improve durability.
Multi-color
The model currently requires AMS to get a multi-color print without paint - it is not broken into separate parts by single color.
NOTE: Unless you have a printer that can print with multiple tool heads/nozzles, Multi-color prints in general use a lot of extra filament to switch colors. I've tried to lay out parts in a way that minimizes the overall amount of waste, there's only so much I can do since the slicer determines the amount of extra filament to flush.
Non-AMS users: I imagine you can print in a single color per piece and paint (though I haven't tried this myself). I would avoid painting on places where different pieces will touch (e.g. at joints), since paint may affect the joint or vice versa.
AMS users: Since I (and I imagine many others who have an AMS) only have a single AMS, I separated things out into multiple plates so that each plate has no more than 4 colors at a time. If you have more than one AMS, feel free to put them on the same plate.
Assembly 🛠️
All the parts of this model snap together with no glue. The only additional element needed is a small length of gray or silver filament for the antenna.
The parts of the body are arranged on the build plate in roughly the location they snap together.
Antenna
- Cut around ⅔ inch (1.75 cm) of gray or silver filament from a roll, and insert one end into the top of the head, and then place the antenna topper (the light blue ball) onto the other end. It should stay in place with friction, but feel free to apply glue if you would like.
- I like to give the filament a slight curve to add some personality.
- You may need to adjust the length to your liking.
- The fit may be pretty tight, so you may need to find a way to reduce the diameter of the filament (cutting, squishing, etc.) or increase the size of the holes for it to fit.
Assembly tips
- The face plate pushes into the head and should stay in place with friction.
- For the shoulder, the side with the cutout/opening goes into the body, while the other end goes into the upper arm.
Other than that, it is hopefully fairly self-explanatory how the pieces fit together, but if not, I can look into providing an assembly guide or better instructions.
Other notes 📝
I designed this model mostly with CAD software (specifically, Autodesk Fusion) other than the “backpack” part, which was mostly modeled in Blender.
There is a lot that I would like to tweak and improve with this model. If I had more time and energy, I would work on things like:
- Improving the fit and poseability of the larger part of the neck joint
- Creating a stand - as it is, the figure can't easily stand up on its own
- Adding a cape
- Making alternative face plates with different expressions
Overall though, I am pleased with how this turned out.
Boost Me (for free)
If you like my model, I would love a boost! But also, it's your life, so do whatever you like :)
Disclaimers 💼
Design is modeled from the ground up based on a character created by Team Asobi and Sony Interactive Entertainment. I make no claims to rights for the likeness of the character.
I am neither a professional artist nor engineer, so I make no promises about the quality or durability of this model. Print, use, and enjoy at your own discretion 😄
Comment & Rating (149)