Filament Guide, Sensor, Cleaner & Cable management for the CR-10 with MK8 Aluminium Extruder
Filament Guide, Sensor, Cleaner & Cable management for the CR-10 with MK8 Aluminium Extruder


Print Profile(0)
Description
Summary
Filament Guide, Sensor, Cleaner & Cable management for the CR-10 with MK8 Aluminium Extruder
Note: these parts are very much still prototypes and need testing and feedback
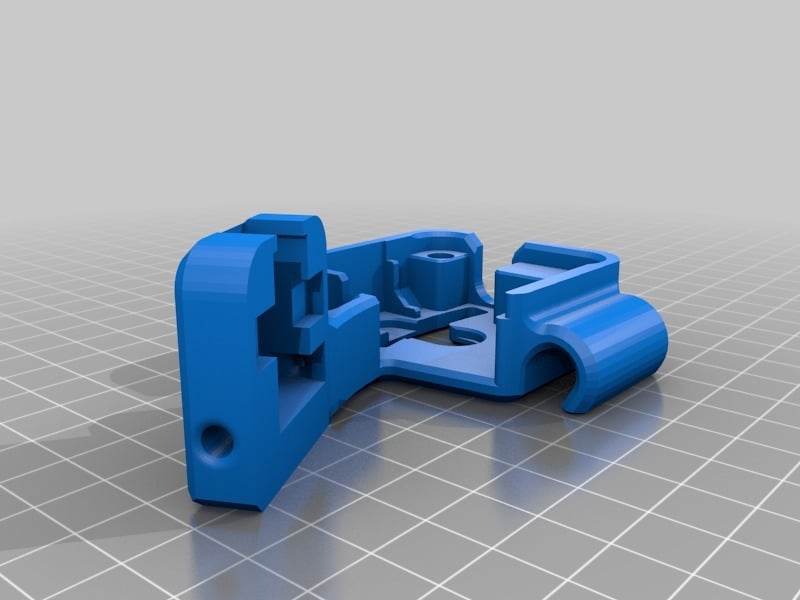
With the Aluminium upgrade, you can't really put something over the top like on the stock MK8 extruder so this bracket is designed to sit under the MK8 and brings together many things into an all in one bracket.
- filament out sensor, which is designed to take a small piece of Bowden PTFE tube as an inlet
- filament cleaner, which can take any material works for you, I recommend a strip of sponge folded in half.
- filament guide, which is designed to use a piece of Bowden PTFE from the cleaner to the Aluminium extruder all the way to the feeder gear
- cable management
The sensor is meant to be a common end stop switch. Make sure you get the one where the switch is 90 degrees to the PCB like in the picture.
To buy the sensor simply do a search for "Mechanical Endstop NO Limit Switch" in ebay, amazon etc
To set this up on your Octopi follow the instructions in this youtube vid
and for more details follow the instruction on the Thingiverse this is remixed from
https://www.thingiverse.com/thing:2480901
Update 1
- Printed prototype and made many changes
- No longer rests under MK8
- Reduced no of parts by 1
- Reduced the need for supports
- Sensor section now slides into place and clips in place
Update 2
- Printed many prototypes and made many tweaks and fixes
- Improved mounting with screws and attachment to frame
- Sensor module is now more streamlined
Print Settings
Printer:
CR-10
Rafts:
No
Supports:
Yes
Resolution:
0.2mm
Infill:
20%
Notes:
As far as I can tell only 1 part needs supports. Refer to the gallery image
Note that these parts have thin walls. Make sure you cater for this in your slicer. It may eventuate that the walls need to be made thicker, and if so ill update the models.
Post-Printing
Assembly
Assembly is easier when the filament is already threaded through the sensor module and the cleaner module. Don't assemble everything and then try to thread the filament it really hard to get into the Bowden tube that leads to the MK8

Add the Bowden tube and insert the sensor facedown. the limit switch arm should angle up towards the sensor module output

feed the filament through the sensor module

feed the filament through the cleaning module

Add cleaning material to the cleaning chamber

The above example a uses a strip of sponge about 45-50mm

Attach sensor module to cleaning module

Attach mount to the CR-10. Unscrew the nut on the lead screw. Make sure the screws are undone high, try not to unscrew them all the way out (easier). Slide the assembly into place and feed the Bowden tube in to the hole on the cleaning module

As you slide it into place make sure it goes under and scoops the washers and screws. Once in place re-screw but not tightly. Be aware that these screws are the only screws on the CR-10 that are meant to be loose. Hand tighten and loosen half a rotation, If your z-axis is still not moving smoothly loosen these even more

Lastly attach the cable the runs to the hotend