Toothpick Dispenser | Pop-up Toothpick Holder


Print Profile(6)


Bill of Materials


Description
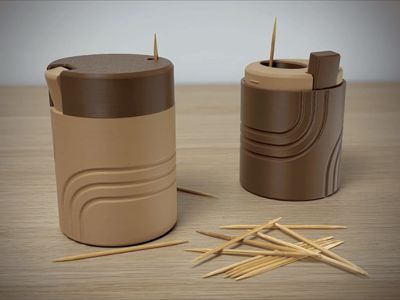
The Toothpick Dispenser offers a clean and simple way to access toothpicks. Press the button and one toothpick pops out every time—no digging, no searching, no touching multiple picks. ✨
- The dispenser has a 60 mm diameter and 83 mm height
- Designed for standard 65 mm toothpicks, ensuring universal compatibility with common household sizes.
- Requires one rubber band (1.4×28 mm); other sizes can be used as long as they provide sufficient force to return the mechanism to its original position.
- Push mechanism dispenses one toothpick per press for clean and consistent use.
- Recommended to print in PETG, but high-quality PLA will also work well.
Assembly instruction step by step👉:
- Attach the rubber band (1.4×28 mm) to the 02_Lever.
- Insert the 02_Lever into the rectangular opening in the 01_Cup.
- Snap the end of the 02_Lever onto the pin on the 01_Cup — you should feel it click into place.
- Hook the rubber band onto the tabs on the 01_Cup to create tension for the mechanism.
- Attach the 03_Rod onto the 02_Lever, then place the 04_Button onto the 03_Rod.
- At this point, the basic mechanism is assembled.
- Insert the mechanism into the 06_Cover.
- Close the 06_Cover using the 05_Plug.
- This requires firm pressure and slight flexing of the 06_Cover so the 05_Plug can fully snap into place.
- Make sure the small alignment grooves are positioned correctly.
- If any hook breaks, consider printing in a stronger material (e.g., PETG) or glue the 05_Plug to the 06_Cover.
- Place the 07_Lid on top — assembly is complete.
Possible Issues & Solutions 🔧:
1. The toothpick doesn’t extend far enough
- Check if the 04_Button has enough clearance. There should be minimal friction between 04_Button and 06_Cover.
- Ensure the rubber band provides enough force to lift the toothpick.
- If needed, twist the rubber band into two loops or use an additional band to increase tension.
- If none of the above helps, remove the lid and use the dispenser without the 06_Cover — it will still function correctly.
2. The lid holds too tightly
- Lightly sand the protrusions on 05_Plug to reduce their size.
- This will create more clearance and allow the lid to fit properly without excessive force.
3. 04_Button breaking
If the eye on 04_Button is breaking, change the print orientation in the slicer and turn on supports.

License
You shall not share, sub-license, sell, rent, host, transfer, or distribute in any way the digital or 3D printed versions of this object, nor any other derivative work of this object in its digital or physical format (including - but not limited to - remixes of this object, and hosting on other digital platforms). The objects may not be used without permission in any way whatsoever in which you charge money, or collect fees.
Comment & Rating (636)