Ultimate Breadboard Prototyping Station


Print Profile(1)

Bill of Materials


- 6PCS Breadboard Kit Includes 2PCS 830 Point + 4PCS 400 Point x 1: https://www.amazon.com/dp/B0DBQ8ML2T?ref_=ppx_hzsearch_conn_dt_b_fed_asin_title_4
- M3x40 Hex Socket Head Cap Screws x 2: https://www.amazon.com/dp/B07C9F2347?ref_=ppx_hzsearch_conn_dt_b_fed_asin_title_19&th=1
- M3x10 Grub Screw (Set Screw) x 4: https://www.amazon.com/dp/B09HXMWRMZ?ref_=ppx_hzsearch_conn_dt_b_fed_asin_title_12
- M2.3×5 self-tapping screws x 4: https://www.amazon.com/dp/B07ZH9GJWP?ref_=ppx_hzsearch_conn_dt_b_fed_asin_title_9
Description
Boost Me (for free)
Thanks for checking out my models! If you enjoy unique 3D prints—lanterns, puzzles, dioramas, containers with clever mechanics, and playful designs built for fast, satisfying prints—consider giving this project a boost. It helps my little corner of MakerWorld grow and keeps new designs coming your way. I’m always working on fresh ideas, experimenting with textures, magnets, lighting, and fun surprises to make every print feel special. Your boost keeps the creativity flowing!
Ultimate Breadboard Prototyping Station
✅ Description
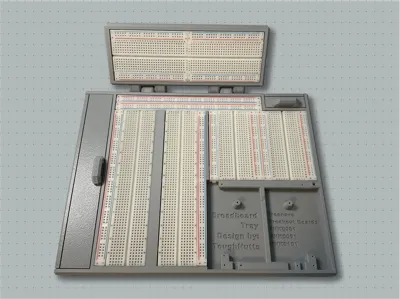
This modular 3D-printed breadboard tray creates a portable, stable prototyping workstation for electronics builds. It combines a hinged upper platform for vertical mounting, precise pockets for multiple breadboards and microcontroller breakout boards, and secure storage for jumpers and small accessories — all contained in a single organized footprint.
The hinged upper tray supports one 830-point or two 400-point breadboards. When raised, it provides improved visibility for displays, IMUs, ToF sensors, and other modules that benefit from upright positioning during wiring and testing. When laid flat, it packs neatly for transport or drawer storage.
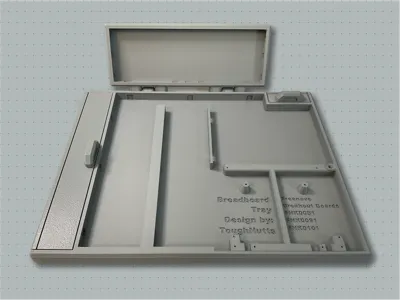
The lower base tray includes:
• Two power Rails
• Two pockets for 830-point breadboards
• Two pockets for 400-point breadboards
• A wide center channel for ESP32-S3 boards, Pico boards, or other dev modules
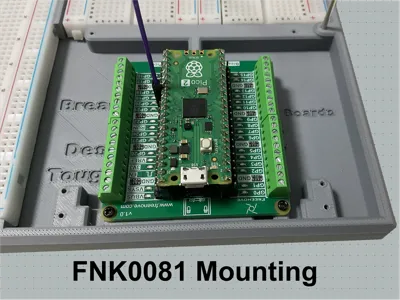
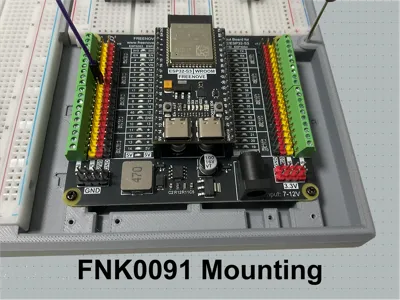
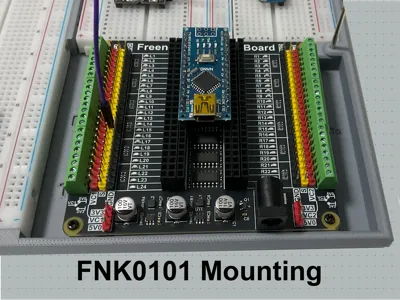
• Precise screw-down mounting posts for popular Freenove breakout boards (ESP32 / ESP32-S3, Universal, and Pico / Pico W)
Two recessed storage bins with removable lids keep Dupont jumpers, breakout parts, and power modules contained — even when the unit is tilted, stacked, or dropped into a backpack.
Side rails and hinge brackets add durability while the flat base keeps your setup stable on a workbench, classroom table, or lab cart. No more loose boards sliding around or wires getting yanked free when you shift your project.
Ideal for:
• ESP32 and ESP32-S3 prototyping
• Raspberry Pi Pico and Pico W projects
• Sensor experimentation (IMUs, ToF sensors, etc.)
• LCD/OLED display interface testing
• Classroom STEM labs or workshop use
🧩 Why This Helps
• Breadboards stay locked in place
• Wires remain tidy and accessible
• Upright tray improves module visibility
• Built-in storage prevents lost jumpers
• Everything moves as a single unit
🖨️ Recommended Print Settings
(for durability and hinge strength)
• Minimum Print Bed: 256 × 256 mm
• Walls / Perimeters: 5
• Top Layers: 5
• Bottom Layers: 5
• Infill: 10% Gyroid
• Supports: Not required for main parts (may vary by printer/material)
📦 Hardware / BOM
Item | Qty | Notes |
|---|---|---|
| Breadboard kit — 2×830 + 4×400 point | 1 | Standard adhesive-back boards |
| M3×40 hex socket cap screws | 2 | Hinge posts |
| M3×6 button head screws | 4 | Storage lid handles |
| M3 nuts | 2 | Captured included with |
| M3×10 (grub screws) | 4 | Lid hinge pivots |
| M2.3×5 self-tapping screws | 4 | Secures Freenove boards |
Links included below under More Info / BOM.
Supported / Recommended Breakout Boards
Board | Model | MCU Compatibility |
|---|---|---|
| Freenove Universal Breakout | FNK0101 | ESP32 / ESP32-S3 / Pico / others |
| Freenove Pico / Pico W Breakout | FNK0081 | RP2040 family |
| Freenove ESP32-Series Breakout | FNK0091 | ESP32 WROOM / WROVER modules |
🔧 Assembly Instructions
Follow these steps to prepare the tray and install breadboards securely.
1️⃣ Prepare the Storage Lids
• Insert the M3×10 grub screws into the side holes of each storage lid
• Adjust screws so they extend 3 mm from the lid edge
• These act as hinge pins that slide into the base tray channels

2️⃣ Install the Storage Lids
• Align each lid with the hinge channel in the base tray
• Slide forward until the grub screws seat fully
• Lids should pivot smoothly without popping out

3️⃣ Trim Breadboard Foam Tape (Optional but Recommended)
Most adhesive-back breadboards have edge tabs that interfere when mounting in a recessed pocket.
• Remove adhesive backing
• Trim ~2 mm of foam tape from the tang side
• Do not grind or cut the plastic tangs — this preserves strength and alignment

4️⃣ Trim Off Power Rails
To make placement easier, follow this sequence:
• Remove the left power rail from one 830-point breadboard
• Remove the right power rail from the other 830-point breadboard
• Connect both power rails together

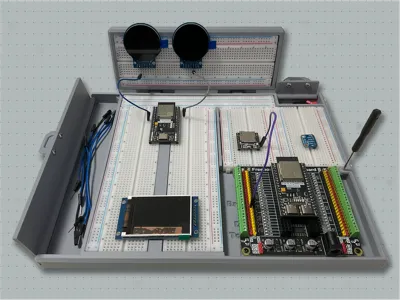
5️⃣ Install Breadboards in Number Order
To make placement easier, follow this sequence:
- Power Rails
- Lower left 830-point board
- Center channel 830-point board
- Right-side 2x 400-point boards
- Hinged tray boards (top panel); 2x 400-point boards, or one 830-point board
Press firmly to bond adhesive and fully seat the tabs.

(See: “Installation order” photo)
6️⃣ Mount the Hinged Tray
• Position the hinged tray so hinge barrels align with the base hinge supports
• Insert M3×40 hex screws through hinge pivots
• Add M3 nuts into the rear brackets and tighten securely
• Confirm smooth folding motion

✅ Finished Assembly Check
All breadboards attached, lids operational, hinge secured, everything sits flat.
Give the unit a gentle shake — nothing should slide loose.
License
You shall not share, sub-license, sell, rent, host, transfer, or distribute in any way the digital or 3D printed versions of this object, nor any other derivative work of this object in its digital or physical format (including - but not limited to - remixes of this object, and hosting on other digital platforms). The objects may not be used without permission in any way whatsoever in which you charge money, or collect fees.
Comment & Rating (9)