Baby Groot
Baby Groot
Print Profile(8)


Description
Remix of HanochH model on thingiverse, all rights go to the original creator.
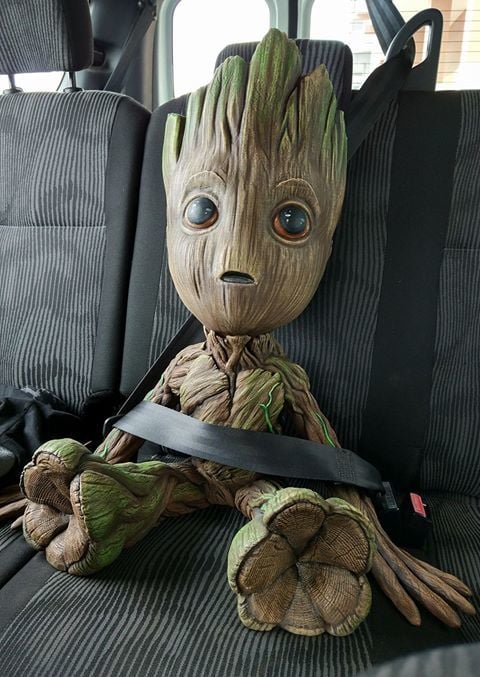
I merged the parts together and scaled to realistic size as seen in the movie. Also optimised the mesh to minimise some steeper overhangs on the details.
Body and head are best printed seperately to ensure higher quality. Head has a thick brim added to avoid any vibrations during printing, this brim can be simply broken off by hand. I also added a multicolour version for the head with the eyes printed in black in case you dont choose to paint the model.
I printed multiple of these models and painted some for friends and family. You only need basic acrylic paint, some black nail polish and some brushes to bring little groot to life. I found normal acrylic paint works great on PLA parts.
You can follow the directions below if you want to paint the model:
- Use a fairly light coloured filament to print the model, I prefer to use white or a light brown since it creates a nice base colour.
- Paint the base coat in medium to dark brown (optional: use hairdryer to dry paint quickly)
- Lightly paint a lighter wood brown colour over the darker brown coat, making sure cracks and crevasses are not filled by this layer (again can use hairdryer to accelerate drying)
- Use an even lighter brown and very little paint on the brush to very lightly brush on some highlights (let dry again)
- Make a black and dark brown dilluted wash with water and use a spunge or kitchen paper to dab it into the crevasses of the model, make sure to wipe it away with kitchen paper within a few second after dabbing it on, this ensure the lighter brown top coat keeps its light colour does not get to dark or dissolves by the wash again.
- Let the whole model dry thoroughly before painting the little vines and mossy hair with light and darker green paint and a very thin brush.
- Finally after all has dried use black nail polish to paint the eyes and make them glossy, this really brings the model to life. I put one drop of nail polish on the eyeball and then dab the nailpolish brush dry on a piece of paper and then continue using it to precisely coat the eyeball to the edges. Less is more in this case, you doint want the nailpolish to droop and can allways add a little more if you used to little.
- Finally after drying you can choose to coat the whole model in a spraypaint clearcoat to seal the paint.
The Remix of HanochH is based of this model https://www.thingiverse.com/thing:2014307 all rights to the original creator
Comment & Rating (83)


