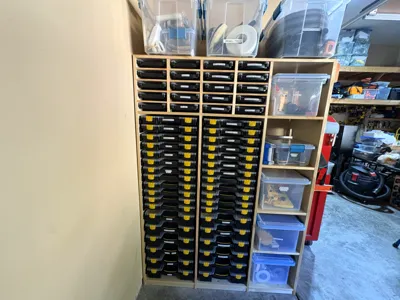
The ultimate harbor freight sortimo rack cabinet


Print Profile(5)


Description
Update: In addition to the original model, I have uploaded a profile that has the same Case Drawer Slide Adapters, but has the Drawer Slide Spacing Jigs split into 170mm long snap fit pieces. This profile will print on any Bambu Printer from the A1-Mini on up. This should make this system more accessible for many people to print. Happy Organizing!
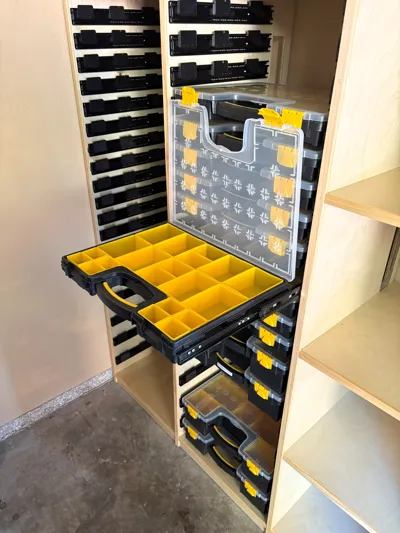
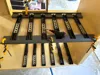
This is a remix of Kai's most excellent drawer slide adapters to allow the insertion of Harbor Freight's "Storehouse Portable Parts Storage Case" into drawer slides. I love first order accessibility. No more small parts/fastener/hardware chaos! Be the change!

The original model fits the Friho 14 inch drawer slides he used like a glove. However, I wanted to use black drawer slides (for purely aesthetic reasons), and the ones I purchased from Amazon had the drawer mounting slots in reverse of the Friho slides.
There are four primary changes to Kai's model:
- Drawer slide mounting order is reversed
- Added a new middle adapter that supports the exact middle of the cases
- Created new drawer slide mounting jigs that matched the spacing I wanted to use for both the medium and large cases
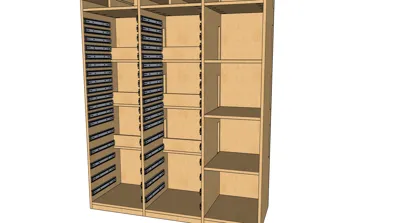
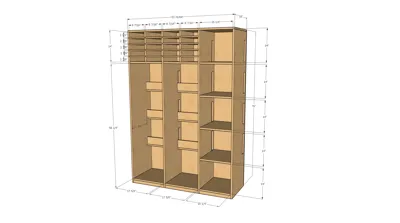
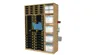
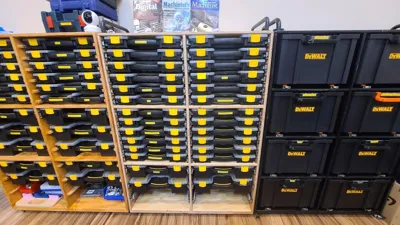
(If you are printing the drawer slide mounting jigs on something smaller than an H2D/S be aware the jigs are 352mm in length and if you can't print them angled on the plate like they are in the .3mf, you will need to use the slicer to split them and then glue them together after printing.) - Built a taller custom cabinet to hold all three versions of the Harbor Freight Storehouse Parts Cases
(24 Small, 24 Medium and 12 Large cases)
Drawer slides, “in general” use the same 3 hole drawer mounting pattern on the inner slide which is hole, vertical slot then horizontal slot. It is not uncommon however, to find some slides that have the order reversed!
From front to rear of the inner slide, the two patterns are:
- Round hole, vertical slot then a horizontal slot.
- Horizontal slot, vertical slot, round hole.
If your slides have a pattern that looks like this:

Print the adapters in Kai's original model.
If your slides look like this,

Then you print the adapters from my remix model here on this page you are looking at!
I added the custom middle support adapter because some of my parts bins get REALLY heavy when they are full! Between the creep of the plastic they used to mold the cases and the design of the lip, over time they start sagging without the center support. If you are not loading your cases heavy, you can probably get by with just the front and rear slide adapters just fine. The new middle adapter is offset similar to the rear adapter so that it sits right in the middle of the case for maximum support.
(As a side note, the center adapter has a “slot” in it that slides into one of the molding supports under the large size case rim, just like the slot in the rear adapter slots a molding at the rear of the rim. both of these slots lock the cases solidly into the adapters when pulling the cases in and out on the slides.)
The files in this model include:
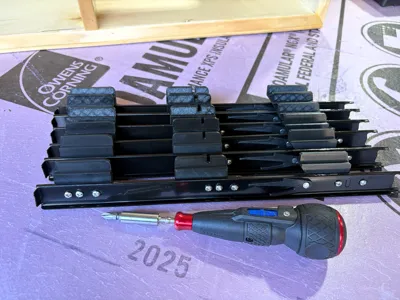
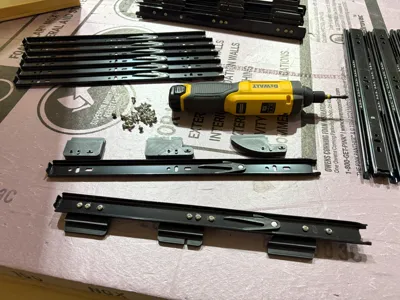
- The Drawer Slide Adapters
- Front and Rear jigs for installing the drawer slides with the proper spacing for both the Medium and Large cases
- A zip file that contains:
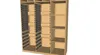
- The SketchUp Pro model I built when designing my cabinet. You can open it in the free web version of SketchUp. Every part is grouped and tagged. You can open the Tags in the Default Tray on the right side and show/hide individual parts to understand how it is constructed.
- Full cut list with measurements and sheet cutting plan for the 3/4", 1/2" and 1/4" plywood used in the construction of the cabinet
- Multiple JPG pictures of the pertinent views of the cabinet and closeups of various sections.
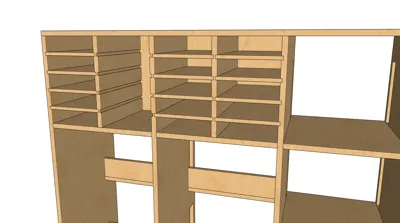
I also designed adapters for the small case, but the way the cases were designed made them awkward to use and it would have increased the expense by requiring twice as many slides so I opted to route slots in the uprights and insert ½" ply shelves. It worked out really well and the small cases are very, very useful.
To build the cabinet you will need 3 - 4'x8' sheets of ¾" plywood, 1 - 4'x8' sheet of ½" plywood and 2 - 4'x8' sheets of ¼" plywood (the ¼" is only needed if you are putting the backing on the cabinet. Mine sits against the wall so the backing was not needed. If you want a smaller cabinet, the cabinet that Kai outlined in his model is a smaller, easier to build and highly functional cabinet that still holds a lot of hardware.
The screws that come with most slides will be ½" long. They work fine for attaching the slides to the cabinet, but they will be too long by just a bit to screw the adapters to the slides. These #6x3/8" screws from Amazon work perfectly to attach the adapters to the slides. An electric screwdriver that you can control the torque on is almost a necessity for this project as there are 792 screws between the drawer slides and the adapters in total. Gets to be a bit much for doing powerless. A drill or impact driver is not suggested as it is very easy to over drive these small screws into your 3D printed adapters. Impact driver is suggested however for the pocket hole screws used to assemble the cabinet itself.
(Be aware that this is NOT a fully developed set of step by step build plans, but if you have even a bit of wood working skill there is plenty there to be able to successfully build this cabinet.)
I played around with various filaments to print the adapters and wound up using Bambu PETG-HF with a .6mm HF nozzle simply for how fast they print for me.
Happy organizing and thanks to Kai for the genius idea to create these adapters!
See how I am creating order in my shop with these other models. Might find something that is useful to you also!
Toolchest and Drawer Label Systems
Documentation (11)


Comment & Rating (31)