Raspberry pi touchscreen (v1) enclosure


Print Profile(1)

Bill of Materials
- Magnet 14x16mm x 2: Just had these to hand but anything this size or smaller will work when superglued in place
- Low profile ethernet cable x 1: https://www.amazon.co.uk/dp/B0DDKK1K2P?ref=ppx_yo2ov_dt_b_fed_asin_title&th=1
- right angle micro usb x 1: https://www.amazon.co.uk/dp/B07GNJZZJ4?ref=ppx_yo2ov_dt_b_fed_asin_title&th=1
- gorilla glue adhesive pads x 1:
Description
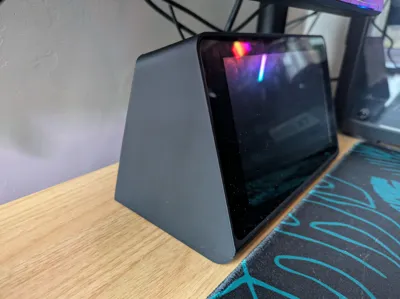
This enclosure houses a Rasberry pi attached to the back of the original Raspberry pi 7" touchscreen (which came out a while ago!)
I've had a raspberry pi 3b+ and the touchscreen hanging around for a while and never had a permanent project to use them for.
I've started using Home assistant so thought i'd set up a desktop controller with these components but couldn't find an enclosure i liked.
It's similar is design to an older Amazon Echo Show and holds the screen in with the use of two magnets. The indents for the magnets are big enough that if you don't have the size i had, you can still superglue some different ones in there.
There's a pass through hole in the rear which i'm using to supply power and ethernet.
So far this works great although it is a little front heavy as i wanted to make the enclosure as small and compact as possible, which means not much material. I've countered this by using some adhesive pads on the bottom to hold it flat in place on my desk, which allows me to poke it without it sliding around!
Print the text fit piece first to make sure your screen will fit nicely before commiting to the full enclosure.
*Notes - there are a few pieces of hardware that will improve your experience with this model, total cost around £12-15
- I've had to use a right angle micro usb adapter to get the power cable to fit in without interfering with the enclosure. Unfortunately, without this adapter cable, the rigid part of the standard power cable is just a bit too long and pushes against the inside of the enclosure. Here's the one i used: https://www.amazon.co.uk/dp/B07GNJZZJ4?ref=ppx_yo2ov_dt_b_fed_asin_title&th=1
- A standard Ethernet cable will have the same problem so i ordered a more flexible low profile one: https://www.amazon.co.uk/dp/B0DDKK1K2P?ref=ppx_yo2ov_dt_b_fed_asin_title&th=1
- I used two magnets i had hanging around roughly 14mmx16mm. anything this size or smaller could be used when superglued into the indents.
- Just some gorilla glue adhesive strips i had hanging around!
License
You shall not share, sub-license, sell, rent, host, transfer, or distribute in any way the digital or 3D printed versions of this object, nor any other derivative work of this object in its digital or physical format (including - but not limited to - remixes of this object, and hosting on other digital platforms). The objects may not be used without permission in any way whatsoever in which you charge money, or collect fees.
Comment & Rating (4)