Raspberry Pi 4 & 5 Mini Server Rack Case


Print Profile(4)


Description
Boost Me (for free)
Boost this model if you like it. I use rewards to buy more filament.
Edit 5/7/25: Aded a folder of sleds with larger holes for threaded inserts. These sleds have 3.9mm holes for threaded inserts.
Edit 4/3/24: Removed experimental Pi3 sled models. If you need a Pi3 sled, go check out Bald Print's excellent remix for a tested Pi3 sled: https://makerworld.com/en/models/411343
Edit 3/20/24: fixed hole size for threaded insert sleds. Previously it had been 3.7mm, it is now 3.3mm.
Edit 2/14/24: uploaded version of files that does not require heatset threaded inserts and uses same screws for top and securing sleds. Should only require socket head M4 screws for frame, and M2.5 to secure the Pis to the sleds.
Raspberry Pi Mini Server Rack
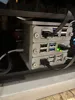
I made a mini server rack where each sled holds a single Raspberry Pi, for a total of 3. There are sleds already made for Pi4B and Pi5 where all front and side I/O is accessible. There is also a "blank" sled with no I/O cutouts, if needed to modify to fit your own needs. The Fusion 360 model is parameterized, so if needing to have more or less sleds, the rack can be customized to fit.
There are 2 versions uploaded - one that uses heatset threaded inserts (M4 & M2.5) and one where the screws thread directly into the plastic. The threaded insert version will be more durable and be able to be reassembled more, however.
This is inspired by this model from Thingiverse. I needed it to support both Pi4 and 5, but the model only had a sled for Pi3 and threaded screws directly into the legs - which broke for me when assembled. So, I decided to make my own from scratch.
Models
There are 2 folders of files - “Heatset Inserts” and “No Heatset Inserts”. All models are named the same between the 2, only difference is the size of screw holes.
- rack_frame.stl - default frame that can hold up to 3 rpis
- rack_top.stl - attaches to top of frame to stabilize the frame arms
- pi4_sled.stl - sled for holding a rpi 4B
- pi5_sled.stl - sled for holding a rpi 5
- sled_lid.stl - lid that slides into slot on top of sled
- blank_sled.stl - sled with no I/O port holes (included if you want to modify to fit your needs)
- rack_frame_4_sleds.stl - frame that can hold up to 4 rpis
- rack_frame_5_sleds.stl - frame that can hold up to 5 rpis
- pi_mini_rack.step - STEP file if you want to modify and extend the design
Bill of Materials
For the rack:
- (1x) rack_frame.stl
- (1x) rack_top.stl
- (4x) M4 heat set inserts (depending on models used)
- (4x) M4 x 10mm screws
For each sled:
- (1x) sled model of your choice
- (1x) sled_lid.stl
- (4x) M2.5 x 4mm heat set inserts (depending on models used)
- (4x) M2.5 screws
- (2x) M4 heat set inserts (depending on models used)
- (2x) M4 x 10mm screws
Assembly
These directions depict the heatset insert version.

For the rack, set the M4 inserts into the holes on the top of each leg, making sure they sit just below the top of the legs. The frame is reversible, so decide on which side you want to insert the sleds into and set the inserts into the holes you will use. Use the M4 screws to attach the top to the frame.
For each sled, set the M2.5 inserts into the posts for the Pi. Set the Pi into the sled, making sure the USB & ethernet ports are flush with the front of the sled. For the Pi4, I've found it easiest to slightly bend the side outward to allow the 3.5mm port to go into the cutout with the USB/ethernet ports aligned. Use M2.5 screws to attach the Pi to the sled. Slide the lid in from the rear (its a dovetail joint and can be tight).

Align the slots in the frame with the guides at the bottom of the sled. Slide the sled into the rack and secure to the frame with an M4 screw on each side. Attach the needed I/O and power the sled up.

License
You shall not share, sub-license, sell, rent, host, transfer, or distribute in any way the digital or 3D printed versions of this object, nor any other derivative work of this object in its digital or physical format (including - but not limited to - remixes of this object, and hosting on other digital platforms). The objects may not be used without permission in any way whatsoever in which you charge money, or collect fees.
Comment & Rating (302)