DUMMY 13 - Acrobatics pedestal V2.3

Remixed by
Copyright Claim

DUMMY 13 - Acrobatics pedestal V2.3

Remixed by
Boost
50
104
25

Print Profile(5)

All
A1 mini
P1S
P1P
X1
X1 Carbon
X1E
A1

V2.3 Sockets and both pedestals
Designer
6.7 h
7 plates
5.0(1)

Accessories, 0.16mm layer, 2 walls, 25% infill, PETG!
Designer
21 min
1 plate

0.16mm layer, 2 walls, 25% infill
35 min
1 plate
5.0(8)

0.16mm layer, 2 walls, 25% infill
37 min
1 plate
5.0(1)
Click to see more

Boost
50
104
25
1
261
85
Released

Description

23. Apr. 2024 V2.3:

  • New pedestal added for well-tuned printers
  • *Note the assembly instructions

04. Jan. 2024 V1.5:

  • Additional sockets added

30. Dec. 2023 V1.4:

  • Additional hands for handstand

25. Dec. 2023 V1.3:

  • Ankle for high-heel-booties added

25. Dec. 2023 V1.2:

  • Additional base added


Based on DUMMY 13 Beta - Oct. 2023

DUMMY 13 Printable Jointed Figure © 2023 by Lucky 13 Toys is licensed under CC BY 4.0
  • Used the ankle for a new design
  • Used the hands for handstand version
  • All other parts are my own design

You will find more of such stuff in my collections:

https://makerworld.com/en/u/2185604356/collections

Description

I started this as an experiment, but it worked surprisingly well.

  • Very easy to print
  • Allows the feet to be fixed by replacing the ankle part
  • Allows DUMMY 13 to adopt some pretty crazy poses
  • Use it to prevent DUMMY 13 from falling over so easily
  • It offers 5 different and rotatable cut-outs that help to find the right balanced position
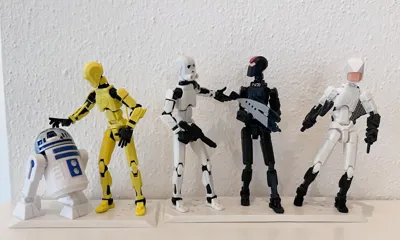
  • You can even place several DUMMY 13s on it and create scenes
  • I have added sockets into which you can simply place the pedestal

Let the pictures inspire you.


Assembly:

Pedestal v2.3:

  • V2.3 has been designed for well-tuned printers
  • The inlays are much more sturdy
  • Align the model so that the side without the version text is later the smooth side
  • After printing, press in the inlays with your fingernails from the side that was not on the printing plate
  • You will hear a “cracking” sound
  • Do this around the entire inlay until the inlay is loose and can rotate

Pedestal v1.5:

  • V1.5 has been designed with a fairly loose tolerance so anyone should be able to print it in place
  • Replace the original ankle
  • Slide the ankle into the pedestal
Can now also be used with high-heel-booties

Comment & Rating (25)

Please fill in your opinion
(0/5000)

These are awesome😁 I was thinking maybe the base should be little wider? Now it skips in some positions. I scaled these to 160% as i got the dummy too, fits like an glove😎 Made with PETG.
(Edited)
The designer has replied
1
Reply
Thank you, I'm very pleased you like it :) Are the inlays still rotatable at this scale? The tolerances were designed for the original size and I would have bet that if the scale was changed, the tolerances for the inlays would be too loose or too tight. I can't tell from your pictures if they are still rotatable, but I think not and that would be the cause ;) The rotating inlays are the essential part of this design. You rotate them until you get a balanced position for your Dummy. This way neither the weight nor the size of the base matters as you use the weight of the Dummy itself. Please have a second look at my model. I have provided different sockets in which the pedestal can be inserted (as you can see in the pictures). This way you not only get a nicer result, but also more weight and wider surface which might help in your case. I hope I was able to help and look forward to your feedback. Have fun.
(Edited)
0
Reply
Replying to @Mici :
I noticed they rotate after i wrote here. Yes all 5 moves😁 Thank you for your reply!
0
Reply
Replying to @FinnishHer :
Great, so they're still working at 160%. Please feel free to upload this as a profile, as there are many people who scale their dummies and would surely enjoy it :)
0
Reply
The portion of the pedestal where the joint attaches also rotates which makes it much easier to distribute the weight on the fly!
The designer has replied
2
Reply
I'm glad the tolerances also fit for you. Thanks for your comment and have fun :)
0
Reply
You pretty much created a new category for stuff with Dummy 13, thanks for sharing it! These were printed in a mix of PLA and PETG. PETG works very well for the frames, while PLA may loosen over time,
2
Reply
Print Profile
0.16mm layer, 2 walls, 25% infill
Printed nicely and assembled with ease. Now, ready for some armor. Thanks!!!
1
Reply
Print Profile
0.16mm layer, 2 walls, 25% infill
Passt perfekt, gute Arbeit! Danke.
1
Reply
Print Profile
For the 160% Dummy 13, made with PETG
Great model to access how my A1 Mini does the job. I am elated! Thank you!
0
Reply
Love this. I work at an emergency room and we are trying to build a diorama with Dummy 13 and this stand is amazing. Is it possible to create a 4x12 of just the slots?
The designer has replied
1
Reply
Wow, I would never have thought that this model would ever be used for such a good cause :) Of course I'd be delighted to help you out. Could you please send me a sketch of how you imagine it? I'm not sure what it should look like at the moment. And thanks for your support. My very first earned boost token :D
(Edited)
0
Reply
Print Profile
V2.3 Sockets and both pedestals
Looove it!
0
Reply
Print Profile
0.16mm layer, 2 walls, 25% infill
cool
0
Reply
Print Profile
0.16mm layer, 2 walls, 25% infill
0
Reply