Bambu P1 and X1 Sliding Vents Glass Top LED Enclosure / Riser

Remixed by

Bambu P1 and X1 Sliding Vents Glass Top LED Enclosure / Riser

Remixed by
Boost
212
428
81

Print Profile(2)

All
P1P
P1S
X1
X1 Carbon
X1E
A1

0.2mm layer, 3 walls, 15% infill
Designer
25.9 h
6 plates
4.7(51)

0.2mm layer, 3 walls, 15% infill
3.9 h
1 plate
4.0(2)

Boost
212
428
81
2
989
1.1 k
Released

Description

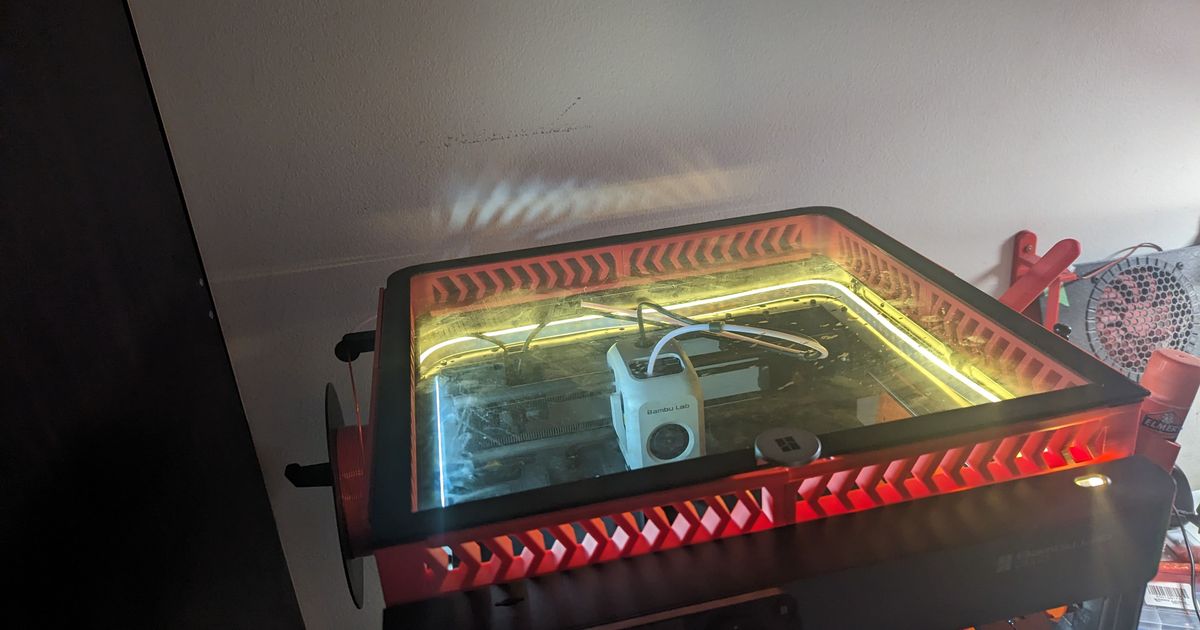
Glass Top Riser with adjustable vents to suit Bambulab X1 and P1 Series Printers. The Frame is designed to be able to stick up to 10mm wide COB LED Strip around the inside edge. The TPU Light Shield on top of the frame gives the glass a soft surface to sit on as well as prevents the light from the LED strip from shining into your eyes when looking down and around the printer. I've linked videos below of before and after from the printer camera.

For the material of the frame, I would recommend PETG or another filament that withstands higher temps if you plan on using high-temperature materials on the printer. The entire frame is around 420g of filament and about 50g for the Light Shields.

The frame is printed in 4 parts along with the TPU Light Shield as well.

Recommended Frame Settings for PETG (Overture):

  • 0.2mm Layer Height
  • Nozzle Temp 250°C
  • 3 Wall Loops
  • 4 Top and Bottom Shell Layers
  • 15% Gyroid Infill
  • Outer Wall Speed - 70mm/s
  • Inner Wall Speed - 100mm/s
  • Sparse Infill Speed - 90mm/s
  • Internal Solid Infill Speed - 85mm/s
  • Top Surface - 70mm/s
  • Bridge - 20mm/s

After Printing there are ~6 interior supports on the bottom of the sliders. To break them fee gently apply pressure with a screwdriver, preferably from the inside along the bottom. You'll hear a few pops as they break free.

For the LED Strip I used the below from Aliexpress as it comes with tape on the back. If you have a P1 series the USB dimmer version works great and can be plugged into the USB port on the printer.
https://www.aliexpress.com/item/1005005014791592.html

Tip for if you ever try to stick something to PET plastics. They have a low surface energy and glues will not stick well to them. To give them a high energy surface grab a butane torch preferably or lighter and run the inner cone (bright little tip inside a flame) along the surface. Don't let it melt or brown.

If using a P1S you may also want to use these seals I made so the frame sits flat.
P1S Seals


Before LED Strip Installed:

After LED Strip Installed:

Comment & Rating (81)

Please fill in your opinion
(0/5000)

Print Profile
0.2mm layer, 3 walls, 15% infill
This came out amazing this was my very first print using bambu labs p1s and the studio. Thanks for the great design work and fitment. I went with three colors
1
Reply
That looks cool! How much poop did that generate?
0
Reply
not to much I change the flush rate to .5 and add flush into infill
0
Reply
Great design, thanks a lot! I had trouble with 1 of the doors being stiff, but I reprinted it exactly the same and it was good. I like this design because it looks part of the printer. It gives plenty more room for the Bowden tube above the print head, and this has fixed a lot of my AMS jams. The joints were a bit loose as mentioned, but when you put the glass in it holds it all square. I haven't used any glue and it works great.
(Edited)
2
Reply
In general, I like the design. but I'm wondering if the distance between the parts isn't a bit too big (see my screenshot). Even when closed, a lot of warm air escapes. What are your experiences?
The designer has replied
0
Reply
I’ve never had an issue with it myself
0
Reply
Print Profile
0.2mm layer, 3 walls, 15% infill
One of my longer prints and quite happy with the result. I gave it 4* because it's more designed towards the P1S instead of the X1-C. It fits perfectly on top but there is no hole or area where the power cable of the led lights could go through. Also, in my case that is, the vents are a bit too loose. They tend to close themselves when they are opened because of the vibrations the printer makes.
1
Reply
Hi OP, how did you get the green glow around the perimeter? Is it just a filament transition in your design (color by layer) or another print?
0
Reply
Never mind. I think I found it on your drawer riser system. Thanks for sharing. Looking forward to seeing how it turns out. https://makerworld.com/en/models/185440#profileId-204184
0
Reply
Print Profile
0.2mm layer, 3 walls, 15% infill
Printed very well, only issue I have is where the pieces connect it is very loose. Have to epoxy it together other than that it is perfect. Printed in BL PTEG.
1
Reply
Print Profile
0.2mm layer, 3 walls, 15% infill
looks amazing! ony down side is that there is no possibility to screw it down on the printer
0
Reply
Print Profile
0.2mm layer, 3 walls, 15% infill
these are perfect risers
0
Reply
Print Profile
0.2mm layer, 3 walls, 15% infill
This model is exactly what I was looking for. It looks awesome, thanks a lot!
0
Reply
Print Profile
0.2mm layer, 3 walls, 15% infill
The print profile worked perfectly👍 Perfect Design love it
0
Reply