Chimera - DIY Silicone Sock
Chimera - DIY Silicone Sock


Print Profile(1)

Description
About
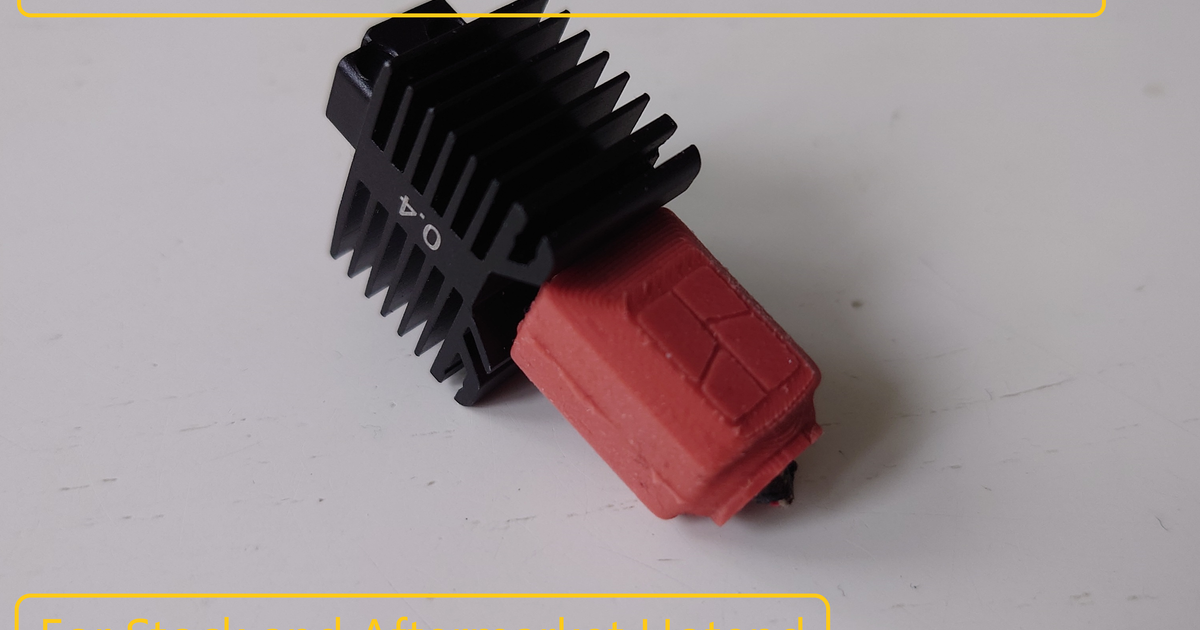
This is a DIY (Do It Yourself) Silicone Sock for the Chimera Hotend for the Bambu Lab X1C, P1P and P1S printers.
Read more about the Chimera Hotend.
The silicone sock greatly improves the thermal stability of both the heatblock and the nozzle, without a silicone sock you can experience a temp drop as the parts cooling fan cools it too much and you get “nozzle temperature malfunction” and the print is paused and you need to manually resume it. With the sock the temp is stable.
There is also a DIY silicone sock for the Stock Hotend.
BOM - Bill of Materials
All you need is some high temp silicone intended for making gaskets. These are usually rated at 300+ C temp, it's important it's rated at a minimum of 300 C. I've tried a couple of different silicone brands and both worked great. Although I've not tried this one personally, it's inexpensive and I believe it should do the job:
The good thing about silicone on tube is you don't need a syringe to apply it, although it can be a bit more difficult to apply as it's generally not as viscous and a little stickier / messy.
The one's I've successfully used are these:
Both were a joy to use and neither require any silicone mold release such as a PTFE spray or soapy water. However, keep in mind the Troll Factory one is a two component silicone, meaning you need to mix two equal portions in a mixing cup then use a syringe:
I will cover this further down in the guide. The upside of this is it's much cheaper per silicone sock made and you can add silicone color pigments for different colored socks if you like. :)
Some silicone brands will require using a silicone mold release, check with the manufacturer.
What to print
Print one of each of the following included models:
- chimera-silicone-sock-front-1.0.3mf
- chimera-silicone-sock-rear-1.0.3mf
- chimera-silicone-sock-inner-1.0.3mf
- silicone-sock-outer-case-1.0.3mf

Also, if you use a two component silicone (like Troll Factory), print the mixing cup as well:
- silicone-mixing-cup-1.0.3mf

Print the parts in the direction I have set them, no supports are required. You can print the tools in just about any filament.
I recommend using a 0.40 mm nozzle (or smaller) with a maximum layer height of 0.20 mm.
The parts here were made using a Chimera Hotend with 0.4 mm CHT nozzle and 0.20 mm layer height.
How to use
Start by assembling the three parts of the silicone mold and then insert it into the outer casing:


The outer casing ensures the mold does not open / widen. If it's too tight to fit in the outer casing, sand it slightly but it's important it's really snug, there is intentionally a small gap on the sides to make it easier to insert and remove the silicone mold.
You will still get some silicone escaping on the sides but it's not concern, it's easily cleaned up.
1A) Single Component Silicone
If you use single component silicone just fill the bigger hole slowly until silicone starts escaping from the small hole. Single component silicone is usually not very viscous so it will take more force, be patient and keep squeezing:


Give the box a couple of knocks against the table and fill a little more to ensure there are no air bubbles. Let it rest for a minimum of 24 hours so it's fully cured. Continue at step 2.
1B) Two Component Silicone
If you instead use a two component silicone like the Troll Factory silicone I linked to it's a little more work. Start by measuring equal parts of each component and add them to the mixing cup. One silicone sock requires around 3-4 g of liquid silicone but I suggest you make two socks and mix a total of around 12 g of silicone to be on the safe side. I recommend using a scale to weigh the bottles so you know how much you use.
It's also easier to draw the silicone into the syringe if there is more silicone in the cup:


Mix them properly with a spoon.
If you like you can use silicone pigments to color the silicone sock as well as you can see below but for this guide we'll stick with standard red silicone:

Draw up the silicone into the syringe. You will likely also draw up some air but don't worry about that, we will ensure it is all removed when applying in the mold.


Next, insert the syringe in the larger hole and start filling it. Remove the syringe when it starts oozing out of the smaller hole. Repeat a couple of times until there is no more air in the syringe. Don't worry if there is silicone spilled out of the small hole, it's easily cleaned up once it has set.


Give the box a couple of knocks against the table and fill a little more to ensure there are no air bubbles. Let it rest for a minimum of 24 hours so it's fully cured.
2) Removing the Silicone Mold
After 24 hours have passed it's time to open the mold and clean up the silicone sock. Use your fingernails and/or scissors for the cleanup. There is a small slot on the side where you can insert a flat head screwdriver or a knife if you need help forcing it open, open it slowly and carefully.


To remove the silicone sock from the inner part, carefully pull and rotate the sock and it should eventually come off unharmed.
Once the silicone sock is cleaned up, do the same with the molds and mixing cup, the silicone will just peel off so it can be used again.

Done!
Tip: When you install the silicone sock it is easier if you loosen the heatbreak grub screws and slide out the heatblock a little as seen in the video on top of this page.