Automatic Brush Washer


Print Profile(8)


Description
Membership
If you want to use this project for commercial purposes, you can join the Commercial License Membership. With this license, you will have the right to produce and sell printed versions of the Shadow Hunter Slingshot, directly supporting my work and allowing me to continue creating new 3D printable projects
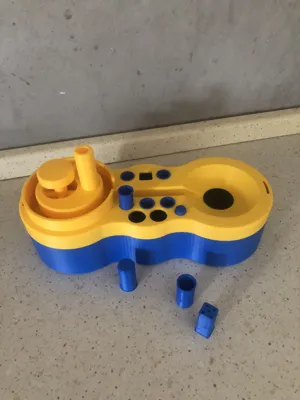
🖌️ Automatic Brush Washer – complete painting system
I designed an automatic brush washer for those who want a clean, functional, and organized painting setup. It’s not just a water container – it’s a full system with controlled filling and fast draining.
🔧 Main features:
🫙 Water tank: uses a standard Nutella jar as the main reservoir – easy to find and with good capacity.
💧 Automatic filling system: water flows into a cleaning tray, and when it reaches the right level, a mechanism automatically stops the flow.
🧼 Drain system with button: press a button and the tray opens to drain the dirty water, then closes again by itself.
🧴 5 side containers: perfect for holding brushes, spatulas, and other tools, always within reach.
🎨 palette slots: designed to hold a tray with 8 color wells, so you can keep everything compact and in one place.
📦 The project includes all the STL files you need to print the full brush washer.
🎯 This project is part of the Painting Tools contest on MakerWorld.
💬 What do you think of the project? Got ideas, suggestions, or improvements you'd make?
Drop a comment – I'd love to hear your feedback!
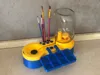
There are two top versions available for this Automatic Brush Washer:
🔵 Standard Top: designed for controlled and precise water flow. It keeps the basin at a lower level, using less water. In my tests, I painted for over an hour and still had a good water reserve left. Ideal for longer sessions or for those who rinse their brushes less frequently.
🔴 Fast Flow Top: has a wider opening that fills the basin more. This makes it easier to wash larger brushes or tools but also results in faster water consumption. In my tests, with this version, the water reserve ran out in about 30–45 minutes, depending on how often you rinse.
Both versions use the same components and have identical assembly instructions.
Choose the one that best fits your painting style!
Boost Me (for free)
🚀 Se ti piace l’idea, lascia un boost! Ogni supporto fa la differenza. 🙏
ASSEMBLY INSTRUCTIONS
This project is very easy to assemble – most parts fit together intuitively without the need for tools.
I’ve included instructions only for the two most complex steps:
Gluing the water mechanism to the top part of the station, where the Nutella jar will be placed.
Mounting the open/close mechanism that controls the water flow and drainage system.
🔧 Step 1 – Gluing the water mechanism to the top part
Apply a small amount of superglue (cyanoacrylate) into the predefined holes on the elevated top part (the main structure).
Then, place the water mechanism on top:
✅ It fits perfectly – it’s very easy to position and impossible to get wrong thanks to the hole layout.

🔧 Step 2 – Assembling the water flow mechanism (drain system)
Place the three springs onto the three pillars (small vertical supports).
Insert the sliding closure part on top of the springs (this is the piece that moves to open/close the water flow).
Insert and glue the two cylindrical blocks:
Add a small drop of superglue on top of each block.
While the glue sets, gently press the sliding part downward for about 10 seconds to ensure correct alignment.
Then, apply a bit of glue again on top of the cylindrical blocks, and attach the top part down onto them to lock everything in place.
3.


4.

License
You shall not share, sub-license, sell, rent, host, transfer, or distribute in any way the digital or 3D printed versions of this object, nor any other derivative work of this object in its digital or physical format (including - but not limited to - remixes of this object, and hosting on other digital platforms). The objects may not be used without permission in any way whatsoever in which you charge money, or collect fees.
Comment & Rating (169)