Search models, users, collections, and posts

Modular Paint Station

Print Profile(2)

All
X1 Carbon
H2S
P2S
H2D Pro
P1P
X1
H2D
X1E
A1
H2C
P1S
X2D
A2L

0.2mm layer, 2 walls, 25% infill
Designer
38.2 h
19 plates
4.4(13)

0.2mm layer, 2 walls, 15% infill
Designer
5.3 h
1 plate
1.0(1)

Open in Bambu Studio
Boost
2650
6781
133
107
2.1 k
246
Released 

Bill of Materials

Bambu Filaments
Select all
Black (65103) / Filament with spool / 0.5 kg
Translucent Purple (32700) / Refill / 1 kg
Translucent Olive (32500) / Refill / 1 kg

Description

Content has been automatically translated.
Show original

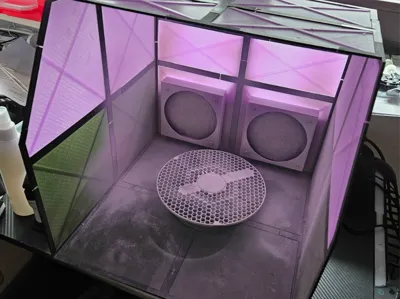
Since I sometimes want to paint 3D Printed models, I designed this modular spray booth.
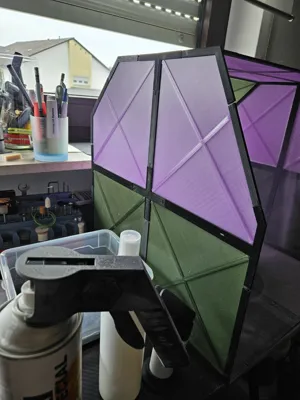
The individual connectors are prepared for rod magnets (2x5 mm), but they also hold the segments firmly together without them.
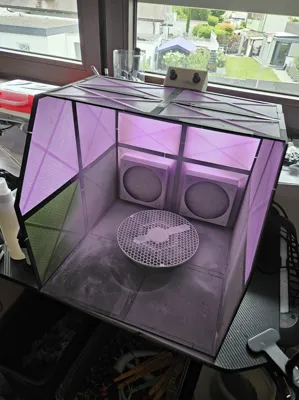
Two fans fit on the back, which extract paint mist through internal filters.

The individual wall elements have a length of 18 cm, resulting in a base area of approximately 36 x 36 cm.
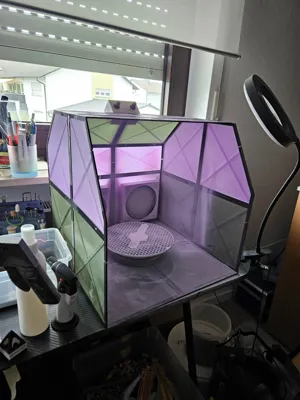
Thanks to the many different connectors, the wall elements can be assembled very individually. The square setup has proven effective for me. 

!!! When printing the connectors, please refer to the second print profile !!!

A connection box to bring the fan control to the front is included and can be easily attached to the outside with double-sided tape.

A small turntable fits well into the spray booth.
I printed the wall elements in PETG Translucent, as I wanted to use it up and thus some light comes through the sides.
For illumination, LED strips could also be attached inside, as long as too much paint is not sprayed and thereby covers the LEDs.

Boost Me (for free)

If you like my model, I would appreciate a free boost. This helps me offset time and material costs and continue to make more models available for free in the future. Thank you for your support!


Documentation (2)

Assembly Guide (2)
Verbindungselemente.pdf
Wandelemente.pdf

Comment & Rating (133)

(0/1000)

nice idea, but i see a few concerns here. PC fans are not powerful enough to pull enough cfm for overspray. there are plenty of youtube videos explaining this. i also wouldn't recommend spraying varnish or anything flammable with pc fans. those are the type of fans that could ignite aerosol since the electronics arent completely protected. looking at the back of your fans there is paint on the blades. you dont have enough filter on the front to catch the spray, so it looks like the spray is still going to moving around the room. hope no one makes this thinking its going to keep them safe from the spray. if you choose to use it, wear a proper respirator, and use it in the garage. it will eventually coat everything with paint in the room.
The designer has replied
20
Reply
Thank you for your thoughts on the component A respirator should always be used when spraying paint, regardless of whether extraction is used or not Always read and follow the safety instructions for paints and lacquers You are right, PC fans are not the best choice for this, but still better than no extraction at all I used "paint filter" material It's quite good In the first attempts, I did not cut it precisely enough For hobby use, this extraction system should be sufficient Priming miniatures with a small airbrush works very well However, the system reached its limits when attempting to paint larger parts with a spray can
Show original
2
Reply
I wonder if these exhaust fans would work.
0
Reply
>i also wouldn't recommend spraying varnish or anything flammable with pc fans. those are the type of fans that could ignite aerosol since the electronics arent completely protected. This is not correct, PC fans do not use brushed motors, they do not generate sparks like a brushed fan does. While the coils are not inside an enclosure, the wire is enameled, and the voltages involved are low enough to not generate sparks or lead to ignition.(Edited)
designer
8
Reply
Just got it together. waiting for my fans to arrive. but it looks great.
The designer has replied
7
Reply
WOW, that looks absolutely clean! Thanks for sharing the pictures with us! Have fun painting
Show original
1
Reply
hope your LEDs last with no paint on them. placing them in the back near fans is a recipe for the overspray to cover them over time.
0
Reply
Looks super impressive. Good job! I wonder if there’s something you can coat the LEDs with that would keep paint from sticking and just wipe clean?
0
Reply
I found the project interesting enough that I decided to print it If I can offer some advice it is to create a new profile with the correct supports Unfortunately I printed everything from the first profile without noticing the comments that indicated the addition of new supports I unfortunately wasted a lot of material for nothing because many supports did not fit together I am currently stuck and printing the new ones
The designer has replied
Show original
designer
3
Reply
Thanks for the heads-up, I have now clearly highlighted the second print profile for the connectors in the text What is visible in the picture looks good
Show original
0
Reply
Print Profile
0.2mm layer, 2 walls, 25% infill
Its a good model, but i think the design its not thinked to be printed...
The profile uploader has replied
0
Reply
What specifically do you consider unsuitable for printing in this design? And have you attempted to print it, or is this merely conjecture?
(Edited)
Show original
1
Reply
Replying to @rike_und_micha :
Regrettably no reply was forthcoming
Show original
0
Reply
Replying to @rike_und_micha :
Obviously i´ve tried to print it.. it includes minimun supports, needed to print it but impossible to separate... maybe some panels with the "insert" areas just one sided?
(Edited)
1
Reply
Boosted
What settings did you use to print the thinner connecting edge cleanly? I blindly used the print profile, and it's printing supports in that area that I can't remove. This makes the edge too thick to connect to the connecting pieces. I wasted a lot of filament because I only noticed it afterward. Also: Please include in the description which screws you used to attach the fan/filter chamber. Thank you.
The designer has replied
0
Reply
I printed the supports in PLA and the plates in PETG. This way they could be easily removed like a frame. I use M3 screws and heat-set inserts for the screws.
Show original
0
Reply
The supports are absolutely not good
The designer has replied
Show original
0
Reply
Did you test the second print profile for the connectors
Show original
0
Reply
Print Profile
0.2mm layer, 2 walls, 25% infill
(Edited)
The profile uploader has replied
profile
1
Reply
Thank you for your review What kept it from a five-star rating? What adjustments should be made?
Show original
0
Reply
Replying to @rike_und_micha :
I would give it a five-star rating if it featured a single air outlet unifying both fans in a single duct Ideally, the design should concentrate airflow in a single direction for enhanced efficiency
Show original
0
Reply
Replying to @JuakoArg :
This is an intriguing concept for future expansions However, you currently rate the present print profile with four stars If there were no issues with the print profile, I would be grateful if you would adjust your rating
Show original
0
Reply
What kind of fans are these, do you have a link? best regards
The designer has replied
Show original
0
Reply
120mm PC fan. I don't have a link, they were just lying around here
Show original
0
Reply
Replying to @rike_und_micha :
servus could it be that the intermediate pieces are too short by 189g? I'm assembling but have too much overlap in between
Show original
0
Reply
Replying to @PatrickderEchte :
This was created without play. If the plates do not fit 100% into the corner pieces, then the middle connectors may have some play
Show original
0
Reply
I will print the cabin and modify its length, height, and depth. Furthermore, the cabin will receive a 100mm fan with 230 volts, as well as pre and activated carbon filters. If I manage it, the cabin will also get a water wall (airbrush cabin with water wall), and once the cabin is finished, I will post pictures.
(Edited)
The designer has replied
Show original
1
Reply
This sounds like a great project I'm very excited and look forward to pictures
Show original
1
Reply
Replying to @rike_und_micha :
But that might take a while longer, as I'm currently busy with planning in the basement room. What and where things should go and I'll only start printing when my Bambu H2S arrives in the summer. Since I will be scaling up the segments a bit.
Show original
designer
1
Reply
Replying to @maikp :
Then have fun setting up the basement room. Printing isn't going anywhere. I'm still excited to see your result
Show original
0
Reply
I can't imagine using this for more than an air brush. a small air brush. if your doing more than that you should just go outside
The designer has replied
designer
2
Reply
That's exactly what it's meant for
Show original
0
Reply
what about with a grinding tool?
0
Reply

License

This user content is licensed under the MakerWorld Exclusive License.

You may create derivative works based on this object, provided that all such derivative works are published exclusively on the MakerWorld platform and include proper attribution to the original creator. You may not share, upload, host, distribute, or publish this object—or any derivative work of this object—on any other digital platform, marketplace, or distribution channel. Commercial use of this object and any derivative works is strictly prohibited. This includes, but is not limited to, selling, renting, sublicensing, or using the object in any context in which you receive monetary compensation or other financial benefits.