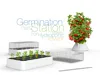
Search models, users, collections, and posts

Germination Station

IP Report

Print Profile(2)

All
X1 Carbon
H2D
A1
X1E
P1P
X1
P1S
H2D Pro
H2S
P2S
H2C
X2D
A2L

Germination Station for Tower Hydroponic System
Designer
7.8 h
3 plates
5.0(13)

Germination Station Top
Designer
4.8 h
1 plate
4.9(8)

Open in Bambu Studio
Boost
894
2512
63
53
1 k
264
Released 

Bill of Materials

Bambu Filaments
Select all
Clear (32101) / Refill / 1 kg
Transparent (60103) / Filament with spool / 1kg
PC
x1
White (45100) / Filament with spool / 1kg
ASA
x1

Description

Germination Station for Tower Hydroponic System


Introduction

After publishing the Tower Hydroponic System , it became clear that home growing is a topic that resonates with many. The tower itself turned out to be quite advanced and naturally sparked ideas for expansion. Accessories practically begged to be added. Today’s post is dedicated to one of them — the Germination Station.

If you're already familiar with the field, you don’t need an explanation. But for beginners — this is basically a mini-greenhouse, a nursery box for sprouting seeds. A compact incubator for your future seedlings — lightweight but thoughtfully designed.

Upcoming Accessories

And there's more to come. New accessories are already being prepared. For example, a new tower section with modified geometry. I’ll also be publishing extension modules that allow you to increase the tower’s height. In development — a lighting module and a controller for managing the lights and pump.

Also in progress: an external container with fittings to connect to a larger tank with nutrient solution. This is useful for crops with high nutrient demands. You can hide the tank below and set up a proper circulation system. If you have multiple towers, they’ll work together as one system.

Support and Feedback

Boost Me (for free)

So follow, like, and boost — that really speeds up my development process. When I see interest, I move faster.

Printing Materials

Everything that will be exposed to UV should ideally be printed from ASA plastic. PLA and PETG will degrade within a season or two. ABS with UV-protective coating is also an option, but ASA is better.

I recommend printing both the tower and the Germination Station container from ASA — and in white. Why white? First, it reflects light, which means less heat. Second, reduced temperature keeps the root zone healthy. Overheating is bad news for plants.

Dome Material

The dome is best printed in transparent PETG because it allows light — including parts of the UV spectrum — to pass through well. An alternative is polycarbonate, which is stronger, but it filters out active UV-A (around 365–385 nm). Some plants need that, but for most, the safe blue and deep red spectrum is enough.

We’ll talk more about LED spectrum and configuration in a separate video.

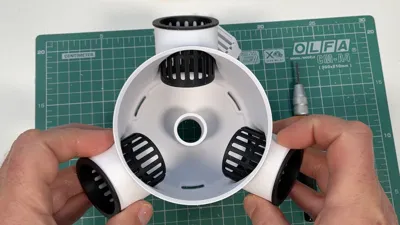
Dome Construction Details

The dome is complex. It had to be split into parts for printing. Each part has its own configuration to achieve a dome that is both thin and strong, allowing maximum light transmission. But in the end, the dome prints as a single part. You can see all the details in my 3MF file . One dome is already included in the file, but if needed, you can download STL versions in other sizes — up to 150 mm in height — and print what you need based on my settings. If you need something custom, just let me know and I’ll add the STL.


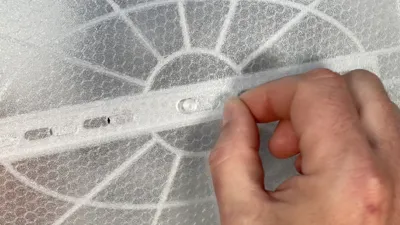
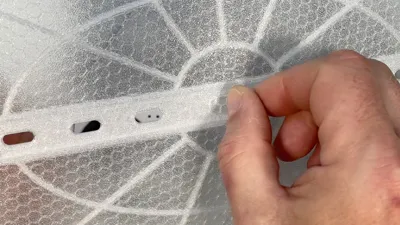
Assembly and Alternatives

In the video, you'll see all the steps: how the box is assembled, how to insert the dome's vent slider, and more. Yes, you can buy similar boxes — they’re cheap. But I wanted to design my own — no compromises, with proper rigidity and smart construction. This box isn’t disposable. It’s made to last. Unlike those flimsy store-bought ones that barely breathe.


I hope my Germination Station turns out to be more useful, more durable, and better looking than the commercial versions. And there's more to come.

See the video for details:

If you liked this thing - let me know by putting like!

Parts links below:

Links to used tools:

My new machine:

My favorites:

Thank you for every tip or donation,

it means great recognition for me and helps a lot to keep going!

https://ko-fi.com/perinski

BTC:bc1qplpzq36ghw84hty4nn2zzu4ps4sdh4th0v93j8

ETH:0xc766ebbeAa76aaf629788c8F99C33A8d80d48977

My some other things:


Comment & Rating (63)

(0/1000)

standard ABS filament is generally not considered food-safe due to concerns about styrene and other potential chemical leaching. While some specialized ABS blends may be food-safe, you should always choose filaments specifically certified as food-safe, such as certified PETG, PLA, or PP, and check that your 3D printer nozzle is not a lead-based brass alloy
The designer has replied
8
Reply
You clearly walked into the wrong room. The Paranoids Club is around the corner — they hand out tinfoil hats at the door. This is the 3D Printers Club. We print with plastic, not paranoia.
17
Reply
Pretty sure the ground in my garden isn't "certified food safe" either... its positively teaming with bacteria, insects, and cow manure... yet we grow food in it, and nobody dies. Stop being so damn paranoid.
7
Reply
Replying to @perinski :
*stands applauding *
2
Reply
Top and bottom parts are great. but one thing, reinforcement parts are not fits. I hope you fix this. thank you.
The designer has replied
designer
1
Reply
How can it not fit if the traverse is a copy of the same part, and the mounting holes are also copies of the same hole? I’m not going to make them different each time. You make one and then repeat it. So there’s nothing for me to redo here — everything matches up. There are three traverses in total. Where the indicator float is, there’s no traverse.
0
Reply
Replying to @perinski :
I don’t want you to misunderstand — I really like your product. I just wanted to let you know that when I tried printing it this time, it didn’t quite fit. There may have been some mistake on my side, so I’m thinking of printing it again and testing it once more.
0
Reply
Replying to @AkiGo :
Yes, I understand, I’m not upset at all. I just don’t know how to help you, because everything fit for me. These are the exact same parts I printed. The print profile I shared is the one I used to print for myself. So I don’t know what isn’t matching on your side. Maybe you could show more detailed photos, because it’s hard to understand how to help when the issue isn’t engineering but more like “it doesn’t fit.” And I can’t tell what exactly doesn’t fit and where. The traverses fit very tightly, but this may be related to flow calibration, and you might have a bit of over-extrusion. In that case, they might not come out easily. Otherwise, they fit perfectly.
(Edited)
0
Reply
amazing print
The designer has replied
1
Reply
Thanks!
0
Reply
Thanks!
0
Reply
Prints came out well, I printed the bottom out of ABS-GF, the baskets out of ABS, and the Lid out of PETG. The only issues that I have are that the walls on the lid are bowed out a little, and the vent didn't fit at all. I ended up scaling the vent slider up until I had a good fit. Yes, I know that the lid is printed in black, so no light comes through it, and I did that on purpose. Seeds propagate better in the dark, I feel, and don't require light until the first sprouting leaves open. At that point, I'll either change the lid to the transparent one or take it off entirely. As of now, I planted seeds in it 2 days ago, and they're already starting to pop out.
The designer has replied
designer
1
Reply
Thanks!
0
Reply
Print Profile
Germination Station for Tower Hydroponic System
Came out perfect.
The profile uploader has replied
profile
1
Reply
Thanks!
0
Reply
Print Profile
Germination Station Top
came out great.
(Edited)
The profile uploader has replied
0
Reply
Thanks!
(Edited)
profile
1
Reply
Replying to @perinski :
Thanks!
0
Reply
Really curious about what net cups you use because standard 2” net cups do not fit in the holes.
The designer has replied
0
Reply
I use custom-sized baskets that also need to be 3D printed. These are not standard off-the-shelf products, but a tailored solution designed for specific tasks and system geometry.
1
Reply
Replying to @perinski :
where may I find the stl for the baskets?
0
Reply
Boosted
Looks really nice. Thanks a lot. But what kind of substrate do you use? The holes are a bit to big for normal soil, right?
The designer has replied
0
Reply
https://makerworld.com/en/models/1623591-tower-hydroponic-system-part-3-accessories Yes, that’s right. I forgot to mention that foam inserts are used for this — they are optimal for the tower. You can see them in the pictures, and the link is provided there. Yes, that’s right. I forgot to mention that foam inserts are used for this — they are optimal for the tower. You can see them in the pictures, and the link is provided there.
0
Reply
you want to use rockwool cubes. They have it on Amazon.
0
Reply
You’ll also want to print some net pots
0
Reply
what if i print with pla. apart from its life would there be any other problems
The designer has replied
0
Reply
PLA is not the best material for sprouters. In sunlight, “transparent” PLA quickly yellows, becomes cloudy, and can deform from heat. It does not transmit the full useful spectrum and scatters light, which, combined with its low UV resistance, increases the risk of weak or uneven sprouts. Beyond low durability, there is also a high chance of a negative impact on the growing results.
1
Reply
thanks for your immediate and helpful response
0
Reply
Boosted
Print Profile
Germination Station Top
A work of art! Unfortunately, I haven't managed to get the slider to stay in place yet. It comes loose with the slightest movement
The profile uploader has replied
Show original
0
Reply
It’s already accounted for. You can glue on small bridges and solve this problem. It’s easy to make clips or flat tabs that will hold the slider in place.
(Edited)
1
Reply