Dry Filament Rack


Print Profile(4)


Bill of Materials


- Recharchable Silica Beads x 1: Bought Wisedry from Amazon
Description
Luxurious
Dry Filament Rack

for
Boost Me (for free)
Your filament stays even drier if you boost this model!
📺 Watch this Video
After my world-famous 😉 Thrifty Filament Shelf — which I mainly use to store sealed spools — I eventually hit a limit: I wanted more colors and materials.
That's nice, but it also eats up AMS space quickly.
Meaning: I had to store unsealed, nearly full spools out in the fresh, humid HomeLab air. Not ideal, as you can imagine.
There are some nice dry box solutions out there, but they’re often just… boxes. Unorganized. Clunky. And they usually need extra hardware like screws or heat inserts.
Since I already had a modular solution for sealed spools, why not go one step further?
✅ Modular
✅ Airtight
✅ Stackable
✅ Scales in 3D
✅ HomeRacker-compatible
Wall-mount it, rack it, ceiling-mount it — whatever HomeRacker can do, this extension can too.
🛠️ What I did:
- Created an airtight filament box with a desiccant compartment and hygrometer integration
- Made it stackable
- Made it rackable (via HomeRacker)
Features
🌬️ Airtight

I spent weeks experimenting with different printable closing mechanisms. Eventually, I found a good middle ground that works reliably and is printable by mere mortals.
It consists of three parts:
- 🧊 The Box
- 🧢 A lid
- 💧 A TPU seal
The TPU seal is designed to fit snugly and be airtight under normal atmospheric pressure — keeping humid air out.
💎 Dessicant Compartment

The desiccant compartment is key to keeping things dry.
It’s a detachable insert designed to be filled with rechargeable silica beads. Just fill it, drop it in, add your spool, and close the lid.
The compartment is designed for:
- ✅ Maximum airflow (thanks to smart slot geometry)
- ✅ MinimalISH (emphasis on ISH) print time
- ✅ Structural integrity with high-temp materials
Design highlights:
- Horizontal slots → faster printing
- Diagonal slots → support different heights without long bridges
- Slot indents → prevent spool blockage
- Vertical relief cuts→ reduce internal stress during high-temp prints
Both versions (Standard and Jumbo) include a funnel to help fill without mess.
📉 Hygrometer Cutouts

Track humidity inside the box with cutouts for both round and rectangular hygrometers (linked in BOM).
These have minimal tolerances and are effectively airtight once placed. They’re also removable by pushing from the inside.
📍 Lid variants:
- Cutout for round hygrometer
- Cutout for rectangular hygrometer
- Blank (for the brave 😅)
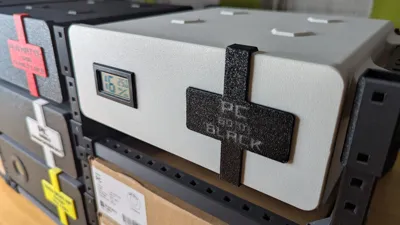
🏷️ Label Plate

Filament isn't always easy to identify by eye (or through an opaque lid). So I added detachable label plates that you can print in the same material as the stored spool.
Each lid has a carve-out for a perfect fit. Snap them in or out as needed.
📦 Stackable

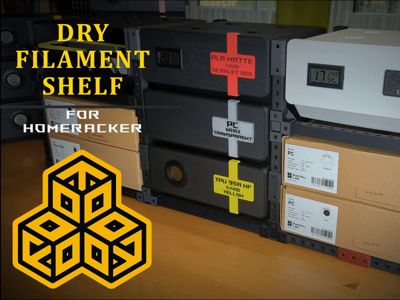
Still debating whether using hexes was wise 😄 — but yes, the shelves have:
- 🕳️ Indents underneath
- 🛑 Nubs on top
This allows them to stack securely. Haven’t gone to the ceiling yet, but mid-height stacks are stable enough. (See pic)
🧱 Rackable

Not a fan of relying on just the nubs? Use a HomeRacker frame for solid, multi-dimensional builds.
Each box has side rails to mount into a HomeRacker frame — while still allowing for stacking.
As seen in the title images, you can fully integrate the Dry Filament Rack into a larger HomeRacker build.
🔥 PC Dessicant Compartment

Most of my prints are PLA Matte (charcoal 🖤 is my fave). It’s cheap, reliable, and even airtight at 2 mm walls.
But for the desiccant compartment, PLA has a flaw:
👉 PLA’s heat deflection temp is ~60°C, but to recharge silica beads, you ideally need ~105°C.
Even ASA struggles here. But one hero remains:
🦾 Polycarbonate (PC)
✅ ~117°C heat deflection (per Bambu)
✅ Recharge beads without removing them
✅ Just toss the whole compartment into the oven
So I created a print profile just for PC. Tried it. Works great.
⚠️ PC is pricier than PLA, but you use less — and it’s worth it for the convenience.
BUT... PC is a diva 😤
To reduce warping, I had to heavily modify the compartment’s geometry (vertical relief slots for the win). With an enclosed printer and the right profile, it should now print reliably — no glue needed.
📏 2 Sizes

When I was about to release the model, I noticed a problem:
Some Bambu spools (like PC Black) are 72 mm wide — too big for the original design.
I could’ve just scaled everything up, but that creates two problems:
- More air → harder to keep dry
- More material → more cost
🧩 So now there are two versions:
- Standard: up to 68 mm width (covers most Bambu spools)
- Jumbo: up to 72 mm width
To preserve HomeRacker compatibility, the Jumbo version scales to the next bigger unit. The desiccant compartment becomes larger, but you can simply half-fill it — works just as well.
🔧 Assembly
🔹 Box

- Insert the seal into the lid.
- Align the seam with the cutout on the lid.
- Start with a corner and press it in.
- Push along the trench until fully inserted.
- Double-check corners and spacing.
- Fit the lid onto the box.
- First fit may be tricky — apply pressure from one corner, then go around.
- Once the seal is properly seated, fitting becomes easier.

If you find yourself having problems fitting the lid onto the box, you might want to check the seal for rejuvenations in the slit. If there are any (inner and outer part not parallel), use the “Seating helpers”: Press them in and let it sit for a while till the TPU stays in place. This way I always fixed fitting problems

🔹 Racking
As described earlier, you can integrate the rack into your own HomeRacker build.
The print profiles include:
- Standard/Jumbo Cage: wraps around a box for rack mounting
- Bottom Cage: needed once per column (if box starts at the bottom)
🛠️ Minimal instructions:
- Build a bottom frame using:
- 2 x15 supports (left/right)
- 2 x14 supports (front/back)
Connectors + lock pins

- Build the box cage:
- 1 x15 support (left/right)
- 2 x14 supports (front/back)
Stack the box cage on the bottom cage. Lock with pins.

Add box and lock again.

Et voilá — a modular Dry Filament Rack. Scale in 2D or 3D!
🏗️What is HomeRacker?
HomeRacker is a universal modular rack building system I created. It's based on an open specification. Find out more here:
HomeRacker - Core on Makerworld
or visit
or checkout
The Official HomeRacker Collection
With HomeRacker, you can build all sorts of things— like bookshelves or 10" and 19" racks


What's in the Box??
The included print profiles are limited to the shelves itself, a minimal HomeRacker cage and a bunch of lock pins.
The profiles only include the most necessary parts.
If you want to create your own build with custom rack sizes, please refer to the HomeRacker catalogs linked below.
This model comes with:
- A Standard and a Jumbo Print Profile. Both of which contain
- box for spools up to 68mm in width (which is most of the BambuLab reusable spools)
- lid
- Dessicant compartment to print with a non high-temperature filament (like PLA)
- Seal - to be printed with BONE DRY TPU 95A (i used the HF variant)
- An exemplary Label Plate
- Alternative lids
- Version with cutout for rectangular hygrometer
- No cutout version
- A funnel to be used when filling the dessicant compartment
- Minimal HomeRacker cage for a single box
- Minimal HomeRacker cage to be placed as bottom of the rack
- A print profile with optimized settings to print dessicant compartments (Jumbo and Standard) in PolyCarbonate (PC).
- Step files of all (assembled) box variants
- Fusion 360 files of the Jumbo and Standard version.
They are basically the same at different points in their history. It's just super compute-heavy when changing params of the spool as there are hundreds of steps to reroll and some minor things to adapt. So I thought it would be beneficial to upload both versions.- If you want to change between the lid faces:
- supress the feature “Delete Face 10” pretty much at the end of the history to get from a clean lid back to the rectangular cutout.
- After you did that you can also suppress the group “Rect Hygro” to get back to the round cutout
- If you want to change between the lid faces:
What's missing?
As mentioned: there's only a minimal HomeRacker frame part of the print profiles.
The open shelf for the shown filament boxes are not included in the model. To accomplish this please refer to the Modular Shelf which you can find here on Makerworld. What you see on the picture is twice a W14_D7 shelf for a single box. This requires you to have 2 x15 supports in width and 3 x14 supports in depth. For the middle depth support you'll then need 2 2D3WP connectors along the x15 supports.
Also, the diagonal support to protect boxes from sliding of are not part of this model. If you want to incorporate them to an open shelf: They are 2D2W x10s. These diagonal supports can be found along all kinds of connectors and supports in the core model (link).
To build a more complete setup or get extra connectors/supports, download the full:
Feedback
Please let me know what you think!
This build has a lot of parts, so there’s a chance something’s missing from the print profiles.
If you notice anything let me know - I’ll fix it asap.
Community Driven
Many of you have already shared great ideas with me — thank you! Unfortunately, my time is very limited. That's why I created the open specification (see Technical Specs), so anyone can create extensions and models for HomeRacker without license restrictions. If you have an idea and the ability to design CAD models, please go ahead — I'd be happy to link your creations in the catalog!
If you're not familiar with CAD design, feel free to pitch your idea to me with as much detail as possible.
Check out the glorious
Community Catalog
Pitch ideas or vote for them
here on GitHub!
Join the
Disclaimer
Even though I think this one might be the pinnacle of my 2025 creations, it comes with some caveats:
- 💸One standard box = ~600 g PLA + 7 g TPU + HomeRacker Cage material
Not a quick/cheap print — sorry, not sorry 😅 - 🥵 On a scale from potato to Astrophysisist level, we're at a solid “Educated Octopus”. So, it's not the easiest print because of the airtight TPU seal. Apart from the PLA parts which should be printable with ease, there's some parts where you REALLY REALLY REALLY need to take care:
- 🧼 Clean your bed thoroughly before every print (IPA recommended)
- 🤐 The TPU seal needs to be printed with care. Since the entire "airtightness relies upon a zero-distance between seal, box and lid, there's no place for additional impurities or uneven surfaces besides the aligned seam (already configured in the print profile). So make sure, you are using TPU 95A (HF → optional but faster) which is bone dry. Check the seals after the print and cut of eventual bumps which don't seem to be in place.
- 🌡️ The optional PC dessicant compartment might be a real improvement in the recharging experience, but it's also a real diva to print. Never saw anything warp like this material. The most development time besides the airtight seal-lid-box thingy went into modifying the geometry of the dessicant department in a way, so I could minimize warping without having to use any glue. The magic trick was to use the vertical relief slots. However, it still is prone to warping, sometimes even to an extreme case to the entire print fails because the print doesn't adhere to the bed.
- You really need an enclosed printer for it!
- Use the print profiles I attached specifically for PC. They contain all settings to not fail the print (brim, first layer speed, wall generator, etc)
- PC Transparent doesn't print pretty. I'd say best so far was Clear Black!
- ⚙️Use the print profile settings from the print profiles which I attached! If you are not using the profile make sure of the following:
- 🪡 It is super important that the seam position of the TPU seal is aligned in the middle of one of the small sides. When you look at the box and the lid you know why: There's a small recess which can contain the seam. This enables a stress-free closing-mechanism
- 🧢 give the box itself an outer brim. The HomeRacker mounts tend to warp.
- 😒 The model is super complex and I haven't had the nerve to make it fully parametric. Meaning: If you change spool width it'll get a bit messy and you'll have to fix on or the other thing. Other than that I didn't test any other changes yet. It might become a battlefield though.
Hardware
- Dessicant: I used Wisedry Dessicant which is white dessicant beads with a part of orange indicator beads.
Bought it on Amazon Germany. Link - Hygrometers: You can use the round and/or rectangular Hygrometers from the BOM down below or just buy their equivalent from Amazon. I think price-wise it makes no differnce.
Support
If you appreciate this model and wanna buy me coffee, you can do so here: https://ko-fi.com/kellervater
Or simply scan this QR-Code:
Want to sell this thing?
Membership
Subscribe to a commercial membership if you want to make money out of this and many other models I created!
License
You may create derivative works based on this object, provided that all such derivative works are published exclusively on the MakerWorld platform and include proper attribution to the original creator. You may not share, upload, host, distribute, or publish this object—or any derivative work of this object—on any other digital platform, marketplace, or distribution channel. Commercial use of this object and any derivative works is strictly prohibited. This includes, but is not limited to, selling, renting, sublicensing, or using the object in any context in which you receive monetary compensation or other financial benefits.
Comment & Rating (227)