Search models, users, collections, and posts
Mini Arcade Pen microSD holder
IP Report


Print Profile(1)

0.2mm layer, 2 walls, 6% infill ALL PARTS
Designer
8.2 h
6 plates
Open in Bambu Studio
Boost
184
437
38
16
204
64
Released
Description
Content has been automatically translated.
Update, printable screenshots on paper added to make it look even better
The PDF file has been added here with screenshots for the 3 models
(If you want to print your own, the dimensions are 43mm x 35mm)
Since I grew up with arcade machines, this contest motivated me to try CAD again, and I stumbled upon Tinkercad after I couldn't get along with several other programs and had given up It's not as comprehensive as other programs, but at least I can manage with it
So this is my very first model, it's not perfect but I put a lot of effort into it and hope some people here like it
Model:
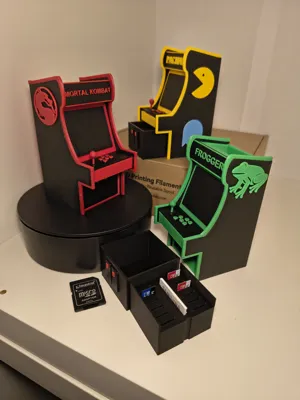
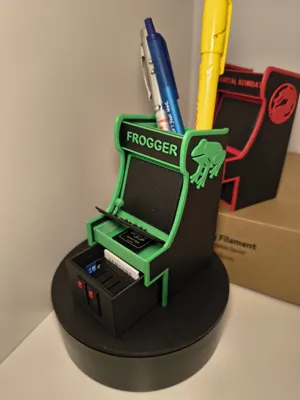
I designed a mini arcade machine as desk decoration with useful features Design is customizable (marquee name)
The most obvious is that it can be used as a pen holder
Below there's a drawer with a removable tray for 10 microSD cards + adapters This can be omitted if not needed, and you can simply use the drawer
The control panel can be removed, and there is also a small hidden compartment underneath
The model is designed so that you can print the machine, sides, screen, drawer, control panel, etc, all separately
I colored the two-color parts in such a way that they have as few color changes as possible, but they can just as well be printed in a single color
I recommend printing the arcade machine at a 45-degree angle as in my print profile; this way no internal supports are needed, and the inner walls are still printed cleanly This way the drawer won't get stuck
The print time is under 6 hours with this print profile; for plate #6, print only the required parts
I have added various marquees
One of them is blank, so you can print your own name on it using the text input in Bambu Studio
(If you don't have a PC, you can also ask me, and I will create a marquee with your chosen name as a print profile that you can then print from Bambu Handy)
++RECOMMENDATION for your own text via Bambu Studio:
-Depending on the length of the text, adjust the size of the text; those shown here are between 5 and 14
-A text thickness of 1mm is sufficient
-Confirm the text and then go to “Objects” in the left menu under Process, click on the part, then on the left under “text shape”, right-click on the box with the color, then you can select the desired color via changing filament
-If you want to color the two stripes at the top and bottom as well, it's easier to go to the coloring function in the top right menu
-Go to the "Coloring" tool and select "Layer height" under "Tool type" Then color the top in your chosen color and then select black again to color the bottom part; go up with black to the beginning of the letters so that the bottom layer of the letters is black to ensure that the flat surface is still black Check in the preview that you like the result
The parts are simply glued together afterwards, not the control panel It is clamped by the two sides of the arcade machine and holds by itself so that it does not simply fall off The control panel can then be pushed upwards from the front with your finger to open it Please do not pull on the joystick, as it is very sensitive
The screen, the two sides, the T-moldings if you want them (not absolutely necessary), the coin panel, and the optional handle for the drawer (the semi-oval part, glued onto the coin panel in the center) are to be glued
If your printer settings are correct, the drawer will slide in and out by itself when you tilt the mini arcade
The marquee also holds without glue, if you want to make different ones and have them interchangeable
I put a lot of effort into this model and printed several test models; it was modeled from scratch in CAD unlike some of the models here that simply uploaded an image to a 3D model
Feedback and suggestions for improvement are welcome
Remember to rate the model and possibly leave a photo to give others ideas; many color combinations are possible
If you like the model, I would be very happy about a boost
I wish you a lot of fun printing and assembling
If you have any questions, feel free to contact me
Best regards
Boost Me (for free)
I would be very happy about a boost for my first real CAD model, if you like it
mortal
combat
kombat
frogger
pacman
mini
arcade
cab
cabinet
desktop
storage
pen
holder
stand
retro
retrogaming
gaming
games
video
videogames
snk
sega
nintendo
atari
capcom
game
joystick
marvel
mario
tetris
turtles
tmnt
arcade1up
1up
level
up
space
invaders
usb
micro
microsd
sd
card
naomi
neogeo
model3
atomiswave
automat
play
Documentation (1)
Other Files (1)
screenshots.pdf
License
This user content is licensed under a Standard Digital File License.
You shall not share, sub-license, sell, rent, host, transfer, or distribute in any way the digital or 3D printed versions of this object, nor any other derivative work of this object in its digital or physical format (including - but not limited to - remixes of this object, and hosting on other digital platforms). The objects may not be used without permission in any way whatsoever in which you charge money, or collect fees.
Comment & Rating (38)