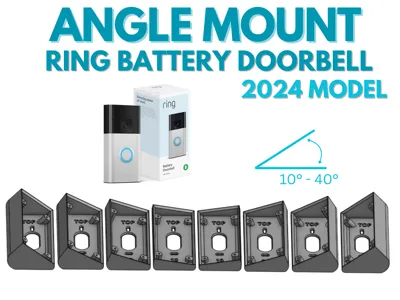
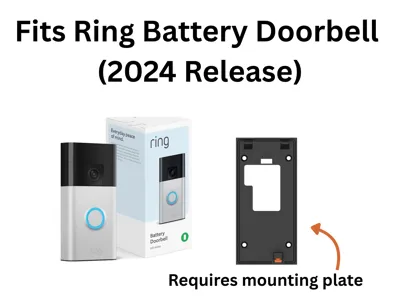
Ring Battery Doorbell (2024 Release) Angled Mount


Print Profile(1)

Description
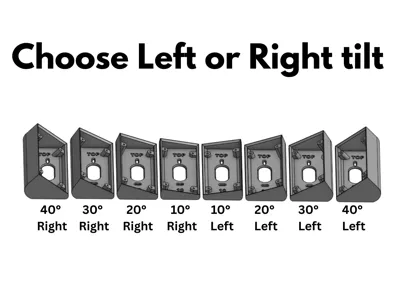
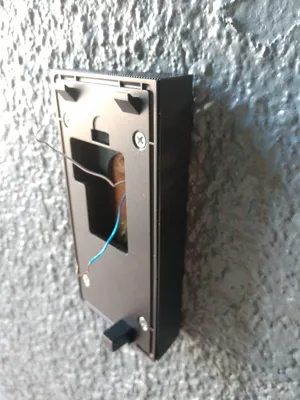
These angle mounts are used angle your Ring Battery Doorbell (2024 Release) either left or right away from the wall which can improve motion detection and view, or to keep your view free of light reflections from the wall or window when it's dark. I created both left and right tilt mounts (because the 2024 release model does not seem to have symmetrical mounting holes) in 10°, 20°, 30°, and 40° angles. Ring sells a similar product called a corner mount kit but I could not find one to fit the “Battery Doorbell-2024 Release” model that I have. This model in particular has a built-in battery with a beveled back mounting plate and four corner mounting holes that are not exactly symmetrical from top to bottom or side-to-side, so other angle mounts I have found cause the back mounting plate to buckle or leaves a huge gap around the perimeter. Furthermore, I was replacing an older traditional doorbell and wanted to use the same wall mount holes without drilling additional holes into my exterior. So, I designed this from scratch to solve my needs and hopefully help someone else out with the same model.
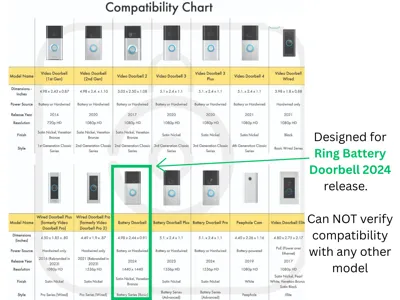
Note: Ring does not appear to list model numbers and many of the models look very similar in appearance, so see the link above and the attached pictures for the specific doorbell model these are designed for. I can NOT confirm they will work for any other model.
Printing:
- PETG (highly recommended due to outdoor usage. Make sure your filament is dry and calibrated before printing)
- 0.20mm
- 15% Gyroid Infill
- 3 Walls (added strength and for attachment screws to bite into and in case you need to drill out holes for larger screws)
- No support is required
Installation:
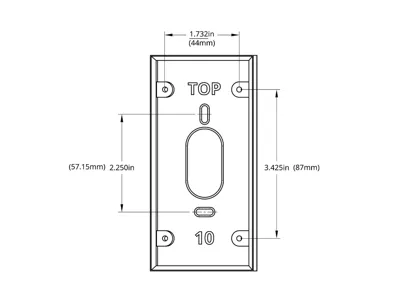
The wall attachment screw holes, spaced at 2.25" (57.15mm), were designed to allow some slight adjustment during mounting.
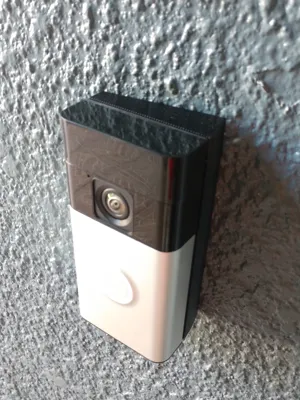
If installing on a wood surface, screw the 3D printed angle bracket directly into the wall. If installing on a masonry surface, mark two screw holes using the bracket as a guide. Drill appropriately sized holes for wall anchors, insert the wall anchors, then drive the bracket screws through the 3D printed angle bracket into the wall anchors. Attach the Ring provided mounting plate in the four corners and then the Ring Doorbell following their installation instructions.
Note: I used the four Ring provided screws to attach the Ring mounting plate to the 3D printed angle bracket. However, I had to cut down two of the screws because they were too long for the shorter angled side. The corner attachment holes in the angle bracket are good fit for #4 or M3 screws to thread in without force. I found that a length of ½" (12mm) long was enough to securely attach the Ring mounting plate to the angle bracket without extending through and interfering with the wall behind. It must be a flat head screw that doesn't protrude above the Ring mounting plate when installed or the doorbell will not lock into place on the mounting bracket.
License
You shall not share, sub-license, sell, rent, host, transfer, or distribute in any way the digital or 3D printed versions of this object, nor any other derivative work of this object in its digital or physical format (including - but not limited to - remixes of this object, and hosting on other digital platforms). The objects may not be used without permission in any way whatsoever in which you charge money, or collect fees.
Comment & Rating (56)