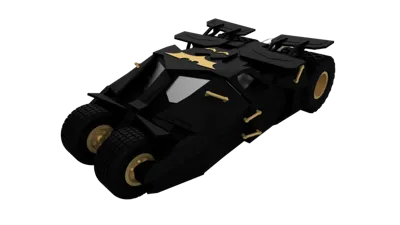
Batman Tumbler - 2005 Batman Begins Version


Print Profile(3)


Description
Boost Me (for free)
Every like, collection, follow, and boost from you is a great encouragement for me to persevere in creating original models, thank you!
For more interesting models, please visit my homepage: CuriousAnt | Home - MakerWorld
♦ ♦ ♦ ♦ ♦ ♦ ♦ ♦ ♦ ♦ ♦ ♦ ♦ ♦ ♦ ♦ ♦ ♦ ♦ ♦
Background:
Christopher Nolan's Batman Begins, the inaugural film of his celebrated Dark Knight trilogy, revitalized the Batman franchise, lifting it from a creative slump. In 2005, the Batman film series was rebooted, and the Batmobile underwent a complete redesign.
The initial aesthetic concept for this iteration of the Batmobile originated with director Nolan himself. Viewing the Batmobile as an iconic emblem of the Dark Knight, he envisioned a vehicle possessing the armored heft of a tank while retaining the sleek, low profile and velocity of a Lamborghini. Nolan sculpted a preliminary clay model, which was subsequently refined by designer Nathan Crowley, resulting in the imposing 2.7-meter-wide, 4.5-meter-long, 2.5-ton machine we see on screen.
The Batmobile's design abandoned the previous generation's ostentatious blend of streamlined contours and exaggerated spoilers, opting instead for a robust, technologically advanced military vehicle aesthetic—often described as a compelling fusion of Lamborghini and Land Rover influences.
Beyond its impressive destructive capabilities and remarkable resilience showcased in the film's thrilling chases, this heavily armored vehicle incorporated a unique system reminiscent of the 1989 Batmobile's "Batmissile" mode, namely, the memorable "Bat-pod" motorcycle.
Powering this behemoth is a potent 500-horsepower Chevrolet 350 V8 engine, capable of accelerating from zero to sixty miles per hour in a mere six seconds. In the 2008 sequel, The Dark Knight, the vehicle was further enhanced with remote control capabilities, allowing for autonomous operation and even self-destruction!
---------------------------------------------------------------------------
Model:
This 3D-printed model deviates slightly from a precise replication of the cinematic prop, incorporating design compromises optimized for 3D printing and assembly. Some support structures are unavoidable but have been minimized for easy removal.
For the wheels, TPU95 filament is recommended; the tactile feel closely mimics the texture of real tires. Of course, feel free to disregard this suggestion (😄😄).
PLA Silk filament was used for the windows, lending a subtle sheen, though the final result fell short of my ideal. If you have a superior alternative, please share it in the comments.
To simplify the process, the Bat symbol on the roof was integrated into the roof piece rather than being a separate component. Acrylic paint was used for coloration, and the effect is satisfactory. If sufficient interest arises, I can create a version with a separate Bat symbol.
----------------------------------------------------------------------------
Boost Me (for free)
Your likes, follows, and support are invaluable, encouraging me to create more original works. Thank you!
Assembly:
*Based on design prototypes, most parts utilize snap-fit connections for secure assembly. If parts exhibit insufficient tightness or secure fit, consider applying adhesive for reinforcement.
1. Install the two front window panes and side window panes

2. Install the two front wheel covers

First, insert the wheel cover from above the chassis, following the red arrow, then press it into the chassis openings, following the blue arrow.
3. Assemble the front wheels
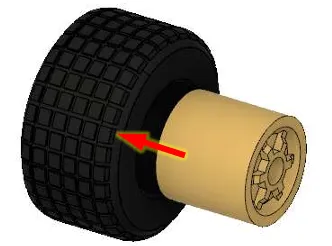
Do not use adhesive at this stage, regardless of the tightness of the assembly. Space is restricted when mounting the wheels onto the chassis; the tires need to slide on the wheel hubs to facilitate installation.
4. Assemble the front wheel axles

The axle end features a spring-loaded clasp. Firmly insert it into the wheel hub opening. Once properly seated, the wheel should rotate smoothly.
5. Install the front wheels onto the chassis
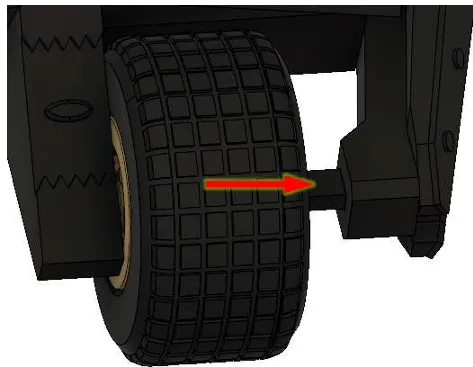
After securely installing the front axle onto the chassis, if the tire and wheel hub assembly is loose, slide the tire slightly along the hub to expose the cylindrical surface of the hub, and use adhesive for reinforcement.
6. Install the other front wheel
7. Assemble the rear wheels

8. Install the rear axle

Insert from the end of the rear axle lacking positioning protrusions into the chassis openings. The axle end has a spring-loaded clasp; firmly insert until the positioning protrusion is close to the chassis. To prevent breakage of the chassis axle support, firmly grip the axle support at the red circle, not other parts of the chassis.

9. Install the rear wheels onto the rear axles

10. Install the exhaust and exhaust nozzles

11. Install the roof support
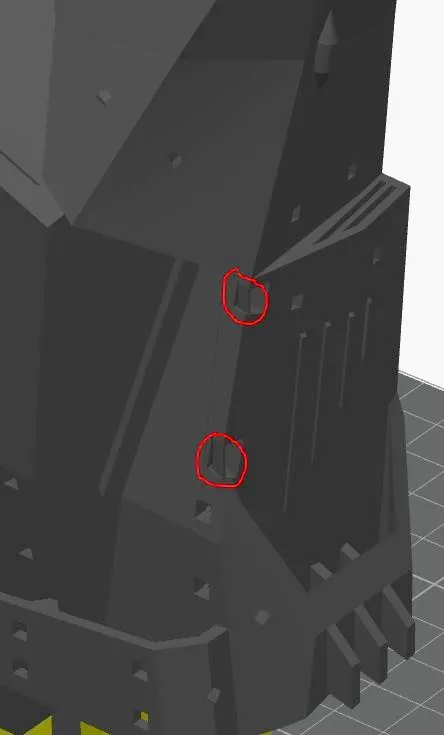
In the areas indicated by red circles on the chassis, there are small thin pieces; there are two corresponding pieces on the other side of the chassis. These were intentionally designed as sacrificial layers to reduce support structures during printing. Remove these four pieces before assembly. If you sliced and printed independently, without using my profile, ignore this step.

First, snap the clasp on one side (red circle) into the chassis opening; press it into place, then install the other side. Finally, press the clasp in the blue circled area into the chassis opening.
12. Install the left mid-wing support
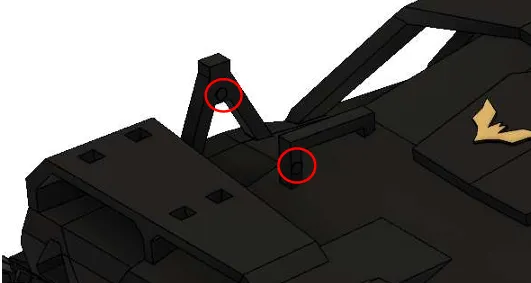
Note that the small circle (red circle) must face the center of the vehicle, not outwards. If the small circle is facing the wrong direction, you have the wrong part.
13. Install the left mid-wing

14. Install the other mid-wing
15. Install the left rear wing support

Note that the small circle (red circle) must face the center of the vehicle, not outwards. If the small circle is facing the wrong direction, or the protrusion of the support does not fit the opening in the chassis, you have the wrong part.
16. Install the rear wing

The wider side of the rear wing faces the center of the vehicle.
17. Install the other rear wing
18. Install the decorative connecting rods

Four per side; three larger rods (red circle) and one smaller rod (blue circle). Note the difference (though it's subtle).

The larger rods are on the left, the smaller on the right.
Documentation (1)
License
You shall not share, sub-license, sell, rent, host, transfer, or distribute in any way the digital or 3D printed versions of this object, nor any other derivative work of this object in its digital or physical format (including - but not limited to - remixes of this object, and hosting on other digital platforms). The objects may not be used without permission in any way whatsoever in which you charge money, or collect fees.
Comment & Rating (51)