Search models, users, collections, and posts

"Book" Bookend

IP Report
GIF

Print Profile(7)

All
X1 Carbon
P1P
X1E
P2S
A1
X1
H2D Pro
H2D
H2S
P1S
H2C
X2D
A2L

Split into parts - Left side
Designer
6.6 h
3 plates
5.0(5)

Split into parts - Right side
Designer
6.6 h
3 plates
4.5(2)

Optional Side Pages
Optional Side Pages
Designer
12 min
1 plate

AMS - Left side
AMS - Left side
Designer
12.7 h
1 plate
5.0(2)
Click to see more

Open in Bambu Studio
Boost
277
919
16
11
216
123
Released 

Description

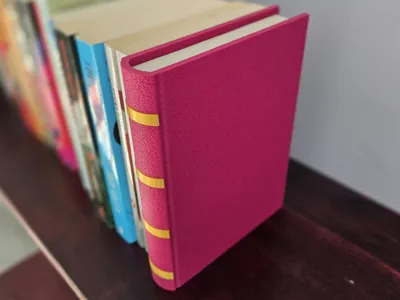
A bookend disguised as a book

Everyone's designing and printing bookends, so here's my take on one. I didn't know we were all such avid readers…


The stand part of the bookend is meant to go under the nearest books so it stays in place, and for the bookend to look like it's just another book on the end of the row.


I put in a a compartment in the bottom of the book where I planned on putting in weights so it would be more solid. But weights are not needed as once you put a heavy enough book on the stand part, the bookend is going nowhere. But I thought the compartment was a neat place to store (or hide) some small valuables so I kept it as part of the design.


I printed this with fuzzy skin walls for the book part to give it an old-leather-journal look. 

There are three print profiles (with left-hand and right-hand versions of each):

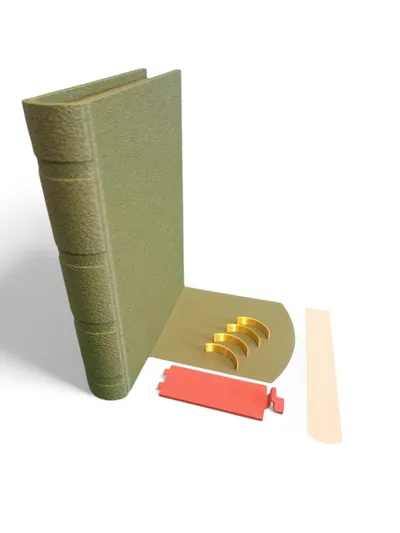
Split into parts version

The bookend is split into parts and separated into a few plates by colour. You will need to glue the spine lines and pages on afterwards. This can be printed on a 3D printer that doesn't have multicolour capabilities. This is how I will personally be printing this if I make this again in the future as it prints a lot quicker than the AMS version and looks as good (if not better). Attaching the parts only takes 5 mins and it doesn't waste filament with all the colour changes that are needed for the AMS version too.

AMS version

One plate, no glue required.

Single colour version

The fastest way to print this. Everything is the same colour. One plate and no fuzzy skin.


Check out the details given in the print profiles for more about the print settings.

The parts assembly STL and STP is what's used in the “split into parts” print profile. The parts are slightly smaller in these files so they fit into the bookend easily.


Other details:

  • Dimensions: 148 x 149 x 200 mm
  • Recommended Material: PLA Matte
  • Designer: Haris Amin, Dezain 3D
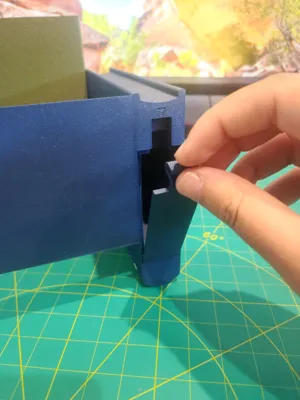
  • Supports Required?: Yes. For the roof of the compartment and the tabs of the bottom cover. But not for the slots for where the tabs go. Use manual supports or block the supports in the slots.

Supports are required because of the compartment, but they come off very easily. If you take a pair of pliers and dig it into the supports underneath and pull, the supports should just come off in one piece:

Membership

Want to help me upload more models like this one? Join my Supporter Tier so I can dedicate more time to making high-quality models!

Join

Comment & Rating (16)

(0/1000)

Print Profile
AMS - Left side
Very good looking. With Dethert Tan PLA it looks like an old book, I printed some for my library. Maybe a round roof inside the book for the small hiding-place would help not to have so much support, maybe I try it if I have more time to design, not just to 3d-print. Thank you very much for your work.
The profile uploader has replied
profile
1
Reply
Thanks for your comment. Good point about the roof of the hiding place. I've just uploaded step files which have chamfers added to the roof of the hiding place which means it shouldn't need as much support. Overhanging chamfers usually 3D print better than rounded edges. You'll still need supports for the outside overhanging edge of the compartment where the bottom cover sits. Also, uploaded a step file which has no compartment which might be better for a public place like a library. These are left hand side versions, You can mirror them if you want the right hand side instead. (Although there is a subtle different between the two in the originals which isn't accounted for when you just mirror) I'll add print profiles for these if I print these in the future.
(Edited)
1
Reply
Can you make a white part for the side of the book as well, not just the top? Love the print!
The designer has replied
0
Reply
I've uploaded a new print profile with just the white part for the side/back of the book. I haven't printed it yet, but I will later today. I'll probably add it to the other print profiles when I make some other changes to the print settings I've been meaning to make.
0
Reply
I guess I didn't add that part because it's on the side facing away and you wouldn't normally see it. But it does look way better with it.
0
Reply
Boosted
Perfect gift!
1
Reply
Print Profile
Single colour - Left side
The filler block was hard to remove in the secret compartment when print was done. This may be due to my printer but once I broke the seal the whole block came out easily.
(Edited)
0
Reply
Print Profile
Split into parts - Left side
Very nice! 😃
0
Reply
Boosted
Works great!
0
Reply
Print Profile
Split into parts - Right side
0
Reply
Boosted
Print Profile
Split into parts - Left side
0
Reply
Print Profile
Split into parts - Left side
0
Reply
Print Profile
Split into parts - Left side
0
Reply

License

If you want to use this model commercially, please join my membership.
Join Now
This user content is licensed under a
Creative Commons Attribution-Noncommercial-Share Alike