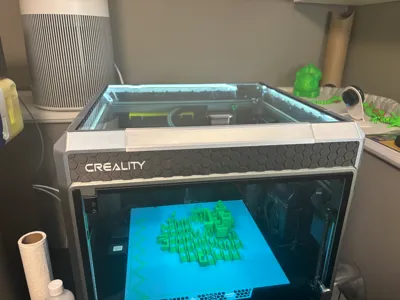
Creality K1 Max Riser + Filament Sensor Relocation


Print Profile(1)


Description
Membership
Want to sell 3D prints of this design? 🔥 Get a commercial license to sell 3D-printed versions of my designs at craft fairs, online, in-store, or anywhere you like! Click Join to sign up and start selling today. 🚀
I really liked the unibody style of riser and so I printed AP's remix of a K1 riser, but I found the distance between the corners was a bit too big resulting in the legs not fitting into the four corners of the printer.
This has a filament sensor relocation mounting point and glass slider rails.
Changes:
- Reduced each side's plates overall distance
- Reduced each side's beams overall distance
- Added a hole in the rear plate for a USB cable passthrough (for LED strip)
- Remove the 3rd knub in on each plate so there is no manual removal required after printing
- Optimized print orientation of all parts and minimal supports for strength and easy printing
- Colorized “Creality” text on front plate for multicolor printing
I also added the filament sensor cable bracket from here into the 3mf since it nicely holds the wire away from the rear belts after relocating the sensor. https://www.printables.com/model/905360-k1-max-filament-sensor-wire-bracket
Assembly is straight forward but here's a summary:
- Glue and clamp the corners to beams
- Glue and clamp the plates to their other half
- Glue the combined plate assemblies into the corner/beam assembly
Done

Next step is to insert the plates and glue all together.
I used this LED strip: https://www.amazon.ca/dp/B0C2P6Y9QN
I used Bambu PLA, PETG or tougher would likely be better to mitigate warping.
Boost Me (for free)
🔥 Love this design? Give it a Boost to show your support! Your tip helps keep the creativity flowing and means the world to me. 💙 Thanks for being awesome!

Comment & Rating (2)