


Print Profile(3)


Description
Boost Me (for free)
Membership
Want to sell Stag3D prints? Click here to become an official reseller.
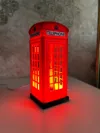
K2 Telephone Box
Add a touch of classic British charm to your home with this stunning K2 telephone box!
This meticulously crafted model replicates the iconic K2 telephone box, designed by Sir Giles Gilbert Scott in 1924. Known for its elegant and timeless design, the K2 was the first red telephone box introduced in Britain and remains a beloved symbol of British heritage.
Features:
- Detailed Design: Every aspect of the K2 telephone box is captured with precision, from the crown insignia to the panelled windows.
- Perfect Size: Measuring approximately 80 x 80 x 200 mm, this model fits perfectly on shelves, desks, or as a unique bookend.
- Easy Assembly: The model consists of 15 parts that are easy to assemble, making it a fun and engaging project for DIY enthusiasts.
- Versatile Decor: Ideal for living rooms, offices, libraries, or any space that could use a touch of British nostalgia.
- Historical Fact: The K2 telephone box was introduced to the streets of London in 1926 and was used solely in the capital, with only a few erected elsewhere under special circumstances
Whether you're a fan of British culture, a lover of vintage designs, or simply looking for a unique decor piece, this 3D printed K2 telephone box is sure to impress and delight.
Assembly:
- Glue the telephone/shelf accessory onto the rear panel
- Slide the rear and side panels into place. Take care not to apply too much pressure to the frame when doing so
- Place the door in place by push fitting the bottom hinge into the recess on the base of the frame
- Slide the front panel frame down over the door and fit the top hinge into the recess
- Fit the top dome section in place over the four stand offs. You may wish to optionally apply glue for a permanent fix
- Glue the 4 Telephone signs in place
- Glue the 4 crowns in place resting them on the bottom ledge and centrally above the ‘PH’ lettering
License
You shall not share, sub-license, sell, rent, host, transfer, or distribute in any way the digital or 3D printed versions of this object, nor any other derivative work of this object in its digital or physical format (including - but not limited to - remixes of this object, and hosting on other digital platforms). The objects may not be used without permission in any way whatsoever in which you charge money, or collect fees.
Comment & Rating (356)