


Print Profile(2)


Bill of Materials


- 4x6x.04 inch (101.6x152.4x1 mm) acrylic sheets x 1: https://www.amazon.com/dp/B0BTPH9WLL?ref=ppx_yo2ov_dt_b_fed_asin_title&th=1
Description
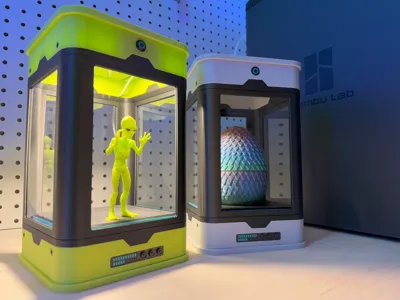
Transform your favorite 3D printed models into a sci-fi inspired exhibit! This enclosure integrates the Bambu Lab LED Lamp Kit to illuminate your models with a functioning power button. The magnetic lid is designed so you can quickly & easily add or remove your models inside the enclosure. I also designed the base to be magnetic for a secret storage compartment!

I used 4x6x.04 inch (101.6x152.4x1 mm) acrylic sheets for the windows. These are the exact ones I bought:
https://www.amazon.com/dp/B0BTPH9WLL?ref=ppx_yo2ov_dt_b_fed_asin_title&th=1
Boost Me (for free)
If you enjoyed the design, drop a boost! Thank you!
Assembly

The Lid
- Insert the power button.
- Put the LED light switch into the switch case and tighten using 4x M3x16mm screws.
- Make sure the USB power cable is on the left side where the cable exit is located.
- Add the LED light & light case and tighten using 2x M3x10mm screws.
- Glue 2x D8x3mm magnets.
- Add 4x M3x5mm screws on the sides. These are just decorative.
 |  |  |  |
To prevent light from bleeding through the top, add a thin layer of tin foil behind the LED light.
 |  |  |
The Frame
- Insert & glue 4x dowels into the top & bottom accent parts.
- ***IMPORTANT: The top accent is chamfered on the inside, the bottom accent is flat to support the platform!
- Add 2x D8x3mm magnets.
- Make sure the magnets properly link to the lid & base magnets they will attract to!
 |  |  |  |
- Slide the acrylic sheets into each slot.
- These were a bit snug on the width
- Add glue for the dowels and connect the top & bottom accent parts.
- Make sure the magnets for the lid and base line up as shown in the picture with the blue circles. I would test it with your lid & base before final assembly.
- Connect the two platform parts & insert into frame.
 |  |  |  |
The Base
- Glue the front control panel.
- Glue 2x D8x3mm magnets.
- Add 4x M3x5mm screws on the sides. These are just decorative.
 |  |
Credits
This design was inspired by these models:
https://lubomir0869.artstation.com/projects/5XlY0W
https://bowley3d.itch.io/sci-fi-plant-incubator
Large Threaded Dragon Egg: SprocketStudios
Put 'Em Up Alien: Zurlingo-3D
License
You shall not share, sub-license, sell, rent, host, transfer, or distribute in any way the digital or 3D printed versions of this object, nor any other derivative work of this object in its digital or physical format (including - but not limited to - remixes of this object, and hosting on other digital platforms). The objects may not be used without permission in any way whatsoever in which you charge money, or collect fees.
Comment & Rating (41)