Airsoft Grenade System V3.1


Print Profile(7)


Description
Description
This is Version 3.1 of my easily printable and customizable “grenade” for use in Airsoft games and other similar sports. It is compatible with both 209W shotshell primers and 8-shot ring caps. Features a lot of small refinements including a new stronger thread system, more stable sensitivity, improved Customizers for generating variations, and improvements to the gas venting.
Hardware Required
- Common to all designs
- 1x 14mm OD, 1.2mm wire, 50mm compression spring
- For primer or ring-cap use
- 1x M6 cone point 60mm long grub screw
- 1x M6 nylock nut
- For ring-cap use only
- M6 x50 button or socket head machine screw
- Additional for Pin & Spoon fuse:
- M3.2 x 30mm cotter pin, or roughly similar
- 1 inch split keyring
- 5.5 x 17.5mm spring (optional) or roughly similar
- Additional option for Flip Top fuse
- a 20-25mm M3 screw and bolt or 20mm M3 split pin
Additional option for Twist Top fuse
- M2.5 10-14mm grub screw
Parts to Print
You will need:
- A fuse and all its components
- A Seer
- A striker and carrier set; either Primer or Ringcap
- Any body style of your choice
I strongly suggest the use of PLA-pro/PLA+ or other stronger material otherwise your print may break apart under stress. I recommend at least 4 walls and 20% gyroid infill for both the grenade body and fuse parts. The striker, seer, and cage should be printed at 100% infill.
Files
- Bodies (choose one)
- V3_body_ball - spherical “baseball” style body
- V3_body_flashbang - typical flash bang style grenade body
- V3_body_l2a2 - styled after the british army L2A2 grenade, with added vents
- V3_body_pineapple - styled after the classic US Army MkII “Pineapple”, with discreet venting
- V3_body_simple - A simple cylindrical design with decorative fluting and vents
- V3_body_type97 - Modelled after the Japanese Type 97 fragmentation grenade
- V3_body_combo_* - Two part primer only body set.
- V3_body_VOG_notip - VOG-25 style (or V3_body_VOG + V3_body_VOG_tip for a screw on tip)
- Fuses (choose one)
- Spin Top (plus 20mm M3 socket head screw x 3)
- V3_fuse_spin_head.stl
- V3_fuse_spin_ring.stl
- V3_fuse_spin_cap.stl
- Flip Top (no added hardware)
- V3_fuse_fliptop_head_pivot.stl
- V3_fuse_fliptop_spoon_pivot.stl
- Flip Top (plus 20mm M3 split pin)
- V3_fuse_fliptop_head_pin.stl
- V3_fuse_fliptop_spoon_pin.stl
- Flip Top (plus 25mm M3 bolt and nut)
- V3_fuse_fliptop_head_bolt.stl
- V3_fuse_fliptop_spoon_pin.stl
- Pin & Spoon (needs cotter pin and ring)
- V3_fuse_spoon_head.stl
- V3_fuse_spoon_simplespoon.stl (Spoon sized for Simple and FlashBang bodies)
- Twist Cap
- V3_fuse_twist_head.stl
- V3_fuse_twist_safety.stl - entirely printed version
- V3_fuse_twist_safety_grub.stl - version to take an M2.5 grub screw (10-14mm)
- V3_fuse_twist_cap.stl
- Spin Top (plus 20mm M3 socket head screw x 3)
- Striker Options (depends on noise source)
- 209W Primer
- V3_primer_striker.stl
- V3_primer_carrier.stl
- V3_primer_cage.stl
- 8-shot ring caps
- V3_ringcap_striker.stl
- V3_ringcap_carrier.stl
- Common to all designs
- V3_seer.stl
- 209W Primer
Instructions
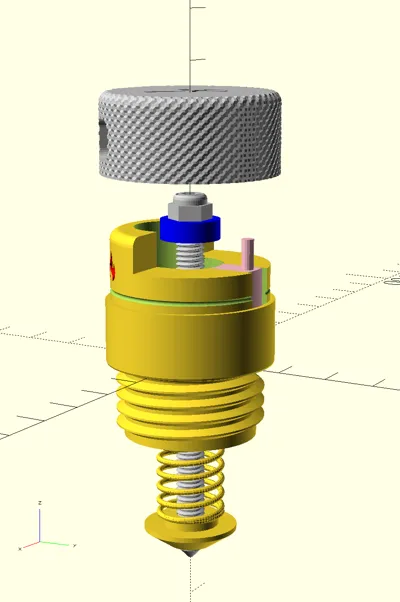
To Assemble, first screw the sear onto the blunt end of the M6 grub screw, far enough to leave just enough room for the nylock nut which you should then screw on to prevent the sear from creeping up the bolt. Insert bolt with it's sear down through the fuse head. Thread the spring onto the bolt from below, it should fit snuggly into the bottom of the fuse head. Use the adjuster tool to help you screw the striker onto the end of the grub screw, the cone point of the grub screw should protrude from the bottom of the adjuster by a few mm (see photo) this is how far it will strike into the primer.
If you find the striker and seer are too loose, or too tight on the screw then you can adjust the internal diameter using the Customizer, the default is 5.8mm for an M6 bolt, adjust as necessary to get a firm grip on the thread. You can also reinforce the striker by placing a nut above it on the spring side, it should fit within the springs coils.
The twist cap fuse is a little trickier to assemble, insert the safety bolt onto it's track from the inside of the fuse head, slide it until the stick part of the safety is aligned with the notches on the fuse head (See photo), then line the cap up so that the window in the cap aligns with the up arrow inbetween the Safe and Armed logos, the cap should then slide on and click into place, this is the only position at which it should be possible to remove the cap, it is securely held when either in safe or armed position. Double check that you have positioned everything correctly by turning the cap to Armed (the flame logo), pushing the striker up into the body until it catches on the shelf, then turning to cap to the safe position. It should now not be possible to dislodge the striker from it's cocked position. If it easily falls down then the safety slider must not have engaged correctly with the track on the inside of the cap, disassemble and try again. If the entirely 3d printed safety is too fragile you can print the grub version and insert an M2.5 grub screw between 10 and 14mm long, when screwed in 6mm should protrude.
The Pin & Spoon fuse comes with a spoon that is sized specifically for the Simple and FlashBang models, you can use the Customizer to generate different sized spoons for other body types.
Operation
Unscrew the fuse assembly from the body, it should only be hand tight. Set your fuse to armed and push the striker up into the fuse, it should lean sidewise and catch on the shelf and stay compressed. Once it is cocked, you can set your fuse to safe and it is now safe to handle without fear of triggering.
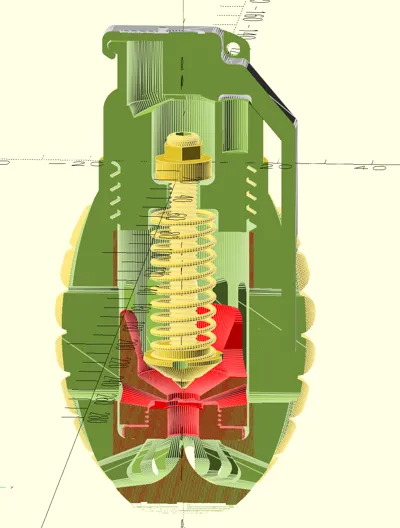
Now gently press a primer, it is designed to fit Fiocchi 209 W type primers, into the primer_carrier plate on the side with a recess. Screw the carrier into the base of the cage (see photo). Drop the assembled carrier into your chosen body and screw the fuse in ontop.
Alternately, if you are using the combo body you do not need a seperate carrier and cage, place the primer into the combo bottom piece, screw that into the base of the combo top piece and screw in your choice of fuse type as usual.
When ready to use, twist, flip, or pull the safety pin and drop or throw it at a hard surface so that it receives a sudden jolt, if you gently roll it then it may not trigger as it requires that impact to set it off.
Important Notice
This is not a toy, it uses shotshell primers or toy gun caps to make it's noise, please ensure that those are legal to possess in your country and follow any safety instructions they include. No part of this system should detach when used and it is not for self defence use. USE AT YOUR OWN RISK. Suitable for use in Airsoft, Paintball, and other Mil-Sim type games only. The noise is very loud, you should ideally be using hearing protection as well as face protection, they should never be used close to anyone's ear or face incase of hearing damage, nor should it be used anywhere that may start a fire. Please follow the safety instructions included with the primers you are using, and always follow the directions of any marshalls or safety officers in the game you are playing.
As always I have made this for fun and the benefit of the Airsoft community, if you have any suggestions for improvement, requests for new body styles, or wish to print these on a commercial basis, please contact me.
Updates
- NEW!! Experimental VS_Striker_twopiece.stl Use an M6x45mm button or socket cap screw + 10mm M3 cone point grub
- Spin Cap - a reimagining of the V2 twist cap fuse. requires 3x M3x20 socket head screws
- VOG-25 style grenade body
- Additional testing has revealed some weaknesses in the Twist Head fuse type, it is possible with a little effort to set it off even when in the Safe position. The cap can also blow off when detonated, so I think it best to avoid using that version for the moment whilst I work on fixing those issues. The other fuse types work solidly and should be preferred (Flip Top is my favourite)
- Updated the primer carrier and cage designs to make them more robust and easier to use, you can even pre-load carriers for quick reloading of your grenade.
- Updated primer striker with the new adjuster tool to make it easier to correctly calibrate your fuse.
- New Combo Body which incorporates both the carrier and cage into the design making it much simpler to load and use.
- Addition of the ring cap cage, you can use this with the primer striker, and it provides an easier to change method for ring caps which does not suffer from the random flip-over problem
Buy pre-made versions of my designs from my store Amethyst Artificery Limited
Comment & Rating (411)