Search models, users, collections, and posts

Crystal Lamp

IP Report

Print Profile(2)

All
X1 Carbon
P1S
P1P
X1
X1E
A1
H2D
H2D Pro
H2S
P2S
H2C
X2D
A2L
A1 mini

Crytal Lamp: 0.2mm layer, 2 walls, 15% infill
Designer
8.7 h
7 plates
4.9(110)

Base without switch controls
48 min
1 plate
5.0(10)

Open in Bambu Studio
Boost
4340
9673
190
215
4.5 k
944
Released 

Bill of Materials

Bambu Filaments
Select all
Translucent Orange (32300) / Refill / 1 kg
Translucent Light Blue (32600) / Refill / 1 kg

Description


Overview

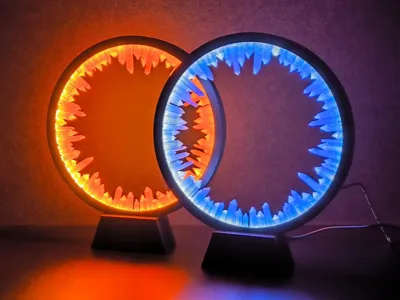
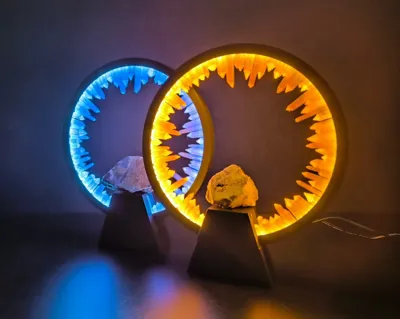
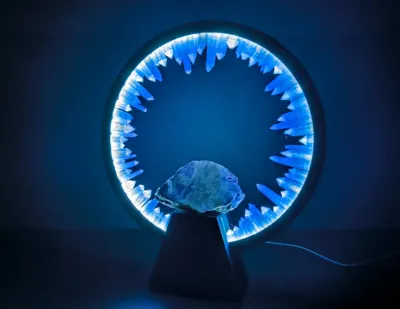
I like crystals and minerals and always want to create a good looking crystals combined with a lamp. This is my approach to this topic.

And since the geographical contest was enriched with a geological aspect along with minerals, I decided that this lamp would fit well into the topic of geology. Besides it have a option to display minerals on inside platform.


Electric parts you need.

The easiest way is to use electrical parts designed specific for this kind of lamp. The kit provides easy installation without the need for soldering.

It is available on Amazon

(Dimmer version) https://amzn.to/4iJ3zHt

(On-Off switch version) https://amzn.to/3ZNb0q4


You can also search for each part separately. You will need

  • led stripe - best are LED COB 8 mm, 12V
  • charger for LED strip
  • dc connector - I used 2.1/5,5 mm , the diameter of the mounting hole is 12 mm
  • On-Off switch
  • alternatively you can use dimmer instead of typical on-off switch

WARNINGS

Led strips can emits some heat depends on what type of LED you and voltage you use. In this project when I use COB Led from the kit the Main Frame achieved about 42 °C, and when I used COB Led with more power the frame achieved 58 °C. 

In this project I used PLA  for black parts and PETG translucent and such temperature is not the problem. But it depends on filament you use. If you have problem with filament which bend due to temperature try to use ASA instead of PLA.

Printing

Printed with 0.4 mm nozzle, 0.2 mm layer height, PLA for black parts (you can also use ASA). PETG translucent for Crystals.

Crystals print with tree supports on bed only, rest part without supports

Instruction

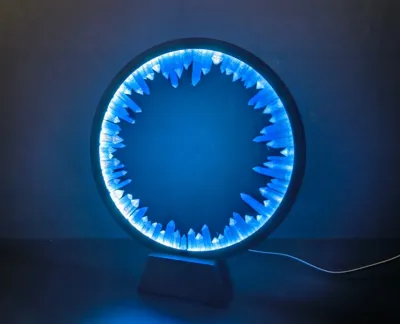
Glue led strip to inner side of Main Frame

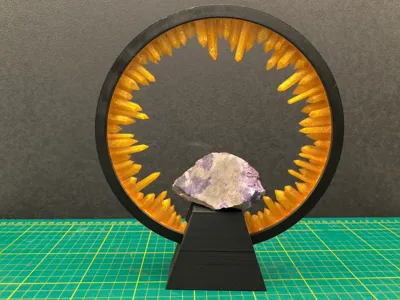
Put Crystals into Main Frame. 

Crystals Have a little gap in the bottom with small carve. This gap with bump (red arrow) should be placed in the bottom like on picture.

Insert front panel into The Main Frame. 

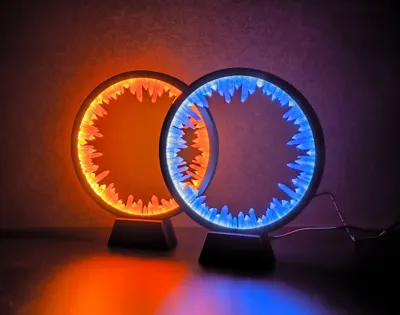
There is two type of Front Panel. Full Glow and With Shade. Full Glow passing full light through base of Crystals. Version with shade blocks light and pass it only into crystals. I recommend panel with shade. It is assure more realistic glow of crystals. However if you want more light choose panel Full Glow. 

Front Panel has cutouts at the bottom. This cutouts should be placed and the bottom of lamp and match with bump on Crystals. 

Insert the electric part into the base and connect them.

There is two type of base. One is holes place for dimmer and AC/DC connector. Second is with holes for on-off switch and AC/DC connector. I also add base in step format so you can cutout holes like you want for electric parts you have.

Connect Frame with Base

You can also close base with cover. It fit tightly

In the end you can also print pedestal and present there whatever you want.


And one more thing.

You can use with this lamp panels designed for my Ring Lamp

Available here:

https://makerworld.com/en/collections/2834845


Have Fun :)


Comment & Rating (190)

(0/1000)

Boosted
Print Profile
Crytal Lamp: 0.2mm layer, 2 walls, 15% infill
Your model is great, printed fine. But seriously, find another vendor for the electronics, this is towards anyone making this. I ordered the one suggested and it's utter crap! The wires were basically disconnected (ie: all the silicone coating was crumbled off & both sets of wires FELL OFF the board as soon as I unwrapped them). Little fighting & some help from a coworker to soldier them back & she lights up!
The profile uploader has replied
profile
16
Reply
Gorgeous! Did you color the crystals with alcohol markers to get the multicolor? I really like your approach!
(Edited)
1
Reply
Boosted
Replying to @sunny6 :
no, i thought about as I've watched several youtubes about it, but i used Studio to paint it & used the AMS lite with 4 different translucent PETG's. Took a bit to print & yes there was poop, but I wanted the crystal colored poops for another project
(Edited)
4
Reply
A very interesting idea and a nice effect. I didn't think about different colored crystals :) As for the quality of the components. When I got the first version for testing last year, one cable from the LED strip fell off and I had to solder it. The seller wrote to me that they improved it and recently I received several pieces of the improved version and I see that it is better protected. Anyway, even if you sometimes need to resolder some wires, these COB LEDs are perfect for this lamp because they are small, produce little heat and allow printing in PLA. Others I tested caused overheating PLA and it was necessary to print with ASA or PETG
(Edited)
2
Reply
Boosted
Print Profile
Crytal Lamp: 0.2mm layer, 2 walls, 15% infill
It turned out absolutely magnificent. I love it. Frame printed with Burnt Titanium PLA and crystals are made with transparent PCTG. I use a 1m led strip from Temu. Specifically one with 10mm between LEDs. I was a bit skeptical to use transparent filament as I've had issues previously with the light not spreading properly but here it is just perfect. Let's me choose any color I want.
The profile uploader has replied
profile
15
Reply
Look great, thanks for boost :)
(Edited)
0
Reply
What type of LED did you use? Do you have a link?
(Edited)
Show original
6
Reply
Replying to @Lhouteng :
WS2812B leds with esp8266 maybe ?
(Edited)
1
Reply
Boosted
Amazing model! 10/10 would recommend. I printed the base and frame in matte black, the crystals with clear transparent PETG. I used a generic WS2812B led strip I had laying around, slapped together an ESP32 and a buck converter and put WLED on it. The led strip was actually a bit too wide to fit in the frame, which then didnt close properly and into the base. I just ended up printing the base again with a slightly bigger gap.
designer
4
Reply
Hey, I used same setup, but I used WS2812B 2020 led size version of strip (typical ws2812b has 5050 led size), this strips are little bit more expensive, but they will fit easly. You can see size difference on photo.
3
Reply
Boosted
Replying to @Matej4D :
looks nice! I got this sort of very dense led strip. I actually trimmed down about 2mm from one side. I might have been able to cut a bit more, but I wanted to be careful not to cut a trace and ruin the whole strip lol I managed to fit 87 leds in the frame
1
Reply
Boosted
Finished mine and love it!
The designer has replied
designer
3
Reply
Nice crystal shading. What filament did you use?
0
Reply
Boosted
Replying to @Sevro :
0
Reply
Print Profile
Crytal Lamp: 0.2mm layer, 2 walls, 15% infill
A great lamp I was looking for something to give purpose to my rainbow filament (200g spool) Then I came across this model. What can I say, I printed 4 pieces 🙈😁 Thanks to the designer, *boost is coming as soon as I have one available again*. On the fourth lamp I didn't have enough rainbow filament left, so I used red and yellow transparent filament and inserted a color change in the slicer just below half of the crystal ring. It worked wonderfully! You don't even know which way the lamps look nicer, absolutely brilliant
The profile uploader has replied
Show original
profile
2
Reply
Great effect with these filaments. Thank you for the photos :)
(Edited)
1
Reply
Boosted
Just to add to my rating post: I used a WS2812B LED strip and connected it all together with an ESP32. Now I have all the colors n the world and light animation too, works like a charm :) The picture is of my prototype to check if it would work and look good, so thus all the loose wires :) PS: Looks better in "Real-Life" than in the photo.
designer
3
Reply
good work change good night lamp
designer
3
Reply
Grabbed a couple pics while testing my LEDs and this is such a cool print!! I used a holographic PEO build plate which gave the faces of the ring an awesome finish too that I think goes perfectly with the gems
(Edited)
designer
3
Reply
Boosted
Print Profile
Crytal Lamp: 0.2mm layer, 2 walls, 15% infill
The first print worked flawlessly, straight out of the box No modifications needed Looks absolutely stunning, too Respect and a big kiss <3
Show original
profile
3
Reply
Boosted
Print Profile
Crytal Lamp: 0.2mm layer, 2 walls, 15% infill
Printed pretty good, base failed 3 times, with brim no problem.
profile
3
Reply

License

This user content is licensed under a Standard Digital File License.

You shall not share, sub-license, sell, rent, host, transfer, or distribute in any way the digital or 3D printed versions of this object, nor any other derivative work of this object in its digital or physical format (including - but not limited to - remixes of this object, and hosting on other digital platforms). The objects may not be used without permission in any way whatsoever in which you charge money, or collect fees.