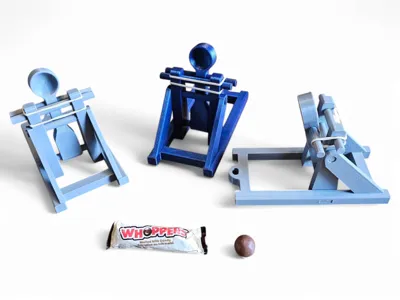
Mini Catapult / Whopper Launcher

Print Profile(1)

Description
DIY 3D-Printed Catapult – Ready, Aim, Launch!
Unleash your inner engineer with this 3D-printed DIY catapult! Whether you’re launching tiny projectiles across your desk or just enjoying the satisfying snap of elastic-powered physics, this little siege engine is designed for maximum fun and minimal print time.
🔹 Fast Print Time – Just 2.5 hours and you’re ready to build.
🔹 Material Efficient – Uses only 50g of filament.
🔹 12 Easy-to-Assemble Pieces – No tools required!
🔹 Elastic-Powered Launch System – Experiment with different bands for varied power.
Perfect for makers, tinkerers, and medieval mischief-makers, this catapult is a fun weekend project or a great way to add some kinetic flair to your workspace. Download the files, fire up your 3D printer, and start launching! 🏹💥
Assembly tips.
There are a total of four (4) rods with three (3) different lengths.
The shortest rod is the one the throwing arm pivots on.
Assemble this rod with the launcher arm into the to vertical "A" beams lowest round hole.
(These are the parts with three (3) round holes on side and two on the other).
**The offset hole in the middle of the "A" beams should be towards to front (the direction the throwing arm faces).
Install the now built throwing arm assembly into the base, securing it with the two rectangular blocks.
**The end of the base with the centered hole is the back. This hole is to allow you to secure the assembled catapult for launching if desired.
There are three (3) rods remaining. Two (2) of equal length, and one shorter.
The shorter remaining rod is for the side supports.
Assemble this rod centered into the offset hole of both "A" beams.
Install the side supports. They can go on either side, but are to be facing forward.
**The side supports are designed to be secured to the base using super glue
Install the two remaining rods of equal length centered into the two remaining holes.
Band an elastic around the two rods of equal length. Hooking the elastic on one side of the throwing arm,
Wrap the elastic around the front of the catapult to the other side and hook onto the other side of the throwing arm.
**Reference model picture if needed
Your Mini Catapult / Whopper Launcher should now be ready to fire!
Use different sizes of elastics for varying power!
Catapult side supports are designed to be secured with super glue
License
You shall not share, sub-license, sell, rent, host, transfer, or distribute in any way the digital or 3D printed versions of this object, nor any other derivative work of this object in its digital or physical format (including - but not limited to - remixes of this object, and hosting on other digital platforms). The objects may not be used without permission in any way whatsoever in which you charge money, or collect fees.
Comment & Rating (10)