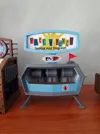
Pack-a-Punch Machine


Print Profile(3)


Description
Pack-a-Punch Machine
- Most parts are press-fit, but if any parts are loose, a small dab of glue will help.
- All parts are colored for the multicolored design. Printing in multiple colors is not required, making the parts look much nicer.
- If you have issues with a press fit part, please remove the supports fully.

INSERT THE SILVER PIECES FIRST

GEARS ARE ALL KEYED SO THEY GO INTO DESIGNATED SPOT

GEARS GO IN HERE

SILVER GEARS SLOT INTO THESE 3 LOCATIONS

ONCE ALL GEARS ARE INSTALLED I SUGGEST DRY FITTING THE FEET BEFORE GLUING TO HELP WITH PROPER ORIENTATION.

LETTERS ONLY GO INTO THEIR DESIGNATED AREA. USE THIS PHOTO FOR REFERENCE.

BEFORE INSTALLING PAP LOGO FIRST ATTACH THESE TWO PIECES.

GLUE IS REQUIRED FOR THE RAYGUN LOGO.

INSERT THE GEARBOX INTO THE BACK PART WITH THE SQUARE CUTOUT IN THE TOP RIGHT CORNER. THAT IS WHERE THE RED FLAG GOES.

ATTACH COIN SLOT, NO TOUCH LOGO, AND GLUE PAP LOGO INTO TOP SLOT.

INSERT BROWN TRIM INTO SLOT. GLUE MAY BE REQUIRED.

LASTLY, ATTACH SILVER FRONT PIECE. THIS PART ONLY GOES IN ONE WAY.
Interested in selling my models? Check out my Patreon link in my bio.
License
You shall not share, sub-license, sell, rent, host, transfer, or distribute in any way the digital or 3D printed versions of this object, nor any other derivative work of this object in its digital or physical format (including - but not limited to - remixes of this object, and hosting on other digital platforms). The objects may not be used without permission in any way whatsoever in which you charge money, or collect fees.
Comment & Rating (89)