


Print Profile(1)

Bill of Materials

Description
Inspired by a watch I used to own many (many) years ago in my youth… takes a little while to get used to the offset of the hands but when you nail it the joy is watching other peoples confusion over trying to tell the time with it
Now available as a desktop version:
https://makerworld.com/en/models/1327687-desktop-offset-clock-ams-required
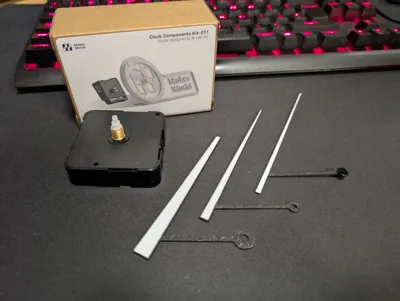
Designed around the Bambu Labs clock kit-011 the clock unit simply clips into the back with no need to use the securing nuts. the clock can be hung using a countersunk 3.5mm dia screw of whatever length you need for the surface you are hanging it on
The hour and minute hands are designed to push fit onto the clock spindle but the sizing is based on the kit I received at the time of designing and I am aware that the movements have been known to vary… if the hands are tight then you can trim them with a sharp craft knife (No. 11 blade)…
I have bought movements from Amazon in the past and while the movement itself fits fine in the clock the spindle diameter and length can vary…
The amazon movement is on the left, the Bambu Labs movement is on the right….

I have measured a Kit-011 and an Amazon supplied movement and found that the spindle length is longer on the 011 kit vs the Amazon unit… the hour/minute hand spindle diameters also differed so just be aware…
The hands are designed with the following sizing of the Bambu Labs kit…
Hour hand I/D = 5.1mm
Minute hand I/D = 3.2mm
The seconds hand is optional… I originally printed it with a boss to push onto the less than 1mm dia seconds hand spindle and found it was too small to print reliably… you could use a 0.2mm nozzle to improve the accuracy but I decided to go a different route…
Using the seconds hand supplied with the 011 kit I separated the hand from the centre boss


Once separated you then insert it into the hole of the seconds hand… its likely to be tight so again you can relieve it a little with a craft knife

I used a little super glue to make sure its all held together fine and then align all the hands to 12 o'clock before setting the time.

The hanger will hold the correct orientation but the 4 thicker lines are 12, 3, 6 and 9 respectively
License
You shall not share, sub-license, sell, rent, host, transfer, or distribute in any way the digital or 3D printed versions of this object, nor any other derivative work of this object in its digital or physical format (including - but not limited to - remixes of this object, and hosting on other digital platforms). The objects may not be used without permission in any way whatsoever in which you charge money, or collect fees.
Comment & Rating (26)