


Print Profile(10)


Bill of Materials


- 1/8" thick clear acrylic sheet x 1:
Description
Note for ALL: Read through the entire description for important details, fun ideas, tips, & assembly! This is a fun DIY project that can involve more than just 3D printing.
Check out our NEW Compact Fidget Bookcase designed for the A1 Mini!
- NO AMS
- PRINT EVERYTHING ON YOUR A1 MINI
- NO CUTTING ACRYLIC SHEETS. This compact model was designed around a 4x6in acrylic sheet (1/8in thickness).
 | 
| 
| 
|
 |  |  |  |
Boost Me (for free)
If you enjoyed the design, drop a boost! Thank you
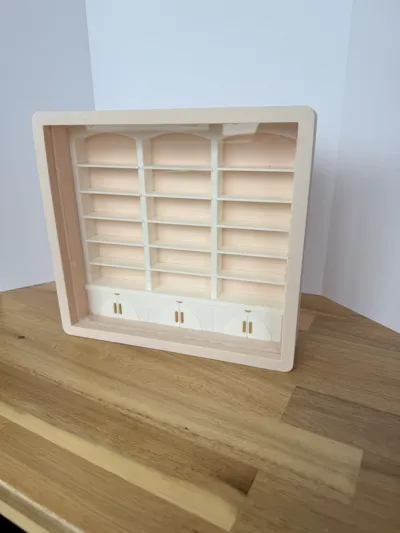
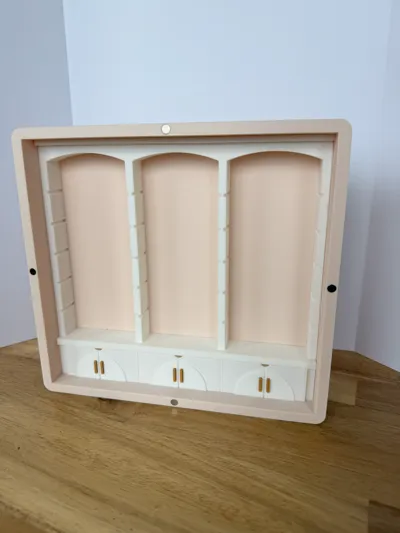
WHAT IS A FIDGET BOOKCASE?
There are multiple uses for a fidget bookcase! The main idea is to use this as a stress-relief activity. Decorating & organizing the bookcase offers self-care, mindfulness, and relaxation. It's a fun activity for both children & adults! When you're done, place it on your desk or bookshelf to display your design. When you want to work on it again just tip it over and start on something new!

Here are some other uses:
- Track your annual reading goal! For each book you read, print & glue the cover of the book on our miniature printable books to add to your bookcase throughout the year
- Buy mini books online to decorate your bookcase! The mini books used in the showcase images can be purchased here: https://www.amazon.com/dp/B0DKF1853V?ref=ppx_yo2ov_dt_b_fed_asin_title (This is not an affiliate link, just sharing what I bought because the bookcase was partly designed around the dimensions of these books)
- Add a unique and thoughtful touch to your workspace, bedroom, or bookshelf
- Serves as a visual reminder to slow down, breathe, and take care of your mental well-being
- An ideal gift for book lovers, therapists, students, or anyone who appreciates mindful décor
FEATURES
Adjustable shelves Provides options for larger décor pieces and unique displays | FUN IDEAS - Use different colors - Use 3D effect print sheets |  |
Storage Store your shelves and other décor neatly inside of the bookcase storage bin so it can all stay in one place. | FUN IDEAS The handles print separately so you can easily customize the small accent pieces of your bookcase with different colors. |  |
Custom Mini Décor I have created a handful of mini décor options to make this activity even more unique & fun | FUN IDEAS - SECRET MAGNET VASE TO TURN ON MOOD LIGHT! - Scale down your favorite designs from other creators and use them to create your own unique bookcase - Create your own décor to truly make it personal - Add your “poops” as décor! |
 |
Multiple Designs I have created two bookcase designs: Vertical shiplap - Adds a soft, modern touch to the design Plain - This is simple & elegant | Vertical Shiplap  | Plain  |
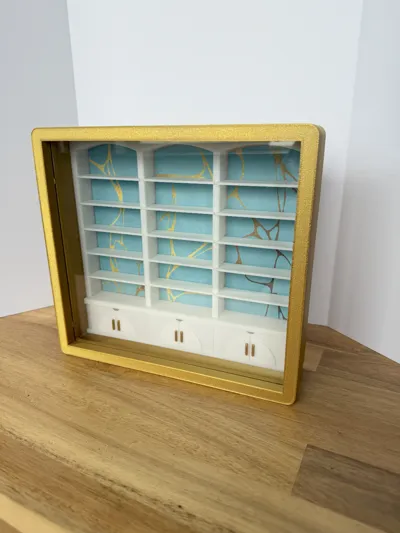
Add Your Own Wallpaper Express yourself by adding your own wallpaper! I designed a Wallpaper Template that you can use to trace & cut out any wallpaper pattern or design of your choice. You can glue the wallpaper or choose not to if you want to switch it out in the future. Once the shelves are added, they do a good job at securing the wallpaper without glue. |
 |
 |
ASSEMBLY
Here is an excellent video that shows a few ways to cut acrylic sheets without power tools. If you use a table saw, circular saw, jigsaw, or miter saw make sure you use a blade that is meant to cut plexiglass/acrylic.
|
 |
Use the Acrylic Sheet Template to trace an outline on your acrylic sheet to cut it. ***LEAVE THE PROTECTIVE COVER ON UNTIL IT IS DONE BEING CUT! I bought 8 in x 11 in clear acrylic sheets (1/8 inch thick) from Home Depot. The 8 inch side fits perfectly, so I only had to make a single cut and trim a few inches off the longer side. This design was specifically modeled for 1/8 inch thick acrylic sheets. |
 |
| 
|
License
You shall not share, sub-license, sell, rent, host, transfer, or distribute in any way the digital or 3D printed versions of this object, nor any other derivative work of this object in its digital or physical format (including - but not limited to - remixes of this object, and hosting on other digital platforms). The objects may not be used without permission in any way whatsoever in which you charge money, or collect fees.
Comment & Rating (172)