Supermarine Spitfire (1:72 Scale)


Print Profile(1)

Description
The Supermarine Spitfire was a British single-seat fighter aircraft that played a pivotal role in World War II. Designed by R.J. Mitchell, it was renowned for its agility, speed, and powerful armament. The Spitfire's elliptical wing design gave it superior maneuverability, which made it highly effective in dogfights, particularly during the Battle of Britain. It was used by the Royal Air Force (RAF) and other Allied forces, with numerous variants produced throughout the war. The Spitfire became an iconic symbol of British resilience and military prowess.
Boost Me (for free)
Boost for more planes :)
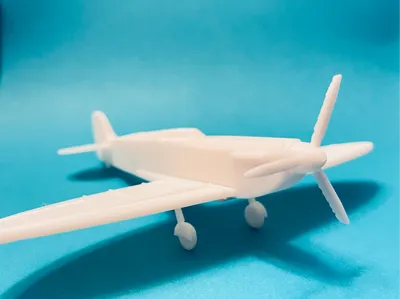
Step 1: Organizing the Parts
Lay out all the printed parts and identify them:
- Fuselage Front (Front section)
- Fuselage Rear (Rear section)
- Fuselage Connector (Small box)
- Wings (Left & Right)
- Tail Fins (Horizontal Stabilizers)
- Propeller Assembly
- Landing Gear (Wheels & Struts)
Step 2: Assembling the Fuselage & Wings
- Take the two wings and ensure they fit snugly into the slots on the fuselage.
- Apply a small amount of glue to the contact points and press them firmly in place.
- Let it dry before handling further.
- Connect the rear fuselage section to the front using the fuselage connector to fill the hole. Connector may need additional modification with a knife or wire cutters to permit optimal fit.
Step 3: Attaching the Tail Section
- Attach the horizontal stabilizers (tail wings) on either side of the vertical fin.
- Ensure they are properly aligned and let the glue set. Refer to the images if unsure.
Step 4: Installing the Propeller
- Insert the propeller into the designated front section of the fuselage. It should have a tight fit and not require glue, but if you wish it to spin more freely, lightly sand the shaft of the propeller.
Step 5: Attaching the Landing Gear
- Attach the rear wheel into the slot on the underside of the tail. Glue is recommended.
- Attach the front wheels using glue into the landing gear struts. Use a small amount of glue in the middle of the wheel and use the corresponding slot for the wheels on the gear strut.
Attach the front wheel struts to the underside of the fuselage/wings.
License
You shall not share, sub-license, sell, rent, host, transfer, or distribute in any way the digital or 3D printed versions of this object, nor any other derivative work of this object in its digital or physical format (including - but not limited to - remixes of this object, and hosting on other digital platforms). The objects may not be used without permission in any way whatsoever in which you charge money, or collect fees.
Comment & Rating (1)