Rabbidz - TEQ63 Pack


Print Profile(1)

Description
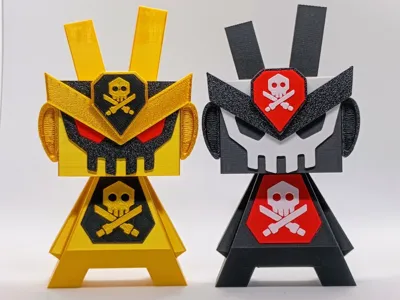
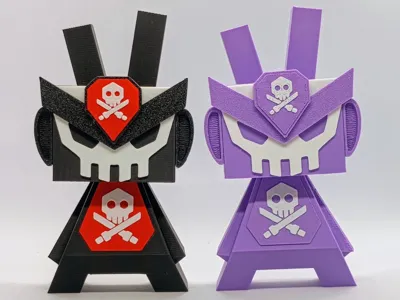
Hey everyone. Here is a TEQ63 pack for customising your “Rabbidz”.
TEQ63 is the world renowned art toy created by the artist QUICCS.
NB: The profiles contain only the accessories, so you will need to print the head and body from my Rabbidz model.
In this model, I wanted the ears to represent the “Maedate” or crest of the helmet, so this is why the crest is not present. Additionally, the vent on the top of the helmet is missing as the gap between the ears was too narrow and it just looked cluttered and bulbous with it on.
For printing the multi-colour parts I have included an “AMS Version” and “Non AMS Version”.
See building instructions and “Non AMS Version” printing instructions below.
Happy Printing!
Building Instructions
Glue the mask on to the head ensuring top corners line up. I usually put a dob of glue in the middle and spread it around the edges with the end of a paper clip. Glue in the optional eyes at this stage if you want them on your model.

Glue the crest to the logo base ensuring that they are snug together and the points are aligned. Below is a picture of the parts glued from the back.

Glue the combined part above on to the face. The bottom of the crest should line up perfectly with the top of the eye.

Remove the brim and supports from the side vents. Glue the side vents to the head. Ensure the front of the vent is flush with the front of the face and the top back corner lines up perfectly with the top back corner of the head.

When placing the second side vent, double check alignment from the front to ensure both are at the same height.

Glue the logo on, ensuring an even distance all around the edge to the edge of the base.

Glue on the chest plate, ensuring an even distance on the sides and the bottom.

Congratulations! You now have one TEQ63 Rabbidz.
Non AMS Version printing Instructions
This section describes how to print the multi-colour parts without using an AMS. I have only tried this on an A1 mini, but the process should be similar on all Bambu printers.
Use the “Non AMS Version” plate. On this plate, I have split the parts and assigned colours to them. Change the colour and filament type to what you intend to use, then slice the plate. Notice that there is a pause on Layer 3. This means that the print will pause at the start of layer 3 and you will need to manually change the filament.

So once you have your first filament loaded and second filament handy, start the print. It will take about 4-5 minutes to reach the pause point, so make sure you are close to the printer.
NB: On Bambu printers when the print is paused, the load and unload features are unfortunately disabled, so you need to do it manually. Hopefully one day Bambu will address this.
When the print pauses, use the printer screen or Bambu Handy app to set the nozzle temperature to around 175 degrees (must be over 170 degrees). This is the temp for PLA, so check what temperature you need for other filaments.
When the nozzle temperature is stable, cut the filament, pressing the level on the side of print head. You may get a warning that the lever is stuck, but just ignore that warning if the lever has returned back to its start position.

Now that the filament is cut, you can start extruding it out, by pressing the up button in the Extruder section. It should look similar to below in the app and on the printer touchscreen. Press it once and then check if you can pull out the filament. If you can't then repeat this process until the filament is sufficiently extruded so you can remove the filament.

With the old filament removed, insert the second filament all the way. Then press the down button and you should start seeing filament coming out of the nozzle. Keep pressing the down button until you see the second filament coming through the nozzle.
Now that all the first filament is cleared and the second filament is coming though, you can now resume the print by pressing the play button. The printer will think for a while before commencing, but it should continue on its merry way and print the final two layers.
NB: Once the print starts, it first puts a small dob of filament on the side of the logo before commencing with the build tower. I don't know how to prevent this, so you will need to trim that small bit of filament off at the end.
Hopefully, these instructions helped. To be honest, this is the first time I have ever tried such a thing as I have always had an AMS.
License
You shall not share, sub-license, sell, rent, host, transfer, or distribute in any way the digital or 3D printed versions of this object, nor any other derivative work of this object in its digital or physical format (including - but not limited to - remixes of this object, and hosting on other digital platforms). The objects may not be used without permission in any way whatsoever in which you charge money, or collect fees.
Comment & Rating (6)