Fifine M9 Mic Handle Flag System


Print Profile(3)


Bill of Materials

Description
For the Fifine M9 Mic Handle check out this link. (The flag works with the 200mm models).
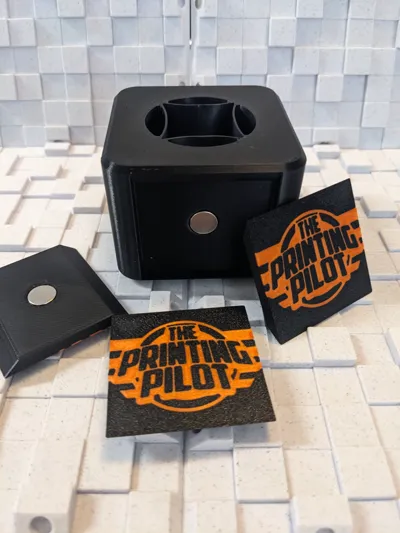
Meet the Fifine M9 Mic Handle System!
After designing the Fifine M9 Mic Handle. I was looking for a flag system, but couldn't find anything at all, so I designed one!
The flag is designed with 2 main parts:
first, is the body itself, it is designed to slide onto the mic handle with a compliant mechanism that deforms and allows you to slide it onto the mic handle while keeping the flag system firmly connected to the mic handle.
Second, is the Magnetic face plate, the blank magnetic face plate allows you to use a SVG as a modifier in PrusaSlicer and add your logo to the face plate, the magnets are pressed into the plate and does not need any glue for assembly.
Parts:
4x - 10x2mm Magnets - Flag Box
1x4 - 10x2mm Magnets - for each one of the face plates.
Variants:
- Flag Box.
- Magnetic Face Plate - Blank.
- Magnetic Face Plate - Fifine Logo.
Why choose my design?
- Snap-in-place design - using magnets for the snap action.
- Interchangeable faceplates - print many different faceplates and just change them as needed.
- Easy to print - 3mf files ready to print, with all the correct seams settings to ensure successful print.
- No Support - No support is needed for this print.
- Single/Multicolor - add your logo as an SVG modifier in PrusaSlicer.
Print Settings
- Material: PLA for indoor use, PETG or above for outdoor/hot environments
- Nozzle Size: 0.4mm
- Layer Height: 0.2mm
- Vertical Walls: 2
- Infill: 15%
- Supports: None
Assembly instructions:
Faceplate:
all you need is just to press the magnet into the faceplate, use a desk or something firm to help you push the magnets in. its a press-in-place design and will need some force, but no glue is needed.


Flag Box:
since its harder to get perfect circles while printing stuff vertically the ovality of the magnet holes wont be accurate enough for a press fit, so you will have to add a drop of CA glue before pushing the magnets in.

Usage:
Cant figure out how to take the faceplates off?
The faceplates has a carefully designed chamfer on the ends, that way, while pushing on the bottom of the faceplate, the faceplate just pop out of the flag box!


License
You shall not share, sub-license, sell, rent, host, transfer, or distribute in any way the digital or 3D printed versions of this object, nor any other derivative work of this object in its digital or physical format (including - but not limited to - remixes of this object, and hosting on other digital platforms). The objects may not be used without permission in any way whatsoever in which you charge money, or collect fees.
Comment & Rating (30)