Search models, users, collections, and posts

Brick City - train switch right

Print Profile(1)

All
X1 Carbon
P1S
P1P
X1
X1E
A1
H2D
H2D Pro
H2S
P2S
H2C
X2D
A2L

Brick City - train switch right
Designer
3.3 h
3 plates
4.7(48)

Open in Bambu Studio
Boost
298
900
96
70
783
514
Released 

Description

Boost Me (for free)

If you like my work, please feel free to boost. Thank you

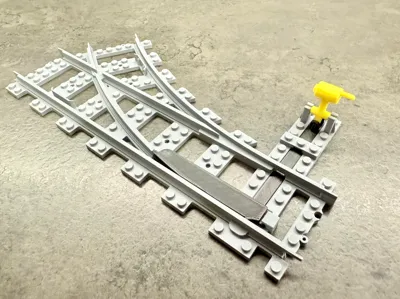
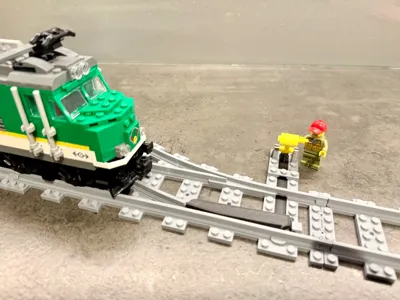
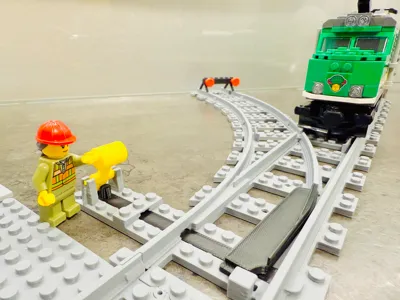
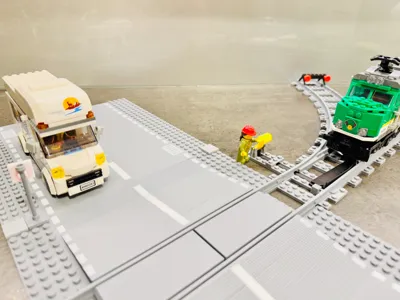
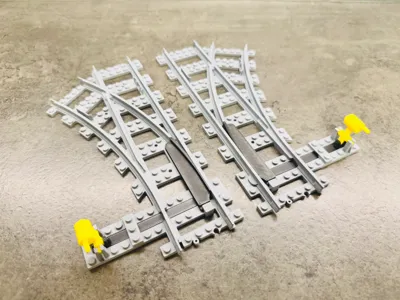
BRICK City 100% compatible - train switch right

  • It fits perfectly with the original railway tracks
  • Railway tracks wide as the original
  • Railway tracks as high as the original
  • No screw, magnet or glue needed


I am preparing many more Brick variants.

Thematic collections are here: TRAIN, ROAD, CLASSIC or everything in one place here: BRICK ALL


  • One tip:
    • There is no need to remove all the supports if you dont want
    • For proper functionality, simply remove the supports marked with number 1


  • Assembly instructions:
    • Insert the switch rod (1A, 1B, 1C)
    • Install the switch arm (2)
    • Turn the train switch and secure with a pin - use force, the pin must be flush with the bottom surface of the train switch (3A, 3B)
    • Turn the train switch back and attach the control handle - the handle must be installed between the rod (4A, 4B) 


UPDATE 17.3.2025: Improved component for changing train direction - stronger connection that can handle higher train speeds


Comment & Rating (96)

(0/1000)

Print Profile
Brick City - train switch right
Great part. fits well with other tracks. switching rail however is thin and needed to be glued.
The profile uploader has replied
0
Reply
Hi, thank you for the rating and comment... I have printed about 10 pieces and there is no problem, but it probably depends on the calibration and type of filament. I will try to come up with a reinforcement that will not affect the functionality.
0
Reply
I made an adjustment, connecting the layers more and increasing the fill. It should be fine now. Thank you
0
Reply
Replying to @MissingBrick :
thanks, yeah I usually slice on my pc but this time around I sent it from my phone. it sealed the base of it and had a gap layer before making the rail. kinda odd. if I print more I’ll let you know if it persists.
0
Reply
There is an issue with the part intended to rotate the train. Please see the attached image. Unfortunately, this flaw causes the train to derail at high speeds. I hesitate to leave negative feedback, but please rectify this component. I specifically printed it twice, yet the problem originates in the design itself. Thank you
The designer has replied
Show original
0
Reply
Hi, thank you for the rating and comment... I have printed about 10 pieces and there is no problem, but it probably depends on the calibration and type of filament. I will try to come up with a reinforcement that will not affect the functionality.
0
Reply
printer Is calibrated, and I used a perfect new Original Bambulab filamenti. If you check the STL, there Is a gap where I have the issues. I solved with glue for now
0
Reply
Replying to @Bavon82 :
Thanks for the warning, you are right. I made an adjustment, connecting the layers more and increasing the fill. It should be fine now. Thank you
0
Reply
Sehr gutes Modell
The designer has replied
0
Reply
Thank you for the photo and five stars... I really appreciate the support.
1
Reply
Cool model, something happened to my first print so one of the connections were deformed, but the second gone well. Thank you for the model.
The designer has replied
0
Reply
Thank you for the comment and photo... I am very happy that the printing was successful. Enjoy!
0
Reply
Boosted
Thank you, works great 💪
The designer has replied
0
Reply
Thank you for the comment, photo and boost... I really appreciate the support.
0
Reply
Print Profile
Brick City - train switch right
Excellent design. Functionality requires revision. The moving part of the track causes the train to derail at high speed
The profile uploader has replied
Show original
0
Reply
Thank you for the comment, photo and five stars... Unfortunately, at high speed the train will derail even on the original train switch. I would have to make a completely different design and a smaller radius...
0
Reply
Boosted
Print Profile
Brick City - train switch right
Printed only the lever. printed great, bu had a flat spot where the lever contacted the bed. I assumed since the track is supposed to fit with the original track, the lever would also fit. the lever is wider than the original.
The profile uploader has replied
0
Reply
Thank you for the rating and comment. This is definitely not a LEGO replica. The original tracks are my inspiration, but I create according to my own. The strength of the printed material and 100% functionality must always be taken into account…
(Edited)
1
Reply
Boosted
Nice projet, I'll try it. Better using PLA or PET-G ?
The designer has replied
0
Reply
Thank you, just use PLA, everything in the photos is made of Bambu PLA and there is no problem with functionality. My 4 year old son is not exactly 100% careful and has not broken anything yet.
0
Reply
Boosted
Replying to @MissingBrick :
Thanks! This one is too big for my A1 mini, I'll try yout smaller models
0
Reply
Replying to @vever :
Sorry, unfortunately it is not possible to make a train switch for the A1 mini, the mechanism and radius must be larger for the wagon to pass through. But now that I think about it, I could try to insert a clutch and divide the model into two pieces. I will think about it, whether it would work...
1
Reply
Do I need to put supports
The designer has replied
Show original
2
Reply
Yes, supports are necessary at least at the end of the track, otherwise 100% functionality of the connection is not guaranteed.
1
Reply
What is the radius of the curved track in cm?
The designer has replied
Show original
0
Reply
Hi, I never understood how someone could measure an exact radius. Are you interested in the center of the track? The outer track? The inner track? Each radius will be different...
0
Reply
Replying to @MissingBrick :
Okay, I need to be clear about which turns he will make that form a 90° angle
Show original
0
Reply
You measure it by connecting enough curve pieces to make a half circle and measure the diameter from center to center. Then divide by two to get the radius.
0
Reply

License

This user content is licensed under a Standard Digital File License.

You shall not share, sub-license, sell, rent, host, transfer, or distribute in any way the digital or 3D printed versions of this object, nor any other derivative work of this object in its digital or physical format (including - but not limited to - remixes of this object, and hosting on other digital platforms). The objects may not be used without permission in any way whatsoever in which you charge money, or collect fees.