TIE/SA Tie Bomber


Print Profile(3)


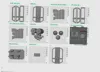
Bill of Materials


Description
The TIE Bomber is a heavy assault starfighter used by the Galactic Empire, designed for delivering devastating payloads in precision strikes. With its distinctive dual-hull design—one for the pilot, the other for ordnance—the TIE Bomber carries proton bombs, torpedoes, and missiles to obliterate ground targets and capital ships alike. Slower and more heavily armored than standard TIE Fighters, it plays a key role in the Empire’s tactical dominance across the galaxy.
Add to your fleet:
TIE/LN- TIE Space Superiority Fighter
Assembly Instructions for the TIE Bomber

Additional Items Needed:
- CA glue
- Spare 1.75 mm filament pieces (used as connectors)
- Templates for bending inner wing panels and wing assembly
Cockpit Assembly

BOM for Cockpit Assembly:
- 1 MAIN_BODY_C
- 1 CANOPY
- 1 TIE-EXHAUST
- 1 CENTER_BEAM_C
- 1 WING_PYLON
Assembly Steps:
- Glue the TIE-EXHAUST to the back of the MAIN_BODY_C. Ensure the tops are aligned, then secure with a small amount of glue.
- Attach the CANOPY to the front of the MAIN_BODY_C:
- Use 3 scraps of filament as alignment pins.
- Insert the filament into the holes of the body, trim so that they extend a couple of millimeters, and secure with a small amount of CA glue.
- Glue the WING_PYLON in place with the notch facing forward.
- Attach the CENTER_BEAM_C to complete the cockpit assembly.
Weapons Bay Assembly

BOM for Weapons Bay Assembly:
- 1 MAIN_BODY_WB
- 1 MISSILE_BAY
- 1 BOMBING_CHUTE
- 1 TARGETING_SENSORS
- 1 TIE-EXHAUST
- 1 GREEBLE_1
- 1 GREEBLE_2
- 1 CENTER_BEAM_WB
- 1 WING_PYLON
Assembly Steps:
- Glue the TIE-EXHAUST to the back of the MAIN_BODY_WB.
- Attach the BOMBING_CHUTE and TARGETING_SENSORS to its corresponding hole in the MAIN_BODY_WB.
- Glue the CENTER_BEAM_WB in place.
- Attach GREEBLE_1 and GREEBLE_2:
- Note: GREEBLE_1 is shorter and should be placed next to the CENTER_BEAM_WB.
- Attach the MISSILE_BAY using scraps of filament as alignment pins and secure with glue.
- Glue the WING_PYLON into place with the notch facing forward.
Left and Right Wing Assemblies

BOM for Each Wing Assembly:
- 1 CENTER_IN
- 1 RAD_CENTER_FRONT
- 1 RAD_CENTER_REAR
- 1 CENTER_OUT
- 1 WING_TOP
- 1 WING_BOTTOM
Assembly Steps:
- Use the provided tool to shape the inner wing panels (CENTER_IN):
- Apply a small amount of glue to the seams.
- Bend the top and bottom sections into place and place the panel in the tool while the glue sets.

- While the inner panel dries, prepare the solar panel inserts (WING_TOP and WING_BOTTOM):
- Insert the solar panels into the top and bottom outer wing skins.
- Optionally, glue the panels in place to prevent them from falling out.
- Attach the outer center section (CENTER_OUT):
- Insert the small panel (RAD_CENTER_FRONT) in the front and the longer panel (RAD_CENTER_REAR) in the back.
- Note: The longer panel only has one correct orientation. Flip it if it doesn’t align.
- Use the wing assembly tool to glue the outer skins (WING_TOP and WING_BOTTOM) to the inner panel (CENTER_IN):
-
- Apply glue evenly to the edges of the inner panel.
- Align the solar panels with their corresponding holes.
- Clamp the pieces together while the glue dries.
- Repeat these steps for the other wing assembly.

Final Assembly

Assembly Steps:
- Attach the wing assemblies to the cockpit and weapons bay subassemblies:
- Insert the WING_PYLONS into the sockets on the CENTER_BEAMS of the wings.
- Ensure the notches on the WING_PYLONS align the wings with the body.
- Connect the cockpit assembly and weapons bay assembly:
- Use filament pins in the CENTER_BEAMS for alignment.
- Secure the two halves with glue.
Boost Me (for free)
"Secure peace. Bring order. Join the Empire."
Citizens, the galaxy needs stability—and you can be the force that ensures it. Serve with pride. Enforce the Emperor’s will. Together, we build a stronger tomorrow. Enlist today.
License
You shall not share, sub-license, sell, rent, host, transfer, or distribute in any way the digital or 3D printed versions of this object, nor any other derivative work of this object in its digital or physical format (including - but not limited to - remixes of this object, and hosting on other digital platforms). The objects may not be used without permission in any way whatsoever in which you charge money, or collect fees.
Comment & Rating (201)