Amazons Cheapest 4L Box,FilSwatch+desiccant+Hygrom


Print Profile(10)


Bill of Materials

Description
*Disclaimer: Cheapest I could find in Sweden from Amazon, can't say if it's true for the rest of the world.. ;)
Printable on A1 mini with good tight fit to the 4l box, between parts and to the hygrometer.
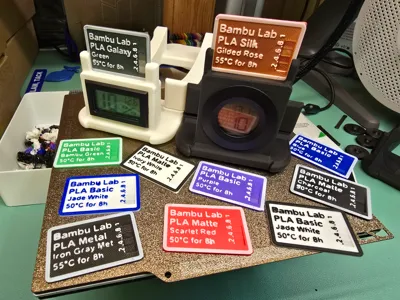
Update! Now with filament swatch holder - Filament swatches that match found here: https://makerworld.com/en/models/1109760-filament-swatches-for-amazon-s-cheapest-4l-box
- Please note that the 0.12mm layer height is intentional and what I recommend printing with, as it will remove the need for a lot of the supports so uses less amount of filament (58g vs 62g for 0.2mm), gives much nicer results, ensures good fit between parts and adds just 50min to the print time (3h9m vs 2h19m for 0.2mm)
All parts are from Amazon, below are links to Amazon Sweden but should work for most of Europe. If link doesn't work try searching with the full description below instead and you should find the part for your country if available, usually works.
- 4L Box
- Skroam 4pcs Cereal Containers [4L/13oz]
- https://www.amazon.se/gp/product/B0CFLJCJSF
- Skroam Cereal Containers, 6 Pack Airtight Food Storage Containers
- https://www.amazon.de/dp/B0C1N9C3T7
- PRAKI Large Dry Food Storage Containers with Lids (4L Black)
- https://www.amazon.com/dp/B08TWH2QHV?th=1
- Desiccant
- Wisedry 20g [12 Pack] Rechargeable Silica Gel Desiccant Pack
- https://www.amazon.se/dp/B081JQFH4J
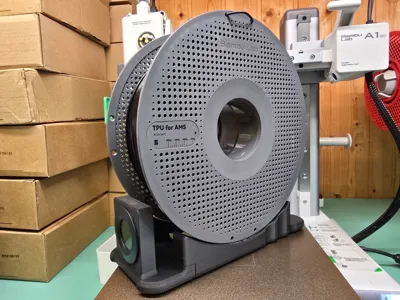
- Hygrometer Round Option
- Thlevel LCD Digital Temperature Humidity Meter Thermometer 6 Pack - Round
- https://www.amazon.se/dp/B07JG9QZ2B
- Hygrometer Rectangular Option
- Set of 12 Vaikby Digital Indoor Thermometer, Hygrometer
- https://www.amazon.se/dp/B0D3TCTXKD
- Thlevel LCD Digital Temperature Humidity Meter Thermometer 6 Pack - Square
- https://www.amazon.se/dp/B07JW7K2M5
If you find cheaper parts with similar quality, please let me know and I can update design and/or Bill of Materials.
Assembly instructions
Step 1: Remove supports and clean up the areas that were supported to ensure good fit between parts.

Step 2: Install hygrometer by pushing it into the big round hole from the front.

It should look like this from behind.

Step 3: Place the part with the hygrometer in the wider end of the 4l box.

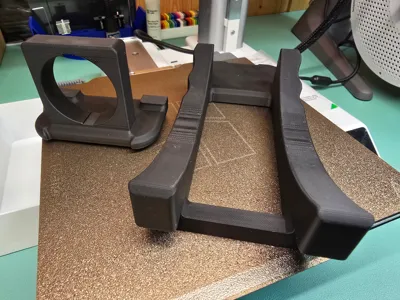
Step 4: Insert the long part at an angle, resting on the shorter part.

Step 5: Push down the long end to secure the parts to the bottom of the box.

Step 6: Place the desiccant bag in the hole in the middle of the long part.

Step 7: Place the filament spool on top of the supports.

Step 8: Put the lid on and secure it with the four locks.

And you're done!
License
You shall not share, sub-license, sell, rent, host, transfer, or distribute in any way the digital or 3D printed versions of this object, nor any other derivative work of this object in its digital or physical format (including - but not limited to - remixes of this object, and hosting on other digital platforms). The objects may not be used without permission in any way whatsoever in which you charge money, or collect fees.
Comment & Rating (486)