🛠️ 3D Printing Secrets: How to Position Models on the Build Plate in Bambu Studio
Author: KORA Workshop
Compatible with: Bambu Studio / OrcaSlicer
Guide Style: Visual Reference Card / Poster
Hello, makers! Proper model orientation on the build plate is 80% of 3D printing success. It determines part strength, surface smoothness, the number of supports needed, and whether your print will fail or succeed.
The engineers at KORA Workshop have created a clean, visual reference poster to help you forget about spaghetti prints and detached models forever. Save it, print it out, and check it before every slicing session!
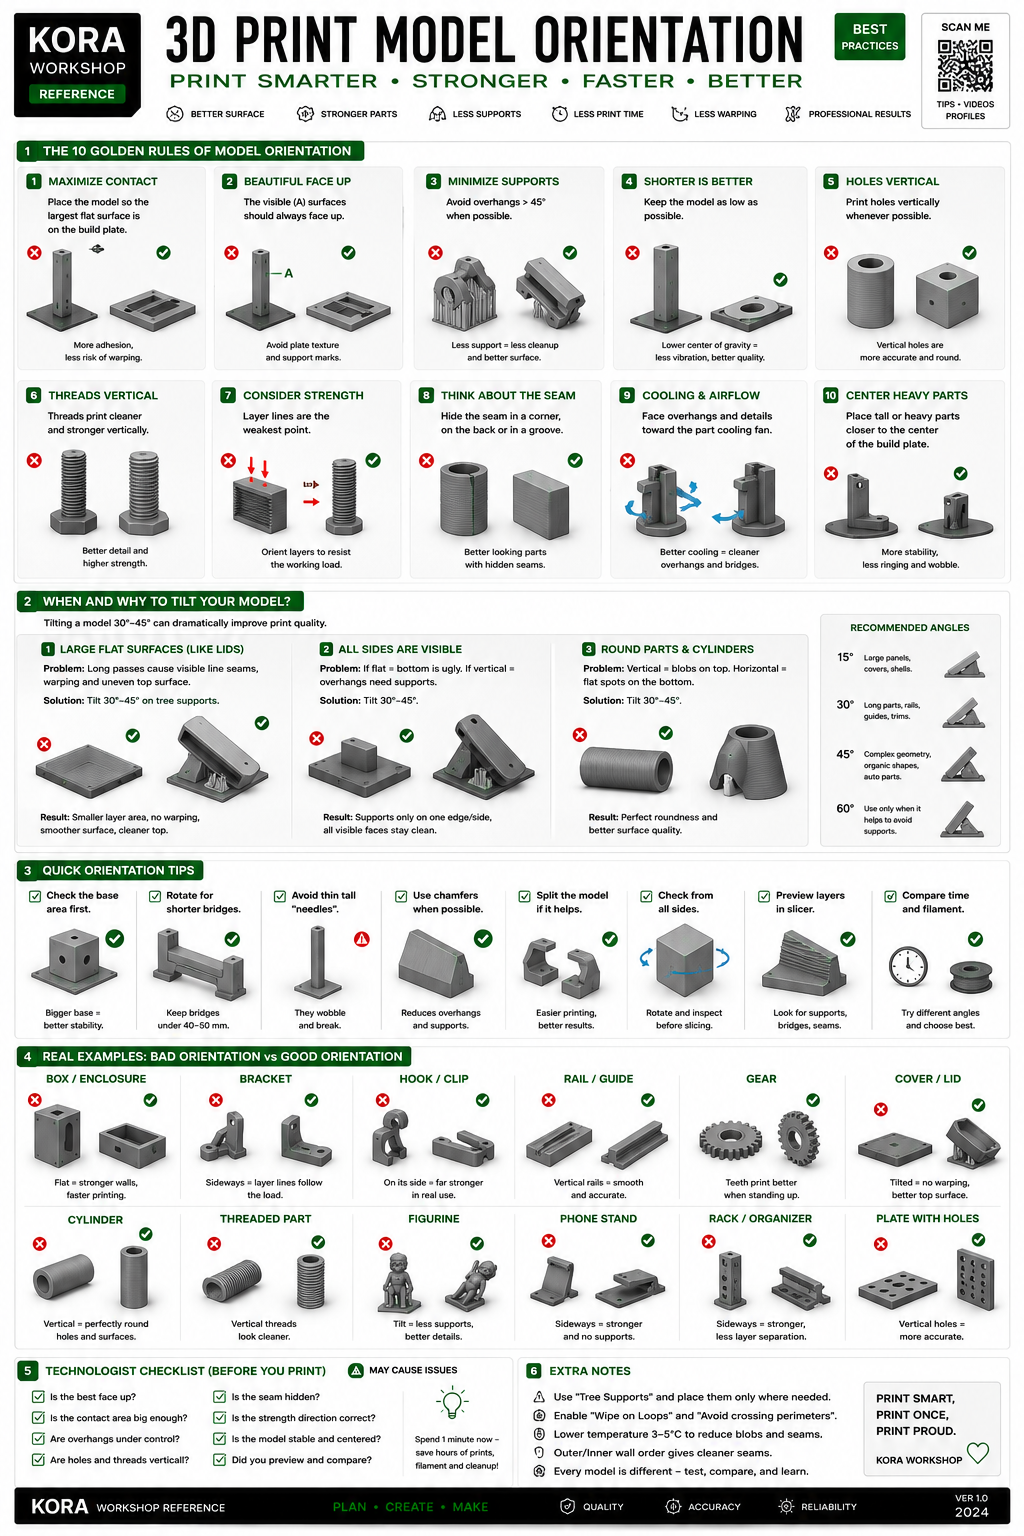
PART 1. Three Golden Rules of 3D Printing Mechanics
- The Aerodynamics Rule (For Bed-Slinger Printers like P2S):
The printer bed moves back and forth along the Y-axis with extreme acceleration. Always orient tall, thin, or flat vertical parts with their narrow profile (edge) facing you. Never place them wide-side-facing the movement (like a sail), or the aggressive vibrations will wobble and detach the model. - The Anisotropy Rule (Part Strength):
FDM 3D-printed parts always break easily along the layer lines (like a layered cake). If a part is subject to bending or stress (hooks, clips, levers), position it so the functional load runs along the printed strands, not across them. Hooks should always be printed lying flat on their side. - The Clean Slots & Rails Rule:
Any through-holes, T-shaped guide rails, or sliding slots turn out perfectly round and smooth only when they are directed vertically upwards (along the Z-axis). If a part needs to slide, print it vertically — the nozzle will simply trace the outline, eliminating any overhang sags or messy underside strings.
PART 2. When and Why Should You Angle a Part at 45 Degrees?
Angling a model at 30° to 45° relative to the build plate using tree supports is a pro-level technique.
- For Perfect Large Flat Covers/Lids: If you print a large lid completely flat on the bed, it can warp or twist due to the massive shrinkage area. Angling it at 45° reduces the surface area of each layer, eliminates warping, and ensures the top finish looks flawlessly smooth.
- For Non-Functional/All-Cosmetic Parts: Angling allows you to isolate support touchpoints strictly to one edge or corner of the model. All other visible faces remain pristine and free of support scars.
- For Perfect Cylinders and Tubes: A vertical cylinder can suffer from blobs on the top dome, while a horizontal one gets squished at the bottom. A 45° tilt ensures a perfectly round profile throughout the entire print length.
PART 3. Step-by-Step Tech Workflow in Bambu Studio
Before hitting the "Print" button, run your model through this strict checklist:
- Step 1. BASE: Use the "Lay on Face" tool (I key). Find the widest, flattest, or least cosmetically important side of the part and snap it to the bed.
- Step 2. COOLING: Check the part cooling fan direction. Rotate the model so that thin elements and steep overhangs receive direct airflow instead of hiding in the "shadow" of the bulky main body.
- Step 3. BRIDGE CHECK: Slice the model and inspect the blue lines (Bridges). If an open-air bridge is longer than 4–5 cm, rotate the model on the bed by 90 degrees to shorten the travel distance of the nozzle.
- Step 4. BRIM: If the contact area with the bed is less than a third of the model's total height (a tall "skyscraper") — always go to the Others tab and enable "Outer brim only" with a width of 8–10 mm. This wide skirt will securely anchor the narrow footprint in place.
Five Questions Before Printing:
- Which side needs to look the most beautiful?
- Where will the seam be hidden?
- Where will the supports go?
- Where is the main mechanical stress applied?
- Can I rotate the model to eliminate half of the supports?
The KORA Rule: Never start printing until you've tried rotating the model by 90°, 45°, and 30° in the slicer to compare the preview results!
Enjoyed this guide? Follow the KORA Workshop profile on MakerWorld, leave a like, and share your makes in the comments! Happy printing and perfect layers to everyone!
🛠️ Секреты 3D-печати: Как правильно располагать детали на столе в Bambu Studio
Автор: KORA Workshop
Применимо к слайсерам: Bambu Studio / OrcaSlicer
Язык гайда: Русский (все параметры названы строго по русифицированной версии программы)
Привет, мейкеры! Правильное расположение детали на печатной платформе (ориентация) — это 80% успеха всей печати. Оно определяет прочность изделия, гладкость поверхностей, количество поддержек и то, пойдет ли деталь в брак.
Инженеры KORA Workshop подготовили для вас наглядный графический плакат-шпаргалку, который поможет вам навсегда забыть о «макаронах» из пластика и оторванных от стола моделях. Сохраняйте себе и используйте перед каждой нарезкой!
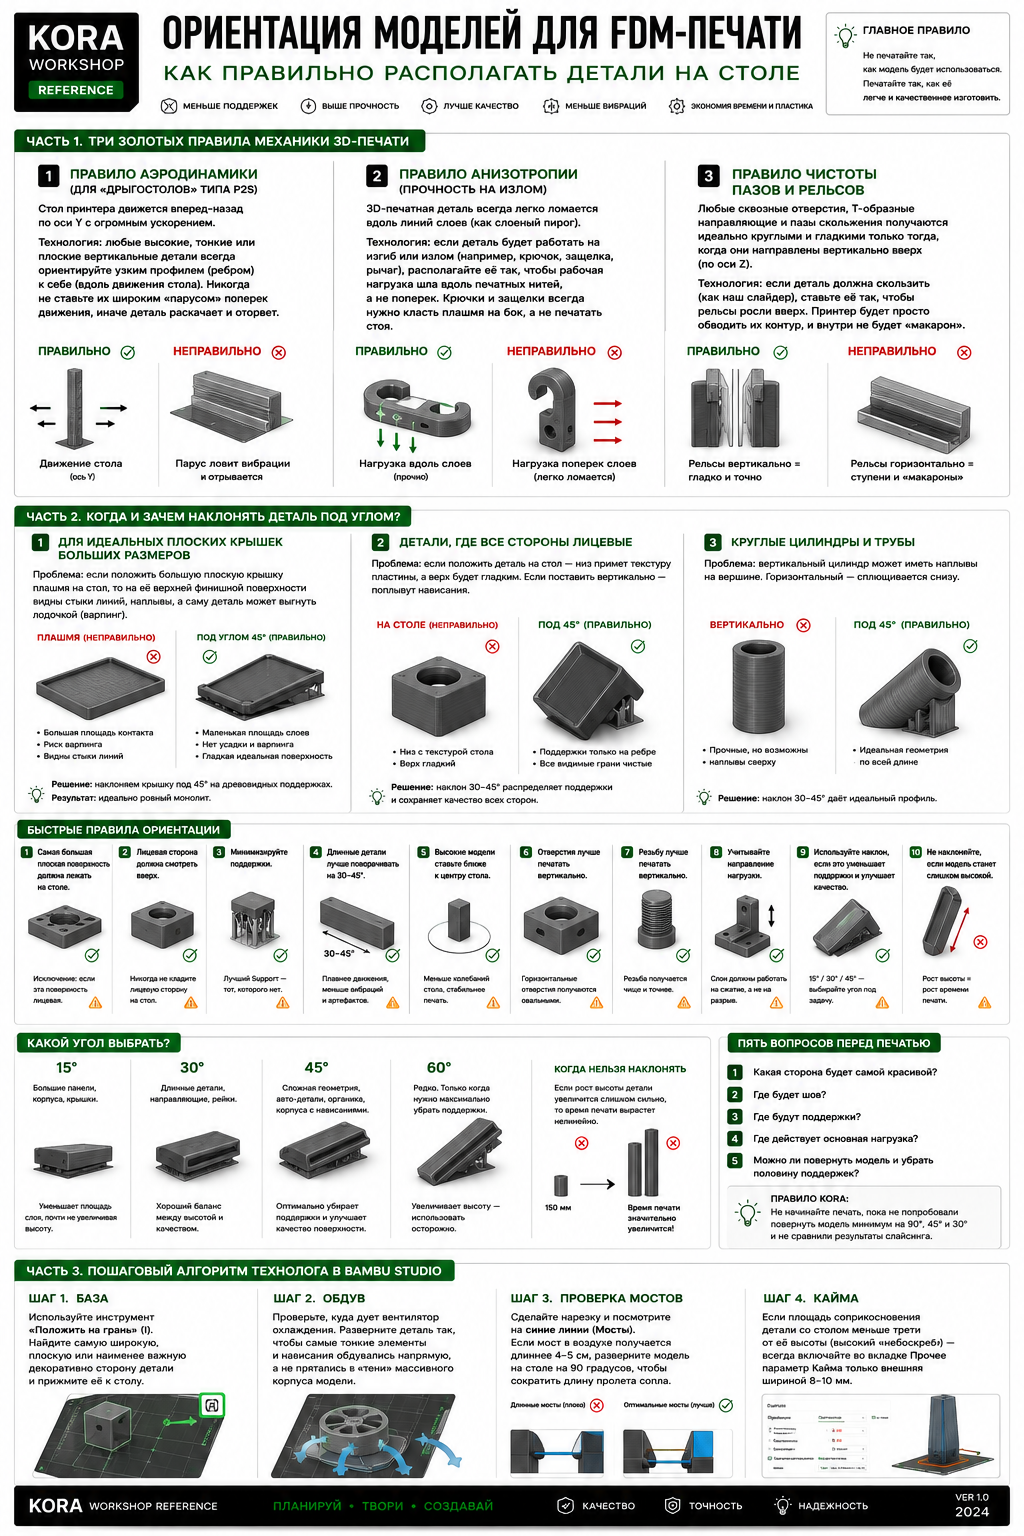
ЧАСТЬ 1. Три золотых правила механики 3D-печати
- Правило Аэродинамики (Для принтеров с подвижным столом по оси Y):
Стол принтера двигается вперед-назад с огромным ускорением. Любые высокие, тонкие или плоские вертикальные детали всегда ориентируйте узким профилем (ребром) к себе. Никогда не ставьте их широким «парусом» поперек движения стола, иначе от резких рывков модель начнет вибрировать и её просто оторвет [см. результат поиска]. - Правило Анизотропии (Прочность на излом):
3D-печатная деталь всегда легко ломается вдоль линий слоев (как слоеный пирог). Если элемент будет работать на изгиб или излом (крючки, защелки, рычаги), располагайте его так, чтобы рабочая нагрузка шла вдоль печатных нитей, а не поперек. Крючки всегда нужно класть плашмя на бок. - Правило чистоты пазов и рельсов:
Любые сквозные отверстия, Т-образные направляющие и пазы скольжения получаются идеально круглыми и гладкими только тогда, когда они направлены вертикально вверх (по оси Z). Если деталь должна скользить, ставьте её вертикально — сопло будет просто обводить контур, и внутри не будет провисаний.
ЧАСТЬ 2. Когда и зачем наклонять деталь под углом?
Наклон модели под углом от 30° до 45° относительно стола на древовидных поддержках — это секретный прием профессионалов.
- Для идеальных плоских крышек больших размеров: Если положить большую крышку плашмя на стол, её может выгнуть лодочкой (варпинг) из-за большой площади усадки. Наклон под 45° уменьшает площадь каждого слоя, убирает усадку, а верхняя финишная поверхность получается идеально ровной.
- Для деталей, где ВСЕ стороны лицевые: Наклон позволяет распределить точки соприкосновения с поддержками только на одно ребро или угол детали. Все остальные видимые грани остаются девственно чистыми.
- Для круглых цилиндров и труб: Вертикальный цилиндр может иметь наплывы на макушке, а горизонтальный — сплющивается снизу. Наклон под 45° дает идеальный круглый профиль по всей длине.
ЧАСТЬ 3. Пошаговый алгоритм технолога в Bambu Studio
Перед тем как нажать кнопку отправки на печать, проведите деталь по этому жесткому чек-листу:
- Шаг 1. БАЗА: Используйте инструмент «Положить на грань» (клавиша I). Найдите самую широкую, плоскую или наименее важную декоративно сторону детали и прижмите её к столу.
- Шаг 2. ОБДУВ: Проверьте, куда дует вентилятор охлаждения. Разверните деталь так, чтобы самые тонкие элементы и нависания обдувались напрямую, а не прятались в «тени» массивного корпуса модели.
- Шаг 3. ПРОВЕРКА МОСТОВ: Сделайте нарезку и посмотрите на синие линии (Мосты). Если мост в воздухе получается длиннее 4–5 см, разверните модель на столе на 90 градусов, чтобы сократить длину пролета сопла.
- Шаг 4. КАЙМА: Если площадь соприкосновения детали со столом меньше трети от её высоты (высокий «небоскреб») — всегда включайте во вкладке Прочее параметр «Кайма только внешняя» шириной 8–10 мм. Она намертво удержит узкую ножку детали на месте.
Пять вопросов перед печатью:
- Какая сторона будет самой красивой?
- Где будет шов?
- Где будут поддержки?
- Где действует основная нагрузка?
- Можно ли повернуть модель и убрать половину поддержек?
Правило KORA: Не начинайте печать, пока не попробовали повернуть модель минимум на 90°, 45° и 30° и не сравнили результаты слайсинга!
Понравился гайд? Подписывайтесь на профиль KORA Workshop на MakerWorld, ставьте лайки и делитесь своими результатами в комментариях! Идеальных вам слоев!