Search models, users, collections, and posts
Recommendation
Creator’s Club
Creators & Fans
Show Your Make
Off Topic
Post Details
Project Aura AQ — Community Q&A Hub 🛠️

Before you DM me — check here first. 😄

This post is your go-to place for questions, issues, and feedback about Project Aura AQ. Assembly, firmware, Home Assistant integration, sensors — anything goes. The idea is simple: if you ran into a problem, someone else probably did too. Ask here, and the answer helps everyone.

I'll be reading every comment and updating this post with the most common questions and solutions directly — so it becomes a living FAQ over time.
 

📺 New here? Start with the video. I just released a full overview of Project Aura — features, UI, sensors, fan control, and answers to the most frequently asked questions. Watch it before posting — there's a good chance your question is already answered there. 


💬 How to ask a good question

Please start your comment with a category tag — it helps others find relevant answers quickly:

[Assembly] — enclosure, wiring, connectors, pin swap 
[Firmware] — flashing, web installer, settings, bugs 
[HA/MQTT] — Home Assistant, MQTT discovery, dashboard 
[Sensors] — SEN66, SFA30, CO, pressure, RTC

Also include your firmware version when reporting a bug or issue. It saves a lot of back-and-forth.
 

📦 GitHub — stay updated

You'll need a GitHub account to keep your Aura up to date — here's why.

I had limited time and a limited number of testers during development. Once all of you start running your Auras, new bugs will inevitably surface that I couldn't catch on my own. I'll fix them and publish new releases regularly. Each release will include a ready-to-flash .bin file for OTA update over Wi-Fi — no cables, no IDE. I cover the update process in the video and it'll be in the assembly guide too.

To get notified when a new release drops: go to the GitHub project page, click Watch → Custom → Releases. That's it — you'll only get an email when there's something new, no inbox spam.

Takes 2 minutes. Worth it.

You can also download the GitHub mobile app — and yes, Aura can be flashed directly from your phone too. 📱

👉 GitHub: https://github.com/21cncstudio/project_aura
 

📌 FAQ (Will be updated as common questions come in)

📧 Assembly Instructions:
You should have received an email with a link to the assembly instructions ZIP file. As a backup, I've also uploaded it to the model files — click "Download STL/CAD Files" and you'll find the instructions archive there!

📧 STEP files:
These STEP files can only be accessed through the crowdfunding project page. Pls go access to the crowdfunding project page: Fulfillment - click "Checkout Rewards".

🆕 SFA40 Formaldehyde Sensor Now Supported!

I've added support for the DFRobot SFA40 — the successor to the SFA30!
 

⚠️ Pin swap reminder: One connector requires swapping the power pins before assembly. If you skip this step, you may damage your sensors. This is covered in detail in the assembly guide — please read it carefully before connecting anything.

🔄 Back Cover Options:
In the original enclosure print files, you'll find 4 different back cover variants. The difference is which optional sensors they accommodate (CO sensor and/or DAC module). Choose the back cover that matches the sensors you're using.
 

Questions, feedback, ideas — drop them below. 👇 

(Edited)
Share
19
636
5
Comment (636)
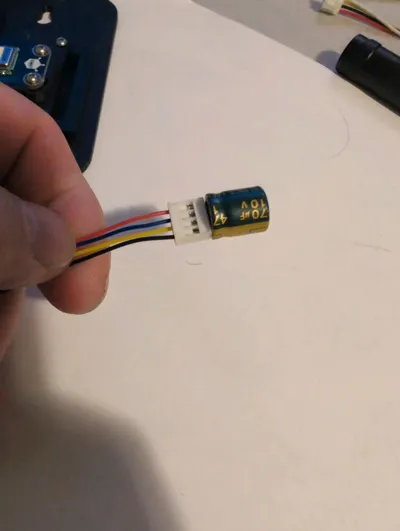
@DV86 personally experienced problems with the Sensirion SEN66 sensor. It gave an error every time during startup. I tested two Adafruit SEN6 breakout boards, and both showed the same error message. Using the alternative wiring method, it worked correctly. In the end, I swapped pin 3 and pin 4 on one side of the JST GH 6-pin cable you supplied. After that, everything worked properly. Has anyone else experienced the same issue?
4
Reply
@Reeperrr Same story here....ich swapped pin 3 to 4 and 4 to 3 and Voala!
0
Reply
@Creatingash @DV86 : Thanks for the photo, My issue was the breakout board had 3-4 pin reversed compared to sen66 end. Switching the breakout board side only worked. Thank you
1
Reply
@user_311075021 possible alternative to the little seeed board. i just moved the wires on a spare cable and plugged it in. i may heat shrink it to the connector so it cant fall out
The poster has replied
4
Reply
@21CNCStudio Very good idea!)
0
Reply
@user_2290242782 USA User: I'm still waiting on 4528 and 5754 cables from Adafruit/Digikey. Has anyone found a reliable source that has them in stock?
4
Reply
@Christian_DMO @Twisted_Owl : Search for "10Pcs GH1.25 2P/3P/4P/5P/6 Pin JST GH Series 1.25 Connector With Wire 10CM/20CM/30CM 1007 28 AWG 1.25MM" at aliexpress 2.64€ without shipping Search for "10Pcs GH1.25 2P/3P/4P/5P/6 Pin JST GH Series 1.25 Connector With Wire 10CM/20CM/30CM 1007 28 AWG 1.25MM" at aliexpress 2.64€ without shipping Don' forget to select *reverse* and not same direction.
0
Reply
@ooze_control @jeremykeen : look at the SparkFun link in the other comment i posted in this same thread. thats where i got mine (not through adafruit). Otherwise, just search “grove” on sparkfun
0
Reply
@TiGeReXe Hey, really like the project! Is there any chance you have a "shopping-list" that shows what cable is needed for what. I feel like the bom on the project page shows more cable than acutally used in the build pdf. Also are there any tips ony maybe soldering some of the connections or kits to fabricate the cable diy. I dont mind paying for good quality sensors and components. But i listed all cable "in think" are needed for the build and im looking at around 30€ only for cables...thats seems a bit high for me.
The poster has replied
3
Reply
@21CNCStudio Thanks for backing the project! You're right — the cables can add up if you're buying from Adafruit/SparkFun. Here are some cheaper alternatives: AliExpress cables: Search for "JST-SH 1.0mm 4-pin cable" or "STEMMA QT cable" — you'll find them for €1-2 each instead of €4-5. Shipping takes longer, but saves a lot. DIY crimping: If you have a crimping tool, you can buy JST-SH connectors and wire separately and make your own cables for a fraction of the price. This is the cheapest option if you're comfortable with crimping.
1
Reply
@gcsefai Hi, I’m an Aura backer and i cant find the assembly steps zip file. i’ve looked everywhere on the model pages but can’t find. Thanks!
The poster has replied
2
Reply
@21CNCStudio @gcsefai : @gcsefai — Great to hear you found them! Could you please share where exactly you found the STEP files? Several Engineer Pack backers are having trouble locating them, and your help would be really appreciated!
0
Reply
@user_1547135649 @gcsefai : I am in the same tier and using the webpage in my browser direct from the link in the project completion update. There is no step.zip under "Download STL/CAD Files". Where did you find it?
0
Reply
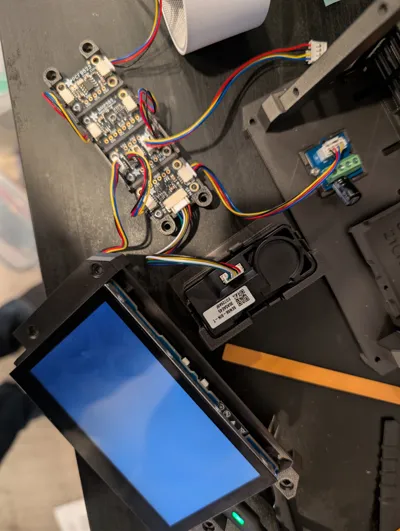
@Crazed9950 Assembly I had my unit working fine I realized that I was missing a part the DFR091 so i disassembled it now when I turn on I the screen just goes grey an none of the other parts light up I got it to once with green lights but the screen was frozen and not responding to taps any advice I've checked cabling so may times image below in case i missed something obvious
0
Reply
@jnplmmr [Assembly] On page 24 of the instructions for the standard enclosure (and all the others!), a module is shown that has a switch on it. But I wasn't able to find that module in the BOM. I may have been looking at the wrong BOM? What is it? And what is the specific URL for the full BOM?
The poster has replied
0
Reply
@21CNCStudio That's the SFA30 formaldehyde sensor — it's been discontinued, so just skip that step. I'll add a note about this in the instructions.
0
Reply
@jnplmmr I think I figured it out. The pictured module, unlabeled, is likely the SFA30, whereas I have the SFA40 that looks different and isn’t as large. This is giving me thoughts about how to arrange the instructions for a project I’m contemplating – a learning experience to be sure!
0
Reply
@mdihle A couple of things from me. First - thank you for the new video. Once I realized that my one cable was inverted, that did the trick for me. Plus I purchased 5 of the PCBs and that really really really made things super easy. Have you thought of the potential of enabling a second display leveraging all the same data from the primary display connected to sensors? I love the display, and would love to just get another display to use in my office that would effectively receive the broadcast from the main unit in the kitchen. I was thinking along the lines of MQTT to a second unit. I love the unit and plan to build a couple more for a friend and one for my vacation home. Lastly. I also bought two SFA40 modules and I can also confirm that they both presented off the charts readings, so I took them out of my setup to get rid of all the warnings. Looks like they were a waste of money. Bummer.
The poster has replied
0
Reply
@21CNCStudio Really glad the video helped! The hub project is already in development — hopefully I'll be able to reveal a bit more soon and put it on pre-launch, so you won't need a second display for that. On the SFA40 — it's been quite an investigation. You can follow everything here: https://github.com/21cncstudio/project_aura/issues/113 — the conclusion is that DFRobot will be replacing defective units.
0
Reply
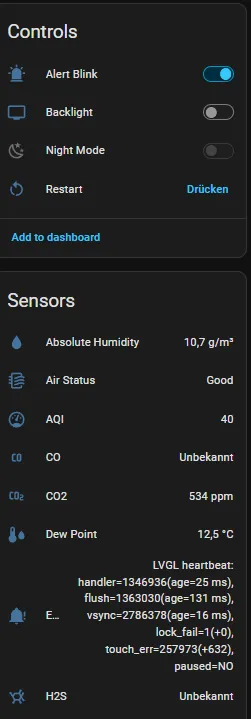
@user_1637927404 Hi, for now I have built 2 Auras. One small and one big Aura. The small one is running perfekt. The big one ist running, but the display seems to be crashing. After a few hours auf running, it seems, that IT does no loger Take touches and does not, turn the display on. Sensors still keep running. Via mqtt I see some LVGL errors. As soon, as I get them again, I will post it here. Does anyone have same Problems?
0
Reply
@user_1637927404 Here is the picture of the Display Problem, I have. Anyone any ideas?
0
Reply
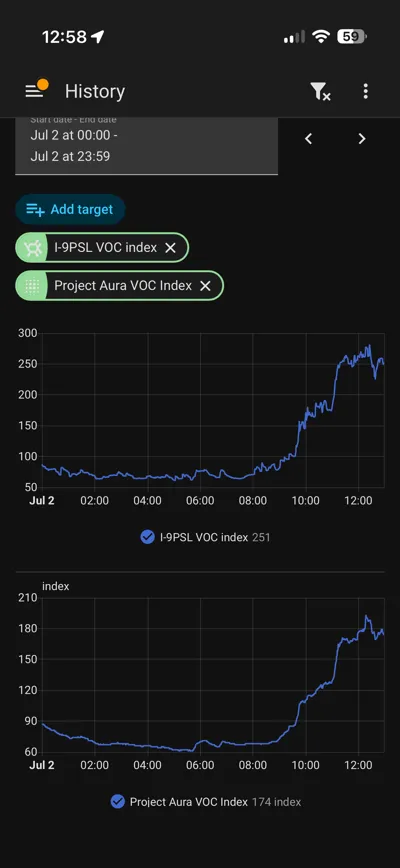
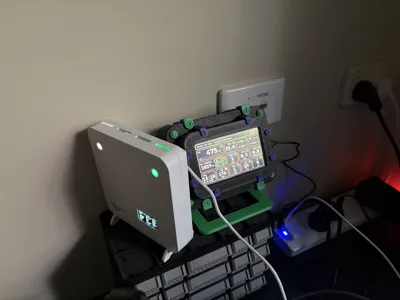
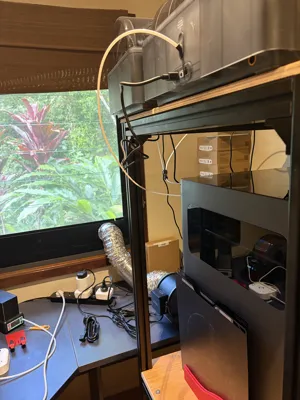
@user_3720540381 Calibration of VOC I have two VOC sensors sitting next to each other in my small H2C print room. One is a Sensirion SGP41. Accuracy: TVOC <±15 @ 0 to 500 VOC Index. The other is the SEN66, which reports 0 to 500 VOC index. When not printing on the h2c, they both display a reading about 90. When I kick off an ABS print, they both increase, and the shape of the curve is similar, but the range of values is different. I am pushing air constantly out the window in a 100mm pipe from an AC Infinity fan running full tilt (only about 25W) so the AQ remains pretty good, but I am intrigued by the range difference. The sensors are not near the AC infinity fan intake. No obvious air currents. I have a second consideration. I have the fan control feature in my Aura. Anyone know how to interface the AC Infinity to the fan control?
0
Reply
Trend
PrintClinic
HideAndSeekChallenge
Weekly Roundup
1
the Great Benchy Nations
4.3 k
2
Questions
1.4 k
3
Theprintertribes
1.3 k
4
Newmodel
731
5
Needhelp
553
6
Contests
543
7
Face Reveal
422