Raspi Arcade A1mini Version


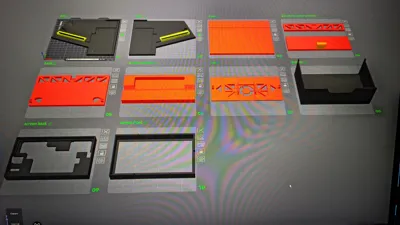


Print Profile(2)


Bill of Materials


Description
Check out the version for larger printers: https://makerworld.com/de/models/1606314
For the A1 mini version, the base needs to be pressed against it when gluing for it to sit correctly. For the large version, there is a precise notch where the base plate fits in
Model Summary:
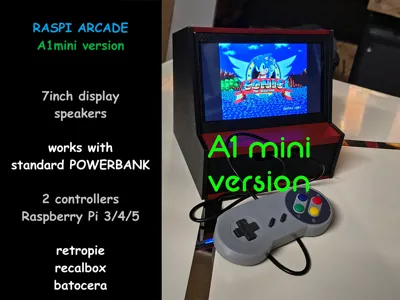
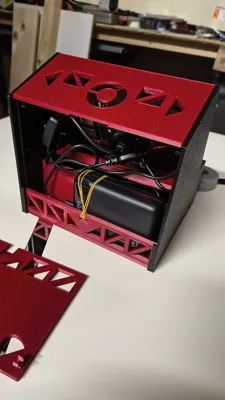
Mini Arcade with Raspberry Pi 4 (Raspberry Pi 3/4/5 possible)
7 inch display, 1024x600 pixels, built-in speakers
Space for standard power bank, 2 controllers
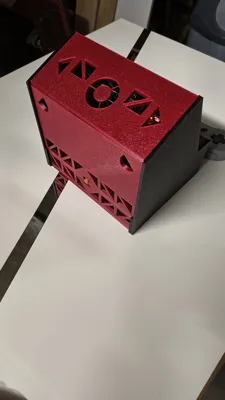
Top mount for optional 40mm fan
No screws or magnets needed, no soldering
Top and back panels as well as display removable anytime without tools
Short video of the large model on Instagram: (all printed parts are visible there)
https://www.instagram.com/reel/DMVwTVqod0t/?utm_source=ig_web_copy_link&igsh=Nmdmb2Jjem5mcnZu
Assembly instructions below also as text, as photos in the PDF, and now as
Video on YouTube:
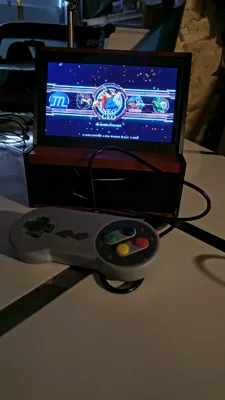
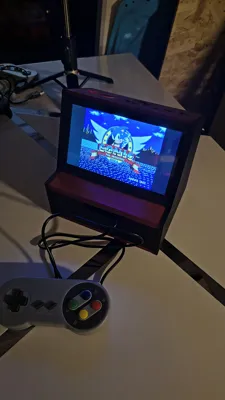
Mini Arcade with built-in speakers and space for a power bank, so you have everything in one device and can take it anywhere and play, even if no power outlet is nearby
No electronics knowledge is needed, everything is plug and play. Adapters for the display are included, everything else is connected with standard USB cables and adapters
Introducing:
The +++\"RASPI ARCADE\"+++,
perfect for reliving games from days gone by, whenever and wherever you want
The power bank powers the Raspberry, which in turn provides enough power for the monitor and speakers
The USB controllers never need to be charged
This way you can relive all sorts of games from earlier days, be it NES, SNES, Sega, NeoGeo or others
2 controllers can be stored in the drawer and the power bank is stowed inside
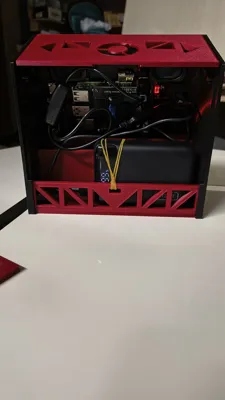
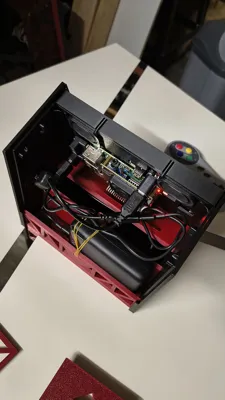
The \"Raspi Arcade\" as mentioned above is powered by a Raspberry Pi 4 b which is mounted directly to a 7\" monitor with integrated speakers, the system is Retropie or others if you wish
No screws or magnets are needed. Base and middle part are glued to the side walls, rear panel and top cover are clipped, so the interior (Raspberry, screen, power bank and cables) remains easily accessible and removable
I have built in a holder for a rubber band to secure the power bank, so it stays in place
List of all additionally required or optional parts:
- Raspberry Pi 4 b (2gb or 4gb RAM), from approx €50
2gb RAM version is sufficient for simple games. For PSX and Dreamcast or newer consoles, I would recommend the 4gb version
- 7 inch monitor with 1024 x 600 pixels
Examples: available on Amazon, depending on offer €35 - €65
*Cuqi 7 inch IPS LCD Touchscreen 1024 x 600 (Amazon ASIN: B0D1C4XLNY )
*Elecrow Raspberry Pi Screen 1024 x 600 (Amazon ASIN: B08FWZWKHF )
*Lafvin 7 inch HDMI IPS display Raspberry (Amazon ASIN: B0CP939DZ2 )
(make sure it is a monitor on which you can screw the Raspberry on the back and that it includes speakers)
- microSD card 32 - 256gb depending on how many games you want to have on it
from approx €5 in online retail
- Power bank or power supply with USB-C cable with at least 5V 3A
(the compartment for the power bank in the Raspi Arcade is approx 30x175x120mm) Power banks up to 30 mm thick fit inside
- USB SNES controller, from approx €10
in my case from the Rii brand on Amazon, 2-pack bought on offer for €7
- 2x USB 90 degree angle
- Rubber band or similar, for fixing the power bank
- Retropie * is available for free on their website: https://retropie.org.uk/download/
*for those who are not familiar, there are pre-made versions with games that you simply transfer to the microSD, insert into the Raspberry, and can start playing immediately
A reliable source for this is arcadepunks.com . There are countless versions with varying numbers of retro games
Here is the link for the Raspberry Pi 4 versions: https://www.arcadepunks.com/category/raspberry-pi-images/raspberry-pi-4-images/
There are also many videos about this on YouTube
It is possible to use another Raspberry with some modifications, for example the Pi Zero 2 w, which is powerful enough for NES, SNES, NEOGEO, Sega Master System, Genesis. Once I have finished my other models, I will try to create a suitable printable version for it if anyone is interested. (For the Pi 3 model b there are also such plug and play monitors with the same dimensions)
+++ASSEMBLY INSTRUCTIONS+++
Assembly is very easy. You can also refer to my photos in the assembly instructions PDF
1. First, attach the Raspberry to the back of the monitor (matching USB adapters are included with the monitor and everything is just plugged together, description in the monitor's manual)
2. Put the rear monitor cover on the Raspberry with the monitor, then slide both parts into the monitor frame, you don't need screws, the Raspi Arcade has rails designed to hold everything together
3. Put that aside, it will simply be inserted into the case later
4. Take one of the two sides and glue the 4 lower parts into the designated cutouts, starting with the bottom plate, then the two smaller vertical parts that lie directly on the bottom plate, and fourthly the plate above the drawer. (There are extra cutouts on the side walls and these are the only parts that are glued)
Pay attention to the correct orientation, especially for the part where the screen will lie on later, I have included an image with the parts so you can orient yourself
5. Then you can glue the other side to match it
6. Now the monitor can be inserted from above
7. Now take the top cover and place it from above so that the hooks snap into the designated clips. The notch for the 40mm fan should face backward
8. Insert the cables from the controllers from the front into the hole where the drawer will later go, and inside, up through to the Raspberry. Connect them to the Raspberry using the USB 90 degree angles
9. Now the drawer can be pushed in with the open side facing backward. The resistance at the beginning is normal, there are small hooks in the walls so that the drawer does not simply fall out later. If you want to remove it later, simply pull out the drawer and tilt it upwards, then it will come out easily. The controllers can now be stored in it with the cable
10. Place your power bank in the back compartment and connect the Raspberry to it
The power bank can be secured with a rubber band or a thin hair tie. Simply thread the band through the cutout at the bottom, loop the band once through itself, then over the power bank to the T-shaped part at the front, drape it over, and the power bank is secured. There is a slot in the rear panel so that the band does not hinder the closing of the panel
11. Now insert the rear panel from above into the designated slot at the bottom and click the panel into place at the top
It can then be easily removed again through the two upper side openings
And voilà, your Mini Arcade is ready. Ready to play whenever and wherever you want, whether an outlet is available or not
For questions or suggestions for improvement, please feel free to contact me
The model was completely created in Tinkercad with many test prints
I hope you like the model and would appreciate photos
Have fun printing and playing
Thank you very much for any support
Documentation (1)
License
You shall not share, sub-license, sell, rent, host, transfer, or distribute in any way the digital or 3D printed versions of this object, nor any other derivative work of this object in its digital or physical format (including - but not limited to - remixes of this object, and hosting on other digital platforms). The objects may not be used without permission in any way whatsoever in which you charge money, or collect fees.
Comment & Rating (3)