Search models, users, collections, and posts


Bio
My printers: X1C, H2D
Achievements
MakerWorld Guardian
Active more than 20 days out of last 30 days UTC time
Stellar Reviewer
Rate or Comment 287 different models
Pioneer Maker
Print successful 286 different models and 2,682 hours
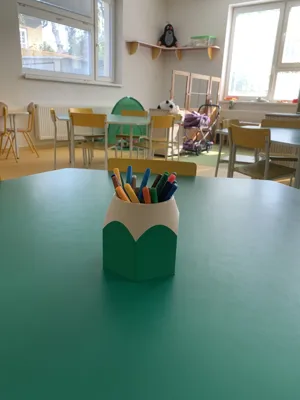
A great idea and a great model. Printed for my mom for kindergarten and it was a great success, so there will be other colors. Enlarged to X160%, Y160%, Z130%. Printed in profile in 2 parts, which fit together perfectly. I recommend printing the upper "wooden" part with 0.16 for better detail and overhangs.


Share
1
0
0
Very nice teddy bear keychain. The hook seems a bit weak, but otherwise the model is nice. I adjusted the ironing to 30mm/s and 15% and it looks great.

Share
0
0
0
Another nice knitted profile. Easy to print and easily removable supports. Printed with Galaxy black.


Share
0
0
0
For the second year in a row, it has been printed in slightly different colors and with better quality ironing on the back. My friends like it.


Share
0
0
0
A very nice model with Groot. It is easy to print and with 4 pieces there is not much waste.


Share
0
0
0
Nice Halloween decoration. I reduced it a bit to about 80% and adjusted the embedding of the magnets to only 2 layers max above the base due to the strength of the magnets.


Share
0
0
0
A great sign for Halloween. The only thing I don't like is how small the screw holes are for such a large model. I printed it twice, once the original size in PLA and then diagonally about 105% enlarged in PETG to get the most out of the base, but the holes are still small.


Share
0
0
0
Cute ladybug keychain design, exactly what I was looking for. Very easy to print and iron on.

Share
0
0
0
It's a shame that your model doesn't include a second design with a bow for girls. But otherwise the ant model is great and exactly what I was looking for.

Share
0
0
0
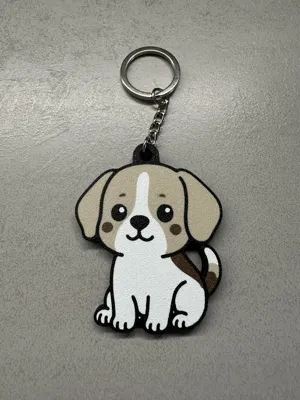
Another breed for the collection at the request of friends. For the Beagle, I repainted the original paintings again to make them more similar to the real breed, which has a combination of white, brown and black. The dog is all white, only the head and ears are brown and otherwise it has a black-brown spot on its back.
Share
0
0
0
Another dinosaur from the series of knitted models. Simple gluing of parts and everything fits nicely. Unfortunately I had to modify the supports on the Tree strong because the original ones broke and the print failed. The second time it came out great.


Share
0
0
0
Another knitted model, very nice and very pretty design. The supports were easy to remove. I used Bambu Green Glow on the eyes and it looks amazing.


Share
0
0
0
Easy to print, just a problem with an unsightly white mane when removing the supports. For other models, where you print upside down and the surface with the supports will not be visible, this is a much better option. I had a problem with the head sitting exactly on the mane and there were gaps in between.


Share
0
0
0

Share
0
0
0
Probably the best 3D model of the Bluey character so far, printed without AMS separately by color. Assembly is easy, but the oriented parts with L and R prints are printed differently on each leg.


Share
0
0
0
Probably the best model of Charmander printed separately by color. Assembling it except for the teeth and claws was easy. Unfortunately, the upper roof of the mouth could not be printed at all, it is terribly weak and I find it unnecessary there.
The teeth and claws need to be put aside from the base in the correct order, otherwise you will have a hard time figuring out where they belong.


Share
0
0
0
Printed both versions with AURAPOL Metallic purple. I reduced the infill to 15%, the 3L box took about 10h and the 5L around 16h.


Share
0
0
0
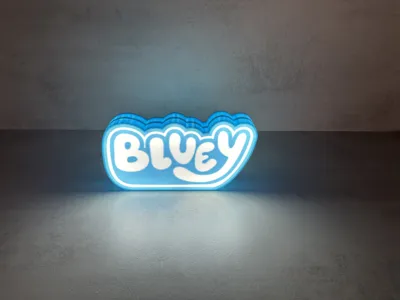
Nice Bluey lightbox. Printed for a friend based on inspiration in the comments with Bambu Blue Glow filament. The only thing I don't like about these lightboxes are the inverted ones, where the base is the main print and only the back cover is attached. It's better to attach the LED strip and all the electronics firmly to the back part and then just attach the motif to the front cover plate. If it gets damaged, the electronics stay and only the cover changes. This way, it's basically undisassembled.


Share
0
0
0

Share
0
0
0


Share
0
0
0