Search models, users, collections, and posts


Bio
From RepRap Roots to Bambu Lab Builds, I design practical prints for people who love to make.
Achievements
MakerWorld Guardian
Active more than 20 days out of last 30 days UTC time
Maker's Supply Contributor
5 models with Maker's Supply Model Kit achieves 500 successful prints.
Popular Model
2 models more than 5,000 successful prints.
Popular Creator
More than 1,000 followers.
Stellar Reviewer
Rate or Comment 418 different models
Pioneer Maker
Print successful 257 different models and 2,954 hours
Tiny print, surprisingly useful.
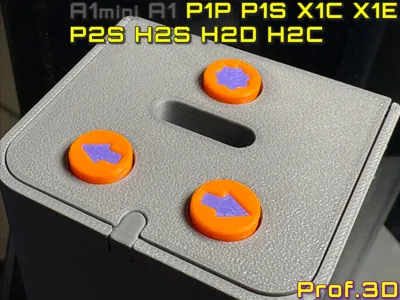
These clip on build plate markers let you label exactly what's on each build plate and instantly show which side belongs up. No more guessing and no more accidentally applying glue stick to the wrong side.
Bambu Lab Build Plate Label⧸ H2S H2D H2C A2L
4
9
Share
0
0
0
Finally, a proper ArUco marker for the BIQU CryoGrip Pro Glacier on the P2S and X2D. The integrated clips lock into the plate's honeycomb structure for perfect alignment and reliable build plate detection every time. No crooked stickers. No detection failures. Just click it on and print.
BIQU CryoGrip Pro Glacier ArUco Marker ⧸ P2S X2D
44
179
Share
0
0
0
The post is no longer available
A hidden motor deserves a little fresh air.
This vented mesh cover replaces the original A2L Z axis motor cover with a dust resistant design based on a proven infill pattern.
A2L Z Axis Motor Vent Cover ⧸ Dust Resistant Mesh
8
30
Share
1
0
0
No more bent PTFE tubes, no more feeding failures.
This A2L upgrade also seals unused filament paths to keep dust and debris out of the system.
Available in four variants, from a single tube setup to a fully equipped AMS configuration.
A2L PTFE Tube Positioning Guide 2.0 ⧸ Dust Cover
16
41
Share
1
0
0
Without an AMS Lite, the unused PTFE ports on the A2L are basically tiny dust collectors. This simple cover seals them off, keeps the filament path cleaner, and gives the Filament HUB Buffer a more finished look.
A2L Filament HUB Buffer Cover ⧸ Seal Unused Paths
9
28
Share
0
0
0
Desiccants Explained ⧸ What Actually Works?
If you print long enough, you eventually end up with little bags, orange beads, blue beads and random mystery pellets from packages. Some work great, some barely help, and some raise questions you are better off avoiding entirely. Here is a practical overview of the desiccants every filament enthusiast will inevitably run into, plus two next level options for people who looked at humidity and decided to declare war on it. Calcium Chloride ⧸ The salty bad boyCommon NameCalcium ChlorideChemicalCalcium Chloride, CaCl₂Water Absorption Capacity144 % as crystal water
Up to >300 % after liquefactionMin. Relative Humidity20 % @ 20 °CRegenerationNot practical, Usually discarded after usePriceVery cheap, 1 to 5 EUR/kgTypical UsageShipping protection, room dehumidifiers One of these bags was probably included with your Bambu Lab printer to keep it dry during its long journey and potentially humid trip across the ocean.This stuff usually comes sealed inside a pouch and, when completely dry and unused, often feels powdery, crumbly like coarse salt or sometimes even like a solid chocolate bar. Calcium Chloride is an extremely aggressive moisture absorbing chemical. As it absorbs water, it starts to "melt", meaning it does not just trap moisture, it actually dissolves together with the absorbed water and turns into a concentrated salt solution. Obviously having salty liquid leaking all over the place would be a terrible idea, so Calcium Chloride products are often mixed with thickening agents. Instead of turning into a leaking mess, the absorbed moisture becomes more like a thick gel that stays contained inside the pouch. The important thing to take away here is this: if you notice liquid, droplets or unexplained moisture inside your printer during delivery, inspect the desiccant pouch carefully and make sure the Calcium Chloride bag was not damaged. If this stuff leaks, it pulls moisture from the air, turns liquid and behaves around electronics and metal like an extended bath in the Atlantic. Rust, corrosion and headaches are basically pre installed at that point. Calcium Chloride is practically a single use desiccant and regeneration is not straightforward.A partial drying step back to the dihydrate is possible at around 150 °C. However, fully driving off the absorbed water requires temperatures of at least 200 °C.At that point the desiccant pouch has usually already surrendered. The adhesive gives up long before the chemistry does, leaving you with a torn bag and a mess that is probably not worth dealing with in the first place. Clay Desiccant ⧸ The Magic Behind Clumping Cat LitterCommon NameClay DesiccantChemicalBentonite, Ca- and Na-montmorilloniteWater Absorption Capacity15 % - 30 %Min. Relative Humidity15 % @ 20 °CRegeneration6 h @ 120 °CPriceVery cheap, 1 to 4 EUR/kgTypical UsageCheap filament Ever wondered why some cat litter suddenly turns into little rocks after your cat paid a visit? The answer is often bentonite clay. Clay is a cheap desiccant that is generally considered environmentally friendly, non toxic and easy to handle, as long as it stays inside its bag. And that is already where things start getting annoying. Clay desiccants are usually very fine grained and absolutely depend on their pouch. Without it, you end up with clay dust everywhere. Unfortunately these pouches are often only moderately temperature resistant, which makes proper regeneration together with the bag rather impractical. And if you only regenerate clay at 85°C, too much moisture remains trapped inside, leaving it with very limited real world capacity for everyday use. In practice, clay is usually treated as a single use desiccant. You will often find it in low cost electronics packaging and occasionally in very cheap filament, or products that want to present themselves with a more environmentally friendly image. The fun little twist: many of these bags will still say "Silica - Do Not Eat" even when there is absolutely no silica inside.So if you are the type of person who hoards and reuses desiccant packs, pay very close attention before dumping random pouch contents into your silica collection. Otherwise you may accidentally turn your nice reusable silica stash into a dusty mystery mix. Ask me how I know. It happened to me already and if you are not paying attention, it can absolutely happen to you too. Silica Gel ⧸ Everybody's DarlingCommon NameSilica Gel DesiccantChemicalSilicon Dioxide, SiO2Water Absorption Capacity30 % - 40 %Min. Relative Humidity15 % @ 20 °CRegeneration2 h - 6 h @ 120 °CPriceModerate, 5 to 15 EUR/kgTypical UsagePretty much anything that should stay dry Silica Gel Desiccant has probably crossed your path more times than you realize. Filament packaging, electronics, food containers, shoes, medicine boxes, if something dislikes moisture, chances are silica was involved somewhere. For everyday use, I simply cut open those little sachets that come with filament, electronics and all kinds of packaging. Been doing this for years and it works great. Just pay attention before dumping random packet contents into your collection. Not every desiccant bag actually contains silica. Some use clay based alternatives instead and I already managed to accidentally create my own dusty mystery mix once. Orange silica gel is another option I trust and use regularly. You can even mix reclaimed packet silica with orange beads and they get along perfectly fine.Now for the part where I become slightly less relaxed. Now here's where I get serious about safety. Blue silica gel might look pretty, but historically many blue indicator systems relied on chemicals with a rather questionable reputation.Examples include Crystal Violet (CAS No. 548-62-9), which is considered a possible carcinogen, or Cobalt(II) Chloride (CAS No. 7791-13-1), which is flat out carcinogenic. I do not care what the marketing says about "eco friendly", "safe formula" or whatever fancy wording ended up on the package. Especially with very cheap no name products, I simply see no reason to gamble when perfectly good alternatives exist. You want to keep your filament dry, not turn desiccant shopping into chemistry roulette.If it is blue, I skip it. You have been warned.Now for some proper nerd behavior.Most sources recommend regenerating silica gel at around 120 °C for 2 to 6 hours. Sounds simple enough. But I wanted to know what happens in the real world with hardware many of us actually have access to. So I stopped guessing and ran my own tests.I regenerated silica gel, weighed it and compared the remaining moisture content after drying at different temperatures.Here is what I personally measured: TimeTemperatureRemainingMoistureHot Air Oven2 h120 °C0 %Print Bed12 h100 °C13 %AMS HT12 h85 °C20 %AMS 2 Pro12 h65 °C37 %AMS 2 Pro12 h45 °C66 %So what does this actually mean in everyday use?First of all, skip the kitchen oven. Use your heated print bed instead. It takes longer, but neither your mother nor your wife will complain about you repurposing kitchen equipment for filament related activities. If you already dry your filament at 85 °C, you can usually skip drying the silica separately. Around 20 % remaining moisture is low enough that it becomes largely irrelevant in real world use. 65 °C gets interesting. Technical filaments are generally not dried here. Materials that want 65 °C are usually less demanding and also do not require absolute desert level dryness to print well. In many cases you can simply dry your silica together with the filament and call it a day. 45 °C is where things start falling apart. At that point regeneration becomes too weak to keep up properly. If you use 45 °C drying cycles, rotate or swap your silica regularly because 45 °C simply is not enough for proper regeneration. Activated Alumina ⧸ Silica's Weird Step DadCommon NameActivated AluminaChemicalAluminum Oxide, Al₂O₃Water Absorption Capacity20 % - 30 %Min. Relative Humidity10 % @ 20 °CRegeneration2 h - 6 h @ 150 °C - 250 °CPriceExpensive, 10 to 20 EUR/kgTypical UsageIndustrial drying systemsYou have probably seen it before. Little white beads, mysterious packaging and absolutely no explanation what the stuff actually is. One thing people tend to know though: this stuff dries aggressively. And that reputation is not entirely undeserved. If regeneration temperature is not a problem, activated alumina is an absolute champion when it comes to moisture control.The catch is simple: drying it properly is a pain. Because of its much higher regeneration temperature, it is not really suitable for drying together with filament inside an AMS HT or on a heated print bed. Below roughly 120 °C, activated alumina becomes surprisingly stubborn and simply does not want to give its moisture back. So while it performs extremely well, it also demands more effort in return. And in everyday filament use, that makes it a lot less practical than it first appears. But if you are willing to declare war on humidity and make desiccant regeneration part of your daily routine, activated alumina absolutely delivers. If maximum dryness is the mission, you are probably going to win that battle. Small warning though: there is such a thing as too dry. Polyamide can actually become hard and brittle when dried excessively. At that point it may print worse than material with a tiny bit of remaining moisture still inside. In cases like that, activated alumina can actually become counterproductive. I even bought 5 kg of the stuff myself and started using it for a while. It works exactly as advertised. The problem was simply that the additional regeneration requirements never really fit into my workflow. Molecular Sieve ⧸ Crimes Against HumidityCommon NameMolecular SieveChemicalSynthetic ZeoliteWater Absorption Capacity20 % - 30 %Min. Relative Humidity< 10 % @ 20 °CRegeneration3 h - 8 h @ 200 °C - 300 °CPriceExpensive, 15 to 30 EUR/kgTypical UsageLaboratories, industrial dryingYou think activated alumina was serious? We are still nowhere near the deep end.Chemistry has desiccants so aggressive they belong in laboratories and industrial systems rather than hobby environments. Molecular sieves sit somewhere in between. Still practical enough to use, but already entering "Crimes Against Humidity" territory. Once you begin looking into molecular sieves, you suddenly run into names like 3A, 4A, 5A or numbers measured in Ångström. Sounds complicated, but the idea is surprisingly simple.Ångström (Å) is just a ridiculously tiny unit of length. 1 Å = 0.1 nm, 10 Å = 1 nm. For molecular sieves, that number describes the pore size. In other words, the size of the tiny openings molecules need to squeeze through.Think of a real sieve. If something is larger than the holes, it cannot pass through.Molecular Sieve 2A, Pore size: ~2 Å
Already extremely tiny and mostly a specialty case. Water molecules are already approaching the limit here.Molecular Sieve 3A, Pore size: ~3 Å
Absorbs water while blocking many larger molecules. Very common for drying applications.Molecular Sieve 4A, Pore size: ~4 Å
The classic moisture destroyer and one of the most common molecular sieves.Molecular Sieve 5A, Pore size: ~5 Å
Allows slightly larger molecules to enter.2A turns out to be a bit too ambitious. Water molecules already need roughly 2.6 Å, which puts them right at the edge of what can realistically pass through.That leaves 3A and 4A as the practical options.3A is the more selective and usually slightly more expensive option. 4A is significantly cheaper, although "cheap" is still a pretty generous description when talking about molecular sieves.5A already starts becoming unnecessarily large for simple moisture control. At that point you are opening the door for molecules you never really needed to invite in the first place.For filament drying and moisture control, most people will realistically end up looking at either 3A or 4A. You just dropped 100 EUR on the table and now own a truly unreasonable amount of molecular sieves. The good news: this stuff is ridiculously stable and will probably outlive you. You are not going to destroy it in a household oven, not even with the pyrolysis mode that literally burns grease out of the oven. The downside: molecular sieves demand temperatures where pizzas go to die. We are talking around 250 °C, or 482 °F for the last few nations still holding out against the metric system. That is the tradeoff. Molecular sieves are insanely effective and practically immortal, but regeneration temperatures already live in territory where your kitchen appliances start asking uncomfortable questions. And please do not even think about throwing molecular sieves into the oven inside a 3D printed container. If you insist on ignoring common sense, at least place it inside a fireproof baking dish first. Molten plastic turns out to be surprisingly difficult to remove from an oven rack.And yes, once again, please do not ask how I know this. The oven has since been replaced and is no longer used for filament related experiments. I promise, Lena.
(Edited)
Share
4
1
0
MaxFlow³ for the SUNLU's is here. Built specifically for SUNLU spools with flexible preload fins and an airflow focused core geometry.
Just print, fill and click into place. More airflow, stronger retention, easier printing.
SUNLU Spools Flexi Silica Box ⧸ MaxFlow³
39
150
Share
1
0
0
MaxFlow³ is here. Built specifically for Bambu Lab spools with flexible preload fins and an airflow focused core geometry.
Just print, fill and click into place. More airflow, stronger retention, easier printing.
Bambu Lab Spool Flexi Silica Box ⧸ MaxFlow³
408
1.6 k
Share
1
0
0
MaxFlow~ was engineered around actual FDM behavior, not decorative mesh patterns.
Fully parametric, airflow optimized and designed for clean extrusion paths with minimal gap fill.
Think you know a better desiccant spool core? Show me.
Filament Spool Flexi Silica Box ⧸ MaxFlow³ᴾ
104
422
Share
1
0
0
This design for the X2D uses gyroid infill to allow airflow while still blocking dust. No visible vents, no compromise on strength, no fiddling, no dust.
Clean look, real function.
X2D Ventilated External Extruder Dust Cover
157
777
Share
1
0
0
This design for the X2D uses gyroid infill to allow airflow while still blocking dust. No visible vents, no compromise on strength, no fiddling, no dust.
Clean look, real function.
X2D Ventilated Filament Buffer Dust Cover
252
1.3 k
Share
1
0
0
A magnetic mount for the LED Mini Spotlight is now available, enabling tool free installation without screws.Fully compatible with the original Bambu Store LED Mini Spotlight and using standard magnet sizes, it installs in seconds and is completely reversible.
Share
3
0
0
It looks great with my big buttons. Thanks, Bambu Lab.
https://makerworld.com/models/2543884-tpu-feed-assist-module-big-buttons
Share
2
0
0
Give every needle file in the Maker World 4 piece Needle File Set a proper ergonomic handle in a familiar Wera style shape. Designed for solid grip, clear form markings and flexible single, dual or tri color printing options. Created as a durable daily use upgrade for precise filing work that actually feels right in the hand.
Wera Style MakerWorld Needle File Kit Handles
144
501
Share
5
0
0
Stop cold air from hitting your P2S build plate with this 45 degree deflector that keeps the chamber temperature stable. Designed to redirect the auxiliary fan’s airflow upward for consistent adhesion and repeatable print results. Created specifically for the Bambu Lab P2S as Part #40 in my ongoing P2Series.
P2S Left Aux Fan 45° Deflector ⧸ Warping Denied
178
765
Share
1
0
0
2025: When Making Became More Than Printing
2025 started with my first follower and ends close to 2000. In between, something more important happened. My son changed schools. At the new school, there were two Ender 3 printers. One was completely broken, the other looked like it might catch fire before finishing a print. As a maker, I couldn’t just ignore that. Through boosts, likes, and follows here on MakerWorld, the school now has a P1S with AMS, a proper selection of filament, and dry storage that keeps humidity comfortably below 10 percent. All funded indirectly by the models shared here. Right now, I’m considering whether to accept the school administration’s request to offer a 3D modeling after school course. The students will probably expect Blender. What they’ll get is OpenSCAD. Clean, parametric, and maybe a little dry. OpenSCAD is programming.
It is mathematics applied to solid geometry.
It is learning to think in a Cartesian space, to describe objects logically, precisely, and reproducibly.
It is not flashy, but it teaches how things actually work.The students who enjoy that kind of thinking are the ones who will build the tools, machines, and systems of tomorrow. We’ll see what 2026 brings.Maybe a laser.
Maybe a cutting tool.
It depends on what the students decide to build next.
More importantly, we’ll see what students can do in robotics club and “Jugend forscht” when the printer is no longer the limiting factor,
and when they have access to external support that the school system simply cannot provide on its own.
Teachers already have enough on their plates.
Thanks for reading all the way to the end.
If this post reaches you, take a look around and see what you can improve in your own environment.
Even if it’s just one school, one club, or one organization you personally care about.
Motives matter less than outcomes. You’re a maker.Make 2026 count.
Share
12
1
0
Give every bit in the Maker World Screwdriver Kit a proper ergonomic upgrade with this full set of Wera style handles. Designed for clean insertion, secure fastening and clear size markings, with single, dual or tri color printing options. Created as a practical daily use enhancement for anyone who wants genuinely comfortable, reliable drivers.
Wera Style MakerWorld Screwdriver Kit Handles
49
143
Share
1
0
0
Turn your empty filament boxes into magnetic purge buckets with a clean snap fit system that needs no glue and no screws. Designed in two drop down heights to keep the box clear of the floor across P1, X1, P2 and the full H2 lineup. Created as a practical, fully parametric upgrade within my ongoing collection of Bambu Lab accessories.
Magnetic Cardboard Poop Box ⧸ Reused Filament Box
181
553
Share
2
0
0
Protect your P2S auxiliary intake with a clean snap fit fan guard that keeps airflow smooth and debris out. Designed as a precise four piece set that locks in securely and adds a finished look to the left side cooling system. Created specifically for the Bambu Lab P2S as Part #41 in my ongoing P2Series.
P2S Aux Fan Guard ⧸ Cover It's Shame! (P1S/X1C)
124
528
Share
2
0
0