Qidi Plus 4 Hotend Fan Shroud


Print Profile(1)

Description
- 3-11-'25 Update
It has come to my attention that more and more of the newly delivered Qidi Plus 4 models now have a small shroud attached to the fan. This covers about ¼ of the lower part of the fan and airflow can still be much improved with this design.
The bolt used by Qidi seems to have a larger head than the older models and because of that I have made a revised version “V5”. This model has a slightly larger recessed area, allowing for a head with 3mm height and 6mm diameter. There simply isn't enough height clearance to make this space even larger, the roof area over the front bolt is now a lot thinner, 0.4mm to be exact, at its thinnest part.
I have test printed this model for wall/roof thicknesses, but please send me some feedback about the new clearance and if it's enough for the new larger type bolt head used by Qidi!!!
The standard hotend has the fan directing airflow towards the heatsink from a distance, with no airflow being directed specificly at the hotend heatsink. The gap between the fan and the heatsink is enough for hot air, from around the heating cartridge, to be sucked into the airflow path directed at the heatsink and this is suboptimal for the cooling of the heatsink which helps prevent heatcreep.
Printing with my ventilated and closeable riser unit open or the lid taken off and the door open made no difference. I had several clogged nozzles with the same PETG printed part.
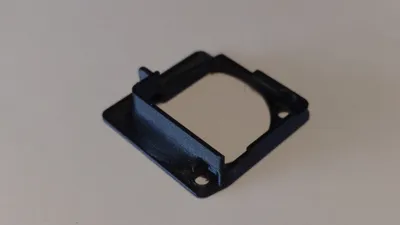
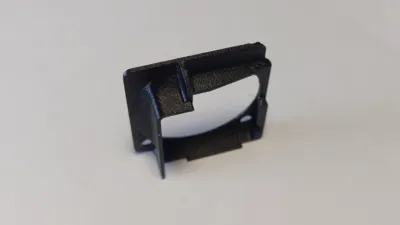
I designed this small duct to close the gap between fan and heatsink. Air flows directly from the fan onto/into the heatsink, causing much better cooling. The printer just finished a 22 hour PETG print with this duct attached, printing the same part that had heatcreep clogs earlier, and it finished without any issues or clogs.
For this duct you will need to remove the 2 bolts holding the fan bracket to the hotend carriage. After you have unscrewed the fan from the backplate, be careful not to damage the wires from the fan. You can now attach the fan shroud with the original bolts that secured the fan back onto the bracket.
Re-attach the fan + bracket back onto the carriage and replace the front cover.
I printed the part in ASA for better heat resistance. This might not be enough for printing with materials like PPS-cf or PEEK.
Ideally you want this printed in filament with a very high glass transition temperature, since this printer has a hotend that can reach temperatures reaching up to 370C.
PPS-cf comes to mind as the ideal material for this.
- First layer 0.2, following layers at 0.12
- nozzle size 0.4 with 0.4 wall thickness
- 3 walls
- 5 top and bottom layers
License
You shall not share, sub-license, sell, rent, host, transfer, or distribute in any way the digital or 3D printed versions of this object, nor any other derivative work of this object in its digital or physical format (including - but not limited to - remixes of this object, and hosting on other digital platforms). The objects may not be used without permission in any way whatsoever in which you charge money, or collect fees.
Comment & Rating (7)