Qidi X-Plus 4 camera mount Nebula & Insta360 2c


Print Profile(0)
Description
Insta360 Link 2C (4K) on the QIDI Plus4 – compact how‑to
Goal: Add an Insta360 Link 2C as a second Klipper camera next to the Nebula.
The Nebula keeps the full build‑plate view, the Insta360 delivers a razor‑sharp nozzle close‑up thanks to 4K, optical zoom, and strong HDR – a real game changer for first‑layer and error inspection.
Hardware & printed parts
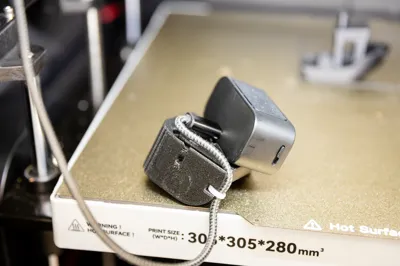
- Camera: Insta360 Link 2C
- Magnets: 4 × 15 × 6 × 6 mm neodymium
- Cable: 1.5 m USB‑A → USB‑C (e.g., Anker)
- Material for mounts: PETG‑CF or PET‑CF
- Files: STL for camera mount and frame adapter (linked in the MakerWorld project)
Mounting concept:
- The printed camera mount holds the Insta360’s magnetic base.
A flat frame adapter with two magnets is placed on the inside of the Plus4 frame; the camera mount snaps onto it magnetically.

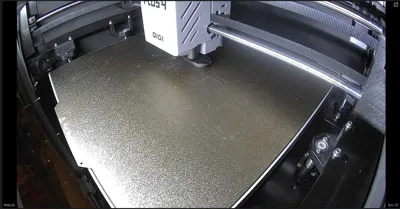
The mount sits low on the left side of the build chamber and looks across the plate almost at nozzle height.

This low angle gives a detailed view of the nozzle and molten filament while printing.
Hiding the cable inside the frame
The USB cable is routed so it is practically invisible from the outside:
Entry at the top
Lead the USB‑C cable from the camera up into the top frame opening.
Run inside the top frame
Lay the Insta360 cable parallel to the LED strip and display cable inside the existing frame channel and tape or zip‑tie it in place.
Down the side
Guide the cable down through an existing opening at the corner, along the existing cable bundle.
Connect to the mainboard
At the bottom, plug the USB‑A end (or a small USB hub) into a free USB port on the Plus4 mainboard.

Inside the chamber only a short, braided section of the cable is visible right at the camera mount.
Software: adding the Insta360 as a second Klipper camera
Nebula stays as Camera 1 on port 8080.
Insta360 runs as Camera 2 on port 8081 with a stable device name /dev/insta360, provided by a udev rule and a dedicated systemd services.
Prerequisites (as on the Plus4/Q4 setup):
- SSH access as mks / makerbase
- mjpg_streamer located at /home/mks/mjpg-streamer/mjpg_streamer with webroot at /home/mks/mjpg-streamer/www-mjpgstreamer
- Both Nebula and Insta360 connected via USB
1. Create a stable alias /dev/insta360 via udev
SSH into the printer and create the rule:
bash:
# sudo nano /etc/udev/rules.d/99-insta360.rules
Insert exactly:
SUBSYSTEM=="video4linux", KERNEL=="video*", ATTR{index}=="0", SYMLINK+="insta360"
Reload udev and verify the alias:
bash:
sudo udevadm control --reload-rules
sudo udevadm trigger
ls -la /dev/insta360
readlink -f /dev/insta360
/dev/insta360 should now point to the current /dev/videoX device of the Insta360, regardless of how the kernel enumerates it .
2. Second MJPG‑streamer instance as a systemd service
The stock system only autostarts webcamd.service (Nebula).
We add a dedicated webcamd-insta360.service that starts a second MJPG‑streamer on port 8081 .
Create the service file :
bash
sudo nano /etc/systemd/system/webcamd-insta360.service
Paste this complete content :
ini:
[Unit]
Description=Starts mjpg-streamer for Insta360
After=webcamd.service
PartOf=webcamd.service
[Service]
Type=simple
User=mks
WorkingDirectory=/home/mks/mjpg-streamer
# wait up to 5 seconds for /dev/insta360 to exist
ExecStartPre=/bin/sh -c 'for i in $(seq 1 50); do [ -e /dev/insta360 ] && exit 0; sleep 0.1; done; exit 1'
ExecStart=/home/mks/mjpg-streamer/mjpg_streamer \
-o "output_http.so -w ./www-mjpgstreamer -n -p 8081" \
-i "input_uvc.so -r 3840x2160 -f 10 -d /dev/insta360"
Restart=always
RestartSec=2
[Install]
WantedBy=multi-user.target
Enable and start it :
bash:
sudo systemctl daemon-reload
sudo systemctl enable webcamd-insta360.service
sudo systemctl restart webcamd.service
Because of PartOf=webcamd.service, both cameras are restarted together when you hit “Restart webcamd” in the UI .
ExecStartPre makes the service wait for /dev/insta360, so unplug/replug of the camera is handled gracefully .
You can verify both ports are listening with :
bash:
ss -ltnp | grep -E ':8080|:8081'
3. Configure cameras in Mainsail / Fluidd
Add two camera entries in the web UI .
Camera 1 – Nebula (overview)
- Name: Nebula
- Stream URL: http://<PRINTER-IP>:8080/?action=stream
- Snapshot URL: http://<PRINTER-IP>:8080/?action=snapshot
- Stream type: MJPEG (Adaptive/Normal)
Camera 2 – Insta360 (nozzle close‑up)
- Name: Insta360
- Stream URL: http://<PRINTER-IP>:8081/?action=stream
- Snapshot URL: http://<PRINTER-IP>:8081/?action=snapshot
- Stream type: MJPEG (Adaptive/Normal)
Important: the format is http://IP:PORT/... – no extra slash before the port number .
In the UI you will now see two tiles:
one wide overview from the Nebula and one low‑angle, zoomable 4K shot from the Insta360.

Why this setup is worth it
- 4K resolution + optical zoom: you can zoom right into the nozzle area without the image breaking apart.
- HDR: the camera handles bright white hotend parts and dark filament at the same time, so you clearly see the bead shape and first‑layer quality.
- Two perspectives:
- Nebula = full build plate and motion overview.
- Insta360 = detailed inspection of extrusion, blobs, and potential crashes.

With the hidden cable routing and the magnetic mount, the mod is fully reversible, clean, and looks almost stock while giving you a professional‑grade monitoring setup.
Comment & Rating (0)